Ubuntu 24.04 introduces new memory handling features; however, many users still require additional swap space to maintain smooth system operation. When you're dealing with memory shortages or want to enable hibernation, this article will show you exactly how to set up swap space on your Ubuntu 24.04 machine.
What is Swap Memory?
Swap memory serves as your system's backup plan when RAM runs low. Picture it as extra storage space on your hard drive where your computer can temporarily park data that isn't being used right now. When programs require more memory than what is physically available, the system allocates less critical data to this swap area, making room for the data you're actively working on.
Here's how it works in practice: your system constantly monitors memory usage and moves inactive data to the swap space when RAM gets tight. Reading from your hard drive takes longer than accessing RAM, but this balance ensures that your applications continue to run instead of crashing when memory is exhausted.
Why Enable Swap in Ubuntu 24.04?
Ubuntu 24.04 comes with zram turned on by default. This feature compresses unused memory pages and stores them in RAM, which works well in many situations. However, regular disk-based swap still has its place in modern systems.
You'll need a traditional swap when:
- Running older hardware with 2GB RAM or less
- Operating servers that handle heavy workloads
- Using hibernation (zram can't save your session to disk)
- Working with applications that rapidly consume virtual memory
- Managing databases that need lots of memory headroom
- Running development setups with multiple virtual machines
You can probably skip the extra swap if:
- Your system has plenty of excess RAM for your specific tasks
- You're using SSDs and want to reduce unnecessary writes
- Zram already handles your memory needs effectively
- You're on VPS servers with guaranteed memory resources
Prerequisites
Before starting, ensure you have:
- Ubuntu 24.04 is installed and running
- Terminal access with sudo privileges
- Sufficient disk space for the swap file (usually 1-2 times your RAM size)
- Basic understanding of command-line operations
Step 1: Check Current Memory and Swap Status
First, examine your system's current memory configuration to understand what resources are already available.
1.1 View the current memory usage, including any existing swap:

The swap total is 0B, which means no swap is enabled.
This command displays memory information in a human-readable format. You'll see output similar to above:
1.2 Check specifically for active swap spaces:
If no output appears, your system does not have any active swap files or partitions. If you see output, it displays currently active swap spaces, along with their sizes and priorities.
1.3 Verify available disk space to ensure you have enough room for the swap file:
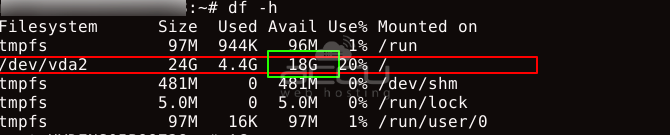
Look for the root filesystem (/) and ensure you have adequate free space. A good rule of thumb is to have at least 1-2GB of free space beyond your intended swap size.
Step 2: Create the Swap File
Now, create a dedicated swap file. The size depends on your system's needs, but here are standard guidelines:
- Systems with 2 GB RAM or less: Create a swap equal to 2x RAM
- Systems with 2-8 GB RAM: Create a swap equal to the RAM size
- Systems with 8 GB+ RAM: Create 2-4GB swap (unless specific applications require more)
2.1 Create a 2GB swap file using the fallocate command:
The fallocate command immediately allocates the specified space. If fallocate doesn't work, use the alternative dd method:
This creates the same 2GB file but may take longer as it writes zeros to the entire file.
2.2 Verify the file was created with the correct size:
![]()
You should see output showing the file size as 2.0 G.
Step 3: Set Proper File Permissions
Swap files contain sensitive data from your system's memory, so securing them is crucial.
3.1 Set restrictive permissions so only the root user can read and write the file:
Sudo chmod with code 600 is used to keep any file private
3.2 Verify the permissions are correctly set:

The output should show -rw-------, indicating only root has read/write access.
Step 4: Format and Enable the Swap File
Transform your regular file into a swap space that the system can use.
4.1 Format the file as swap space:

This command prepares the file for use as swap and displays information about the created swap space, including its UUID.
4.2 Enable the swap file for immediate use:
4.3 Verify the swap is now active:

You should see your new swap file listed with its size and priority.
4.4 Check the updated memory information:

The swap line should now show the additional space available.
Step 5: Set up Permanent Swap
Currently, your swap file is only active for this session. To ensure it remains active after reboots, add it to the system's file system table.
5.1 First, create a backup of the fstab file:
5.2 Add the swap file to the fstab configuration:
This line instructs the system to mount the swap file at boot time automatically. The fields mean:
- /swapfile: The swap file location
- none: No mount point (swap doesn't mount to a directory)
- swap: File system type
- sw: Swap-specific mount options
- 0 0: No backup needed, no fsck required
Step 6: How to Optimize Swap?
Fine-tune your swap configuration for optimal performance based on your system's usage patterns.
Adjust Swappiness
Swappiness controls how aggressively the system uses swap space. The value ranges from 0 to 100:
- 0-10: Minimal swapping, prefer RAM
- 10-50: Moderate swapping for balanced performance
- 60 (default): Aggressive swapping, suitable for desktops
- 90-100: Very aggressive swapping
Check the current swappiness value:
6.1 cat /proc/sys/vm/swappiness
For servers or systems where you want to minimize swap usage, set a lower value:
6.2 Make this change permanent by adding it to the sysctl configuration:
6.3 Adjust Cache Pressure
The cache pressure setting controls how quickly the system removes cached file system data. Lower values keep the cache longer, improving file system performance.
Check the current cache pressure:
Set a more conservative value:
Make this permanent:
Step 7: Test Your Swap Configuration
Verify everything is working correctly and will persist across reboots.
Test automatic mounting without rebooting:
The first command disables your swap file, and the second command enables all swap spaces listed in the fstab file. Check that your swap is active again:
Monitor swap usage in real-time:
Press Ctrl+C to exit the watch command.
Managing Swap Space
Disabling Swap (If Needed)
If you need to remove swap space later:
# Disable the swap file
# Remove the file
Remove the swap entry from fstab by editing the file:
Delete the line containing /swapfile none swap sw 0 0.
Troubleshooting Common Issues
Issue: The fallocate command fails. Solution: Use the dd method instead, or check if your filesystem supports fallocate.
Issue: Swap file doesn't activate after reboot. Solution: Verify the fstab entry is correct and the file permissions are set to 600.
Issue: The System becomes slow after enabling swap. Solution: Reduce the swappiness value to minimize swap usage, or consider adding more RAM.
Issue: "Operation not permitted" when creating a swap file. Solution: Ensure you're using sudo and have sufficient disk space.
Best Practices
- Size appropriately: Don't create unnecessarily large swap files(> 4G) that waste disk space.
- Monitor usage: Regularly check swap usage to ensure it's helping rather than hindering performance.
- Consider SSD wear: On systems with SSDs, monitor swap usage to avoid excessive wear on your storage device.
- Security: Always set proper permissions on swap files to protect sensitive data.
- Backup fstab: Always backup your fstab file before making changes.
Setting up swap space in Ubuntu 24.04 provides your system with extra memory when it becomes tight. Although Ubuntu now includes zram compression by default, traditional swap files still address real problems, especially for hibernation, low-memory systems, and resource-intensive applications.
Your new swap configuration will start automatically every time you boot up, helping prevent those frustrating moments when programs crash due to memory shortages.
