If you have a budget friendly VPS, but you are concerned with the performance try optimizing it. We are going to talk about ZRAM to optimize your VPS. Low-memory VPS hosting can be considerably powerful — particularly when combined with optimal optimizations.
A very effective method to reveal improved performance without paying more for hardware is ZRAM. With many other OS like Ubuntu or Debian on a budget friendly VPS, activating ZRAM can significantly enhance responsiveness and stability by magically compressing memory.
This tutorial will guide you through how to install ZRAM in order to get the most out of your resources and transform your slow server into a slick one.
What is ZRAM and How Does It Help Your VPS?
ZRAM is a Linux kernel module that creates compressed swap devices directly in your system memory rather than on disk. When your VPS runs low on memory, instead of swapping to slow disk storage, ZRAM compresses the data and keeps it in RAM.
The magic happens because of compression - ZRAM can effectively double or triple your available memory. For example, a VPS with 2GB RAM might gain the functional equivalent of 4-6GB RAM after implementing ZRAM, making your fast VPS hosting experience even faster.
ZRAM vs. ZSWAP: Which is Better for VPS?
Before diving into implementation, let's understand the difference between these two memory technologies:
ZRAM
- Creates a dedicated compressed swap device in RAM
- Works independently of disk-based swap
- Perfect for VPS environments with limited memory
- Easier to configure and manage
- Compression happens in memory, giving you significant speed advantages
ZSWAP
- Acts as a compressed cache between RAM and disk-based swap
- Still relies on disk swap for overflow
- Better for systems with larger memory where disk-based swap is still needed
- More complex to configure optimally
- Requires fine-tuning to get maximum performance
Which is best for VPS?
For most low-memory VPS configurations (under 8GB RAM), ZRAM is the clear winner. It provides better performance gains with simpler configuration. ZRAM is particularly effective for budget VPS hosting server environments where every megabyte of memory counts.
Step-by-Step ZRAM Installation for Faster VPS Performance
Step 1: Check if ZRAM is Already Enabled
Before installing anything, let's check if your VPS already has ZRAM enabled:

If you see output containing "/dev/sda." or similar, ZRAM is already active on your system. If not, continue with the installation.
Why this step matters: Prevents duplicate configurations that could cause conflicts on your fast VPS hosting environment.
Step 2: Turn Off Existing Swap (If Any)
If your VPS has traditional swap enabled, we'll need to disable it first:
First, identify your swap:

If you see the NAME, TYPE, SIZE then you have already Zswap enabled.
Disable existing swap:
# sudo swapoff -a
//No Direct Output
Don’t forget to edit fstab to prevent swap from activating on boot:
In the fstab file, comment out any swap lines by adding a at the beginning of the line.
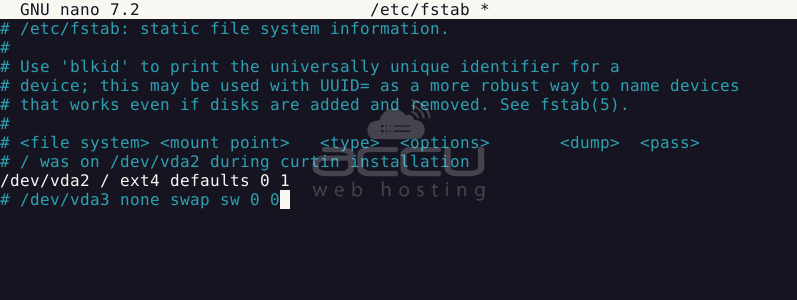
We want our VPS to use the faster ZRAM swap instead of the slower disk-based swap. This ensures your Ubuntu VPS or Debian VPS will be using the most efficient memory management method.
Step 3: Install ZRAM on Your VPS
For Debian/Ubuntu VPS:
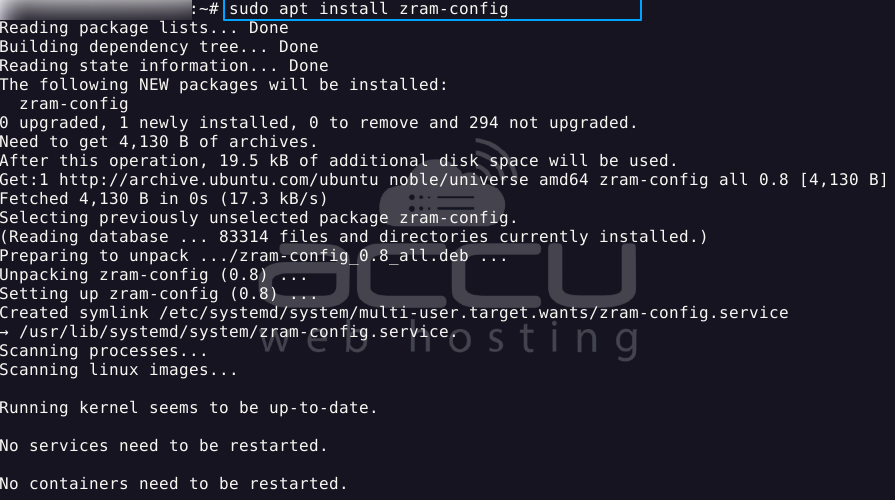
# sudo systemctl enable zram-config
// No direct Output
# sudo systemctl start zram-config
// No direct Output
For CentOS/RHEL VPS: Run this steps in sequence.
# sudo yum install epel-release
# sudo yum install zram-generator
# sudo systemctl start zram-generator
# sudo systemctl enable zram-generator
This installs the necessary tools to manage ZRAM on your VPS hosting server and ensures it starts automatically when your server boots.
Step 4: Optimize ZRAM Configuration for Best Performance
For Debian/Ubuntu VPS, edit the ZRAM configuration:
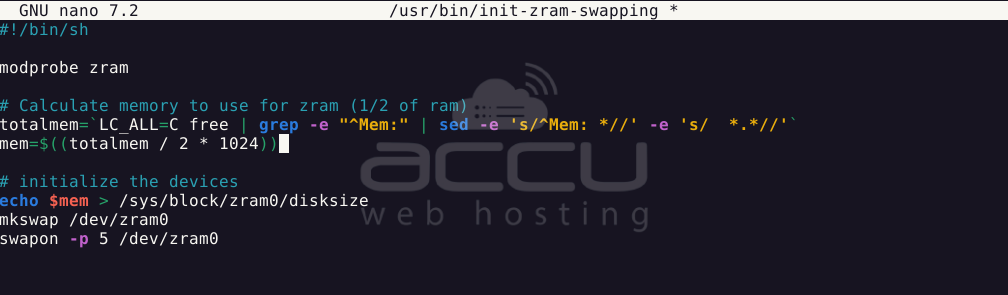
For optimal performance, you can adjust the amount of memory ZRAM uses. The default is typically half your RAM size, but you might want to increase this for very memory-constrained systems.
To change the compression algorithm to something more efficient like zstd:
Zstd is the high-performance compression algorithm used to compress and decompress quickly.
Add this line after the mem= line:
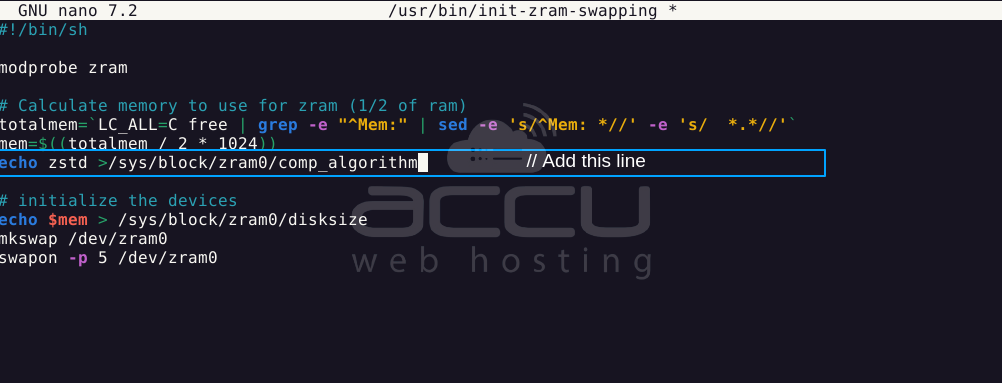
Different compression algorithms offer varying trade-offs between speed and compression ratio. ZSTD provides an excellent balance for most VPS hosting environments, making your fast VPS even faster.
Step 5: Adjust Swappiness for Optimal ZRAM Usage
Swappiness controls how aggressively your system uses swap space. For ZRAM, we want a higher value to take advantage of compression:
Edit sysctl.conf
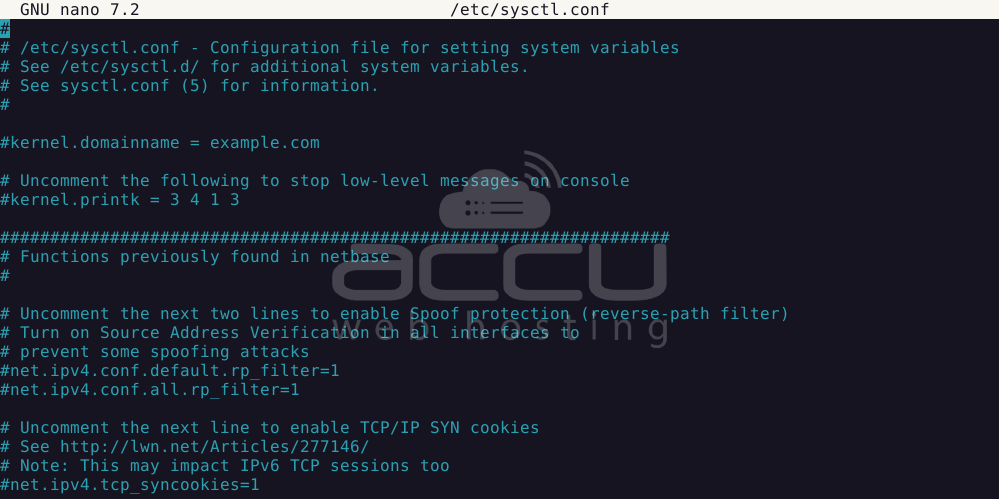
Add this line wherever you like but remember you don’t commnent it:
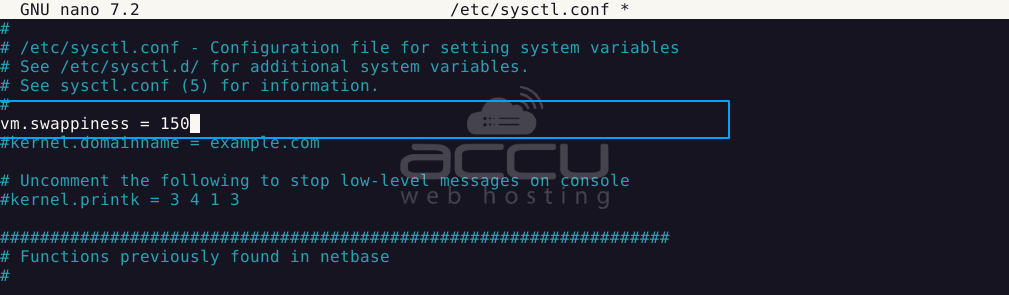
A higher swappiness (150) encourages your VPS to use ZRAM more aggressively, keeping more compressed data in memory rather than wasting uncompressed RAM space.
Step 6: Verify Your ZRAM Setup
After rebooting your VPS, check that ZRAM is properly configured:
Check ZRAM status (there is a space after cat.)

For more detailed information:

You can clearly see our ZRAM device listed with details about its algorithm (zstd),size and compression.
It confirms that your fast VPS hosting setup is correctly using ZRAM and shows you the actual compression benefits you're getting.
Optimizing Your VPS Beyond ZRAM
While ZRAM dramatically improves performance, here are some additional tips to optimize Ubuntu VPS or Debian VPS:
1. Minimize unnecessary services: Disable services you don't need to free up more memory.
2. Use lightweight alternatives: Consider nginx instead of Apache, or lighter database options when possible.
3. Monitor memory usage: Use tools like `htop` to identify memory hogs.
4. Fine-tune cache settings: Adjust application caches based on your available memory.
Real-World Performance Benefits
After implementing ZRAM on your VPS hosting server, you can expect:
- Up to 2-3x effective memory capacity
- Significantly faster application response times
- Better handling of traffic spikes
- Reduced need for disk-based swap operations
- Overall smoother VPS performance even under heavy load
Testing and Troubleshooting ZRAM on Your VPS
While setting up ZRAM on your VPS hosting server, you should be aware of how to troubleshoot any issues that might arise.
Testing ZRAM Performance
Method 1: Basic ZRAM Verification
First, let's verify that ZRAM is active and properly configured:
Check if ZRAM is active in the swap configuration
# swapon --show
Check memory usage statistics

The output should show your ZRAM device(s) with information about size, usage, and compression ratio.
Method 2: Stress Testing Your ZRAM Setup
To properly evaluate how ZRAM improves your VPS performance, run a controlled stress test:
Install the stress utility
# sudo apt install stress
Run a memory-intensive test (adjust values based on your VPS size)
# stress --vm 2 --vm-bytes 500M --timeout 60s
While the stress test is running, monitor your system in another terminal:
# watch -n 1 'free -m && echo "" && zramctl'
This will show you memory usage and ZRAM statistics updated every second. You should see:
- Memory usage increasing
- ZRAM storage filling up
- Compression happening (check the DATA vs COMPR columns)
Method 3: Real-World Application Test
The best way to test ZRAM's effectiveness on your VPS is to measure application performance:
1. Before enabling ZRAM, time how long it takes to launch a memory-intensive application
2. After enabling ZRAM, measure the same operation
3. Compare the results
For example, if you're running a web server:
Install Apache Benchmark if needed
# sudo apt install apache2-utils
Test response time under load
# ab -n 1000 -c 50 http://localhost/
Record the response times before and after ZRAM implementation to see the improvement in your fast VPS hosting environment.
Troubleshooting Common ZRAM Issues
Problem 1: ZRAM Not Starting on Boot
If your ZRAM configuration doesn't persist after rebooting your VPS:
Solution:
For Debian/Ubuntu VPS
# sudo systemctl enable zram-config
# sudo systemctl status zram-config
For CentOS/RHEL VPS
# sudo systemctl enable zram-generator
# sudo systemctl status zram-generator
Ensure the service is enabled and check for any error messages in the status output.
Problem 2: Poor Compression Ratio
If you notice your ZRAM isn't compressing data efficiently (compression ratio less than 2:1):
Solution: Try a different compression algorithm:
Check available algorithms
cat /sys/block/zram0/comp_algorithm
Change to zstd (often best for VPS environments)
# echo zstd > /sys/block/zram0/comp_algorithm
Reset ZRAM to apply changes
sudo swapoff /dev/zram0
sudo zramctl -r /dev/zram0
sudo systemctl restart zram-config # or zram-generator for CentOS
Problem 3: System Still Sluggish Despite ZRAM
If your VPS performance remains poor even with ZRAM:
Solution: Check if swappiness is properly set:
cat /proc/sys/vm/swappiness
1. If it's not 150 (or your chosen value), set it:
sudo sysctl vm.swappiness=150
2. Verify no disk-based swap is being used:
swapon --show
Only ZRAM devices should be listed.
3. Check for memory leaks or runaway processes:
ps aux --sort=-%mem | head -10
Problem 4: ZRAM Using Too Much Memory
If ZRAM itself is consuming too much of your VPS memory:
Solution: Adjust the ZRAM size to be smaller:
For Debian/Ubuntu VPS:
sudo nano /usr/bin/init-zram-swapping
Modify the mem= line to use a smaller fraction, e.g., change from mem=$(((totalmem / 2 / ${NRDEVICES}) * 1024)) to mem=$(((totalmem / 4 / ${NRDEVICES}) * 1024)) for a quarter of RAM instead of half.
Problem 5: "Cannot allocate memory" Errors
If you see "Cannot allocate memory" errors in your logs:
Solution: Your ZRAM configuration might be too aggressive.
Try Reducing ZRAM size as shown above
Lowering swappiness:
# sudo sysctl vm.swappiness=100
Add a small disk-based swap as emergency overflow:
# sudo fallocate -l 512M /swapfilesudo chmod 600 /swapfilesudo mkswap /swapfilesudo swapon --priority 10 /swapfile
When to Consider ZRAM Alternatives?
While ZRAM significantly improves performance on low-memory VPS hosting servers, recognize when you might need alternative approaches:
1. If your VPS consistently uses more than 90% of RAM even with ZRAM, it's time to upgrade your VPS resources.
2. For database-heavy workloads, consider tuning your database memory settings alongside ZRAM
3. For web servers under heavy load, implement application-level caching in addition to ZRAM
By properly testing and troubleshooting your ZRAM configuration, you'll ensure your fast VPS hosting environment remains responsive and efficient even under demanding workloads.
Remember that ZRAM isn't a replacement for actually upgrading your VPS when you truly need more resources, but it's an excellent way to maximize performance within your current specifications.
