
Introduction:
Ensuring application security and reliability is essential for web developers and administrators. A key aspect of this responsibility is managing .NET trust levels. It defines the permissions and access rights that .NET applications have within the hosting environment. In this article post, we'll explore how to change the .NET trust level using both Internet Information Services (IIS) and the web.config file.
Understanding .NET Trust Levels:
.NET Trust Levels control the permissions that are granted to .NET applications, determining their ability to access resources and perform certain operations. There are four trust levels in .NET:
1. Full Trust: Applications have unrestricted access to resources and operations on the server. This level should only be used when absolutely necessary, as it can compromise server security.
2. High Trust: Similar to Full Trust, but certain potentially dangerous operations are restricted. This level is also discouraged in shared hosting environments.
3. Medium Trust: This is the default trust level for most shared hosting environments. It allows access to limited resources, providing a balance between security and functionality.
4. Low Trust: The most restrictive level, suitable for applications with minimal permissions and limited access to resources.
Steps to change .NET Trust Level in IIS
Changing the .NET Trust Level through IIS involves modifying the application pool settings. Here's how you can do it:
Step 1: Open the Internet Information Services (IIS) Manager on your server.
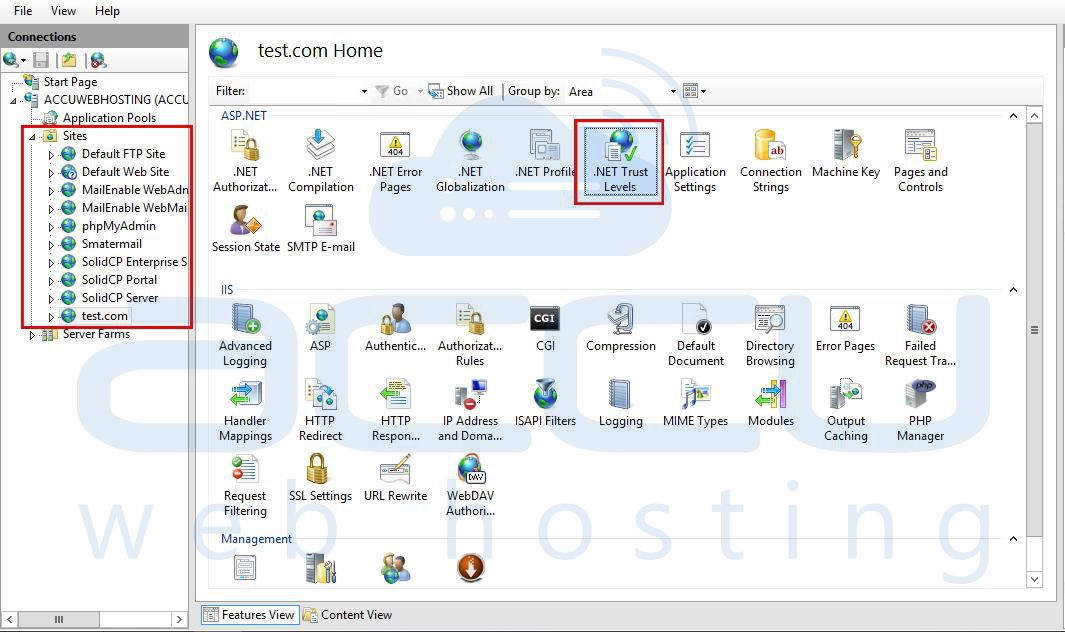
Step 2: Once the IIS Manager is open, you will see a left-hand navigation pane called "Connections." Locate and click on the "Sites" in the Connections pane. This will display a list of websites hosted on your web server.
Step 3: Find and click on the website for that you want to modify .NET Trust level.
Step 4: Now, it's time to configure the .NET Trust levels for the Website. Double-click on the ".NET Trust levels" feature in the center pane.
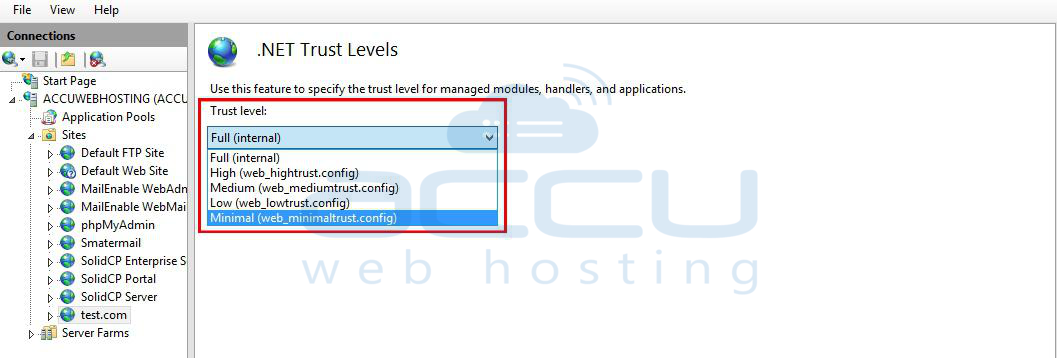
Step 5: A dialog box will appear, presenting you with a "Trust level" drop-down list. This list contains five options: "Full (internal)," "High,", "Low", "Minimal" and "Medium." Choose the appropriate trust level based on your requirements and security considerations.
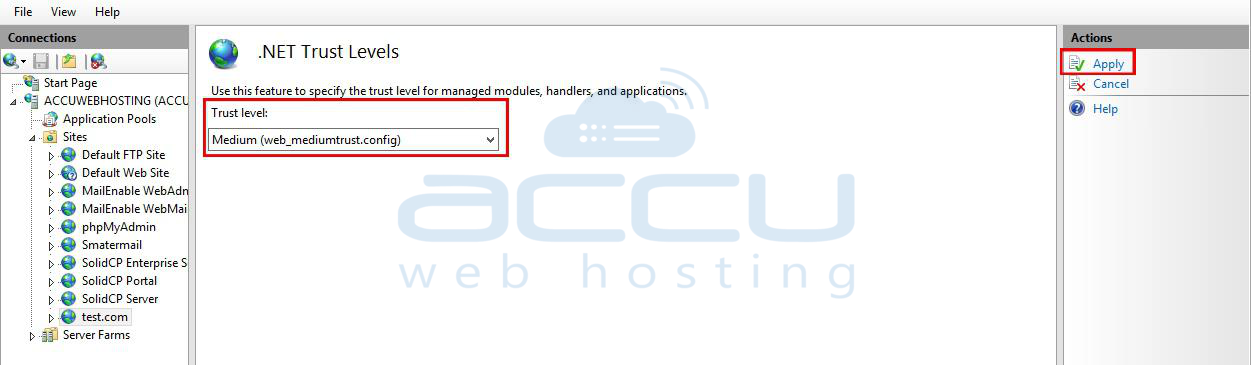
Step 6: After making your selection, click on the "Apply" button in the dialog box to save the changes and apply the chosen trust level to the Web application.
Changing .NET Trust Level in web.config:
If you don't have access to IIS or prefer making the change at the application level, you can modify the web.config file of your .NET application. Follow these steps:
Step 1: Open the web.config file of your application using a text editor or an Integrated Development Environment (IDE).
Step 2: Locate the `<system.web>` section within the web.config file.
Step 3: To apply Full Trust, add the following configuration inside the `<system.web>` element:
<trust level="Full" />
For High Trust, use the following configuration:
<trust level="High" />
For Medium Trust, use this configuration:
<trust level="Medium" />
Lastly, for Low Trust, use:
<trust level="Low" />
Step 4: Save the changes to the web.config file.
Conclusion:
Managing the .NET Trust Level is a critical aspect of securing your .NET applications. Whether you choose to modify the trust level through IIS or the web.config file, it is essential to understand the implications and select the appropriate level based on your application's requirements and security needs. By following the guidelines provided in this article, you can confidently manage the .NET Trust Level and maintain a secure and reliable web application.