Today, we will guide you on how to take a MySQL database backup using cPanel cron. To secure a MySQL database backup using cPanel cron, you need to perform the following steps.
Secure MySQL database backup using cPanel cron
Step 1: Log in to your cPanel account.

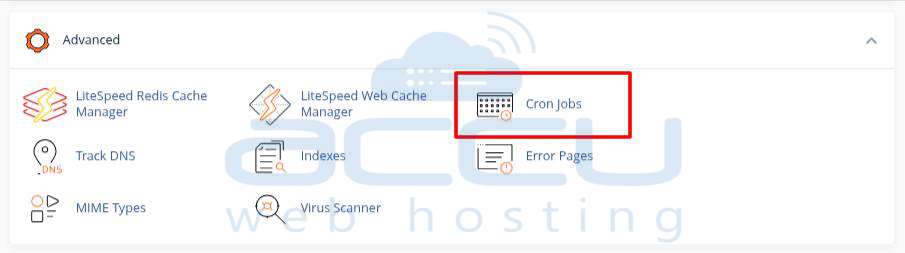
Step 2: Go to the Advanced section and click on the Cron Jobs option.
Step 3: In the Email field, enter the email address you want to receive a notification of the result every time the cron job runs. Here, we have entered an email address, [email protected], as an example.

Step 4: Click the Update Email button to update the Email address entered in the Email field.
Step 5: Once you click on it, the email address will be updated under the Current Email section.
Step 6: In the Common Settings field, you will get a list of common settings, such as Once Per Day or Once Per Week. You can select it as per your requirement.
Step 7: If you don't get a setting that fulfills your needs in the list of common settings, enter a time interval in the boxes on the left or use the menus on the right to select from typical entries for each period.
Here, we have selected the backup frequency, Once Per Day, as an example. The cron job will back up the database every day at midnight. It will save the backup with the current date appended to the file name.
Step 8: In the Command field, you need to enter the command or path of your script. For example, since we want to secure a backup of the MySQL database through a cron job, we will enter the following command to secure a backup of the MySQL database.
date=`date -I`; /usr/bin/mysqldump -udbusername -ppassword dbname > /home/cPanel_username/Database_backup/Backup_name$date.sql

Important Notes
- udbusername: There should be no space between -u and DBUSERNAME.
DBUSERNAME is the username of the database you are trying to back up. - Password: There should be no space between -p and PASSWORD.
PASSWORD is the password of the database user. - dbname: This is the name of your database. /home/cPanel_username/Database_backup/Backup_name$date.sql -
- cPanel_username: It is the username you use to log in to your cPanel account.
- Database_backup: It is a directory name that we have created under the home directory (home/cPanel_username) to store the database backup. You can create a directory and name it as you wish.
- Backup Name: The name of the backup you want to set. But adding $date at the end will append the date to that backup.
Step 9: Click the Add New Cron Job button to add the cron job in the cPanel.

Step 10: Once you click on it, it will be added, and you will see it under Current Cron Jobs.
Verification of the database backup
To verify whether the database backup is generated through cPanel cron, you need to go to the path you mentioned in the command.
Below are the steps to verify the database backup generated by the cPanel cron.
Step 1: Click on the Home icon on the screen's upper left to go back to the cPanel home page.![]()
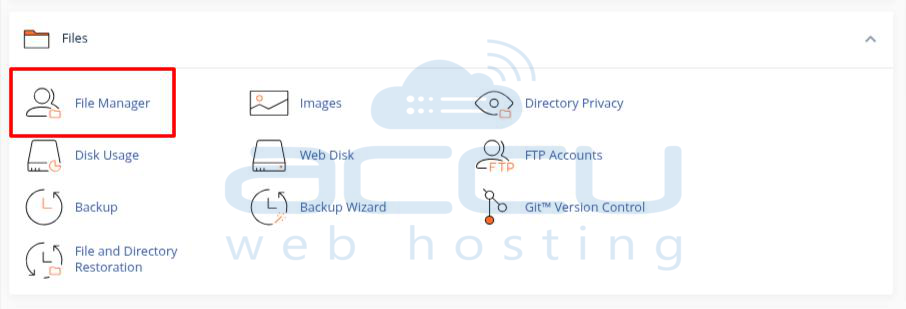
Step 2: Go to the Files section and click the File Manager option.
Step 3: Once you click on it, a new window will open with the File Manager's name. It would help if you navigated the path mentioned in the command to store the database backup. In this article, we have mentioned that the database backup path is /home/demovpstest/database_backup/, so we will go on that path.
Step 4: Click on the home and double-click the database_backup directory to open it.
Step 5: You can see that the cron job generates the MySQL database backup.
