To setting up SmarterMail as an IIS website, you need following things to be installed in your Windows VPS:
- Latest .Net framework
- IIS server with Full Configurations
- SmarterMail
Following are steps to setting up SmarterMail as an IIS website:
- First you will need to disable the SmarterMail Web Server, for this perform below mentioned steps:
- Open SmarterMail Web Server Config from Start → All Programs → SmarterMail → SmarterMail Web Server Config.

- Click on the Stop button.
- Change the Startup Mode from Automatic to Disabled.
- Click on the Apply button and click the Close button.

- Open SmarterMail Web Server Config from Start → All Programs → SmarterMail → SmarterMail Web Server Config.
- Now you will need to add an Application Pool for SmarterMail, for this perform below mentioned steps:
- Open IIS Manager from Start Menu → Administrative tools → Internet Information Services (IIS) Manager.
- Add Dedicated Application pool for SmarterMail. For this click on Application Pool from left pane of IIS Manager.
- Now click on Add Application Pool… link from right pane of IIS Manager.

- Open IIS Manager from Start Menu → Administrative tools → Internet Information Services (IIS) Manager.
- Fill the following details in Add Application Pool dialogue box, as below:
- Name: SmarterMail
- .Net Framework version: Select Latest .Net Framework
- Managed pipeline mode: Integrated

- Name: SmarterMail
- Now you will need to add SmarterMail website in IIS, for this perform below mentioned steps:
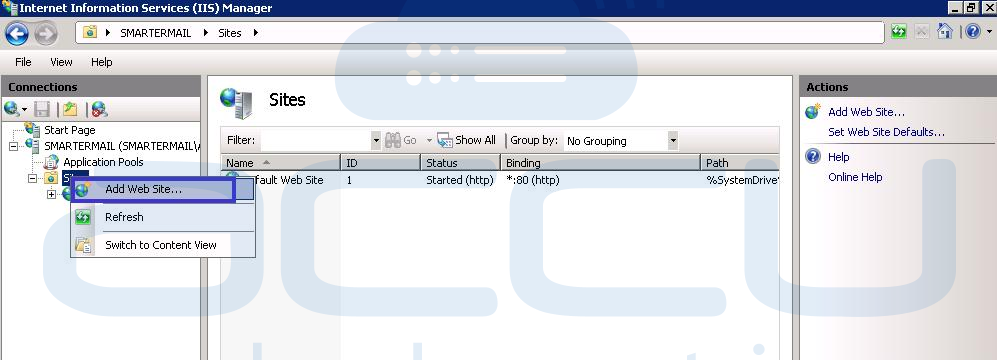
- Right click on Sites option from left pane of IIS Manager.
- Select Add Website option.

- Right click on Sites option from left pane of IIS Manager.
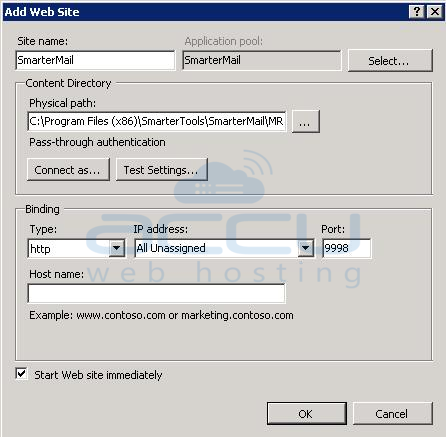
- Fill the following details details in Add Website dialogue box:
- Site Name: SmarterMail
- Application Pool: SmarterMail
- Physical Path: MRS Folder of SmarterMail. Default location is “C:\Program Files (x86)\SmarterTools\SmarterMail\MRS”
- Type: http
- IP address: All Unassigned
- Port: 9998
- Check Start Web site immediately option
- Click on “OK”

- Site Name: SmarterMail
- Your SmarterMail is now integrated with IIS. Browse http://IP_Address:9998 from any browser to test that your SmarterMail is working properly or not.
Important IIS Settings:
To work your SmarterMail website from IIS Server, your IIS should be configured with following settings:
- Open IIS Manager and click on your Server Name.

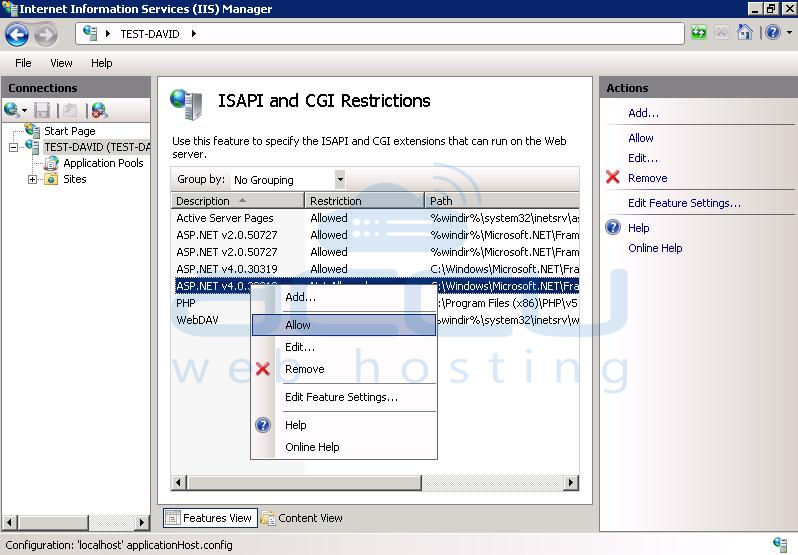
- Under IIS group, open ISAPI and CGI Restrictions option.
- Verify that ASP .NET v4.0 is allowed. If it is Not-Allowed, right-click on ASP .NET v4.0 and select Allowed option.

- In the tree view, click Sites.
- Expand SmarterMail site.
- Click App_Themes folder.
- Under IIS group, open HTTP Response Headers option.

- Now, from Actions pane click on Set Common Headers link.
- Enable the Expire Web content setting.
- Click on After:
- Add 7 for the number of days.
- Click on OK.

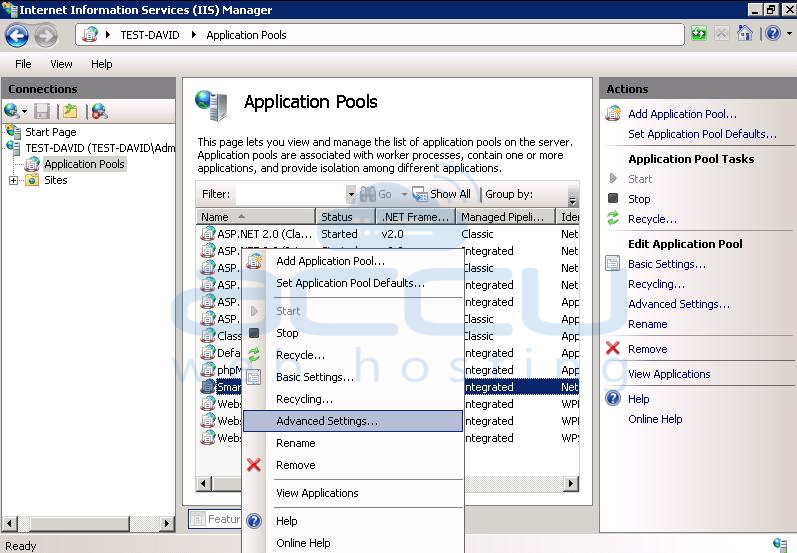
- Click on Application Pools in the tree view.
- Right click on the SmarterMail application pool and select Advanced Settings.

- Under the Process Model heading, ensure the the Identity is set to the Network Service account.

- Now click on Start button and select Run.
- Type services.msc and hit enter.
- Check the World Wide Publishing Service is running.

Note: Kindly make sure following two things:
- SmarterMail Web Server Config service should be stopped and disabled.
- Port number[9998] to which we have assigned to SmarterMail should be opened in Server’s Firewall.


