Transitioning from Substack to WordPress offers creators a powerful opportunity to take full ownership of their content, audience, and monetization strategy. Substack’s simplicity is ideal for newsletters, but its 10% revenue cut, limited customization, and reliance on a third-party platform can restrict growth for creators seeking more control.
WordPress offers advanced plugins for newsletters and seamless integration with payment systems like Stripe, resulting in lower fees. Whether you’re a blogger, journalist, or entrepreneur, migrating to WordPress allows you to build a branded, scalable platform tailored to your audience.
What is Substack?
Substack is a platform launched in 2017 that enables writers, journalists, and creators to publish newsletters, blogs, and podcasts directly to their audience. It simplifies content distribution by offering tools for creating, sending, and monetizing newsletters through free or paid subscriptions.
Substack handles hosting, email delivery, and payment processing, taking a 10% cut of subscription revenue (plus Stripe fees). As of 2025, it hosts millions of newsletters, with top creators earning significant income, and is praised for its ease of use and direct reader relationships.
However, it lacks deep customization, full data ownership, and advanced website-building features, which can limit scalability for creators.
Why Switch From Substack to WordPress?
Switching from Substack to WordPress gives you full control, unlimited customization, and better monetization options.
With WordPress, you:
- Fully own your email list and audience relationship
- Customize your site, forms, and landing pages to match your brand
- Add revenue streams like paid memberships, online courses, and digital products
- Avoid Substack’s 10% subscription fee
- Get complete control over content delivery and analytics
How to Migrate From Substack to WordPress?
Step 1: Set Up Your WordPress Website
The first step in migrating from Substack is to set up your new WordPress site.
You’ll need two things:
- Domain name – Your website’s address on the internet
- WordPress hosting – The service that stores your site’s files online
AccuWeb Hosting offers pre-installed WordPress, a free domain for first year, LiteSpeed-powered performance, and zero setup fees, all starting at just $1.99/month.
Step 2: Install the Necessary Importer Plugins
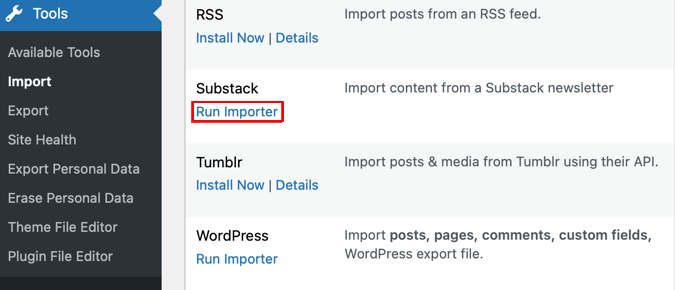
In your WordPress dashboard, navigate to Tools > Import and install the WordPress Importer plugin first to ensure compatibility.
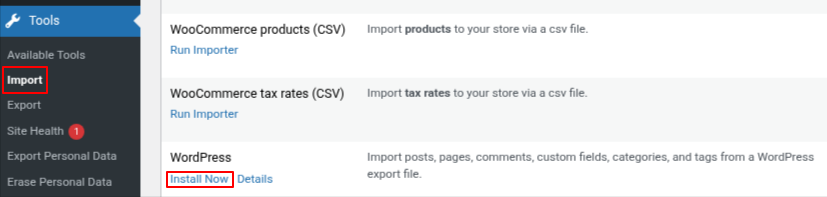
Once the installation is complete, the link will change to ‘Run Importer.’
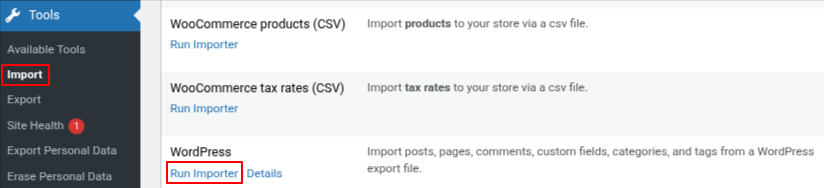
Important: Click ‘Run Importer’ right away, even if you’re not uploading anything yet. This step activates the tool so the Substack Importer works properly later. If you skip it, you may encounter errors.
You’ll then arrive at the importer’s upload screen, but you can ignore this for now.
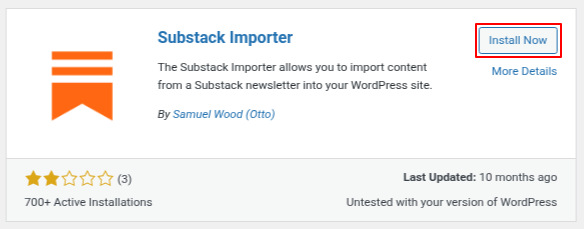
Install the Substack Importer
Next, install the Substack Importer plugin to manage your Substack export format.
1. Log in to your WordPress dashboard.
2. Navigate to Plugins > Add New.
3. Search for the Substack Importer plugin.
4. Click on Install Now and Activate it.
Step 3: Export Your Content From Substack
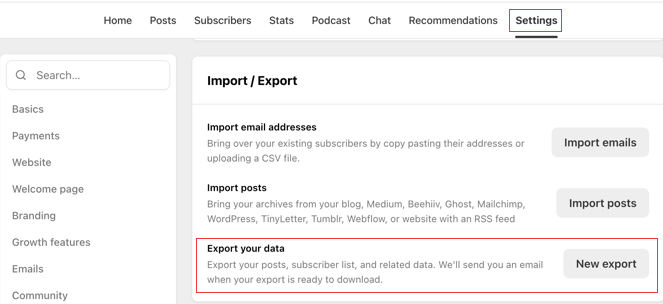
First, log in to your Substack account and open your publication’s dashboard. From there, click ‘Settings’ in the top menu, then scroll down until you reach the ‘Import/Export’ section.
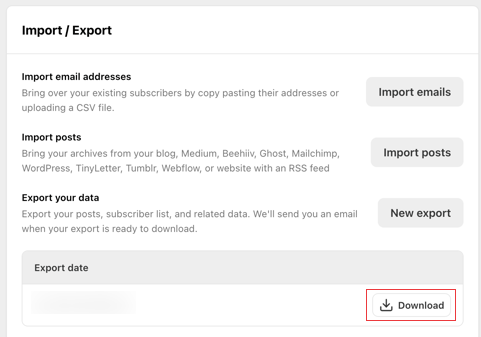
Click ‘Export your data’, then hit the ‘New export’ button.
Exporting Content and Subscribers From Substack
Substack will prepare a .zip file containing all your posts, images, and a CSV file with your subscribers’ email addresses and related details. If you have a large archive, this process might take a few minutes.
Once your export is ready, Substack will notify you via email. Click the ‘Download’ button to save it to your computer. This file contains some of your most valuable data; make sure to store it in a safe location.
Step 4: Import Your Posts into WordPress
1. Log in to your WordPress dashboard and go to Tools > Import.
You’ll now see ‘Substack’ listed among the available importers.
2. Click ‘Run Importer’.
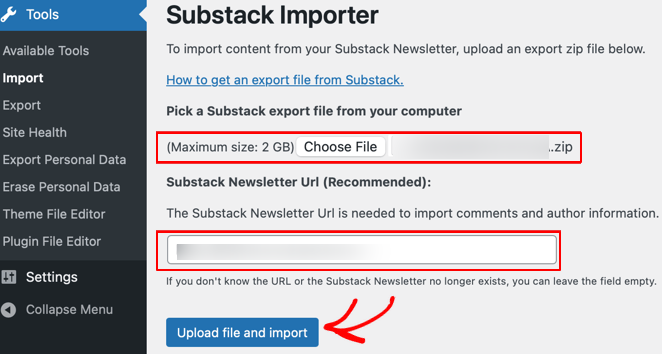
The importer will prompt you to upload the export file from Substack.
3. Click ‘Choose File’, select the .zip file containing your exported posts..
If you want, you can also enter your Substack URL to help import comments and author details, but this step is optional.
4. Once ready, hit ‘Upload file and import’.
Next, assign an author for the imported posts. You can either create a new author or link them to your existing WordPress account.
5. Check the box that says ‘Download and import file attachments’, this ensures all your images and media files from Substack are safely moved over.
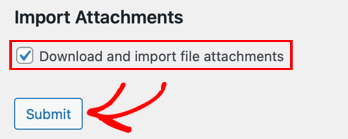
6. Click ‘Submit’. In a few moments, your Substack posts will be transformed into WordPress posts.
7. Once the process is complete, go to Posts > All Posts to see your articles. Open a few to check that your formatting, images, and content look perfect.
Step 5: Set Up Your Email Newsletter System
Unlike Substack, WordPress doesn’t include a built-in email newsletter feature. Instead, you can take advantage of a dedicated email marketing service, giving you far more control, customization, and growth potential.
WordPress requires an email service provider (ESP) like Constant Contact, Mailchimp, or ConvertKit for newsletter functionality. Install a plugin like WPForms or Newsletter to create signup forms. Sign up for your chosen ESP, create an email list, and connect it to WordPress using API keys. This setup replicates Substack’s newsletter capabilities with more control and no platform fees.
For this tutorial, I am using Constant Contact.
Step 6: Migrate Your Subscriber List
Inform your readers about your move by sending them an email from your Substack account. Highlight the benefits of the new platform and let them know to expect emails from your new sender address. This helps build trust and reduces the chances of your messages being marked as spam.
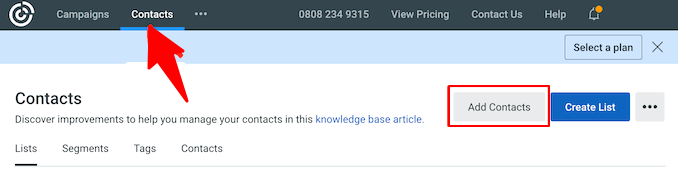
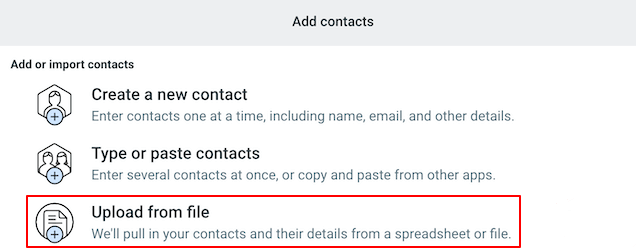
Next, log in to your Constant Contact account and navigate to the ‘Contacts’ section. Click the ‘Add Contacts’ button and choose the option to upload from a file.
From your Substack export and unzip the downloaded file. Inside, you’ll find a CSV file (often named something like email_list.your-publication-name.csv) containing your subscriber data. Upload this CSV into Constant Contact, then follow the on-screen prompts to map each column correctly (e.g., match the ‘Email’ column to the email field). Add them to the list you created earlier.
Once the list is ready, set up a short welcome email sequence in Constant Contact. This is a perfect opportunity to reintroduce your brand, share exciting updates, and encourage engagement on your new platform.
Step 7: Point Your Domain to WordPress
If using a new domain from your host, it’s already configured. For an existing custom domain, log in to your registrar and update the nameservers to match your WordPress host (e.g, ns1.hostname.com).
DNS propagation may take up to 48 hours. Test by visiting your domain to confirm it loads the WordPress site.
Step 8: Set Up Permalinks and Redirects
To avoid “404 Not Found” errors, you’ll need to configure your WordPress permalinks and set up redirects from your old Substack URLs.
1. Configure SEO-Friendly Permalinks
- In your WordPress dashboard, go to Settings > Permalinks.
- Select the Post name and click Save Changes.

This creates clean URLs like yoursite.com/post-title, which are SEO-friendly and similar to Substack’s structure.
2. Redirect Old Substack Links
You want anyone clicking an old Substack link to land on the right post in WordPress. Since Substack uses a /p/post-name format, you can redirect all posts at once.
- Install and activate the free Redirection plugin.
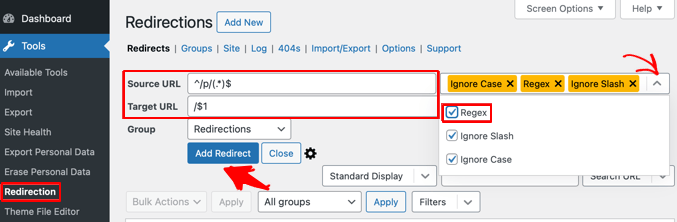
- Go to Tools > Redirection and add a new rule:
- Source URL: ^/p/(.*)$
- Target URL: /$1
After entering the URLs, make sure to check the ‘Regex’ box. This step is crucial, as it instructs the plugin to apply the special rule.
This rule automatically redirects any link starting with /p/ to the same URL without the /p/ prefix.
For example, a link to domainname.com/p/my-first-post will now automatically redirect to domainname.com/my-first-post. This eliminates the need to manually create redirects for every single post.
Step 9: Customize Your Site and Go Live
Install a responsive WordPress theme to give your site a clean, professional look across all devices.
Next, navigate to Appearance > Customize to add your brand colors, fonts, and layout, ensuring they reflect your brand’s personality. Once the design is in place, create your key pages (For example, About, Contact Us, Privacy Policy)
With the foundation set, build a welcoming homepage that prominently features your newsletter signup form to encourage subscriptions.
Before going live, run a complete check for mobile responsiveness, broken links, and page loading speed using tools like Google PageSpeed Insights.
Step 10: Set Up Your Paid Newsletter in WordPress
Install a membership plugin to create subscription tiers (e.g., monthly/yearly) and restrict premium content. Integrate payment processors like Stripe or PayPal.
Once you are set up, send a welcome email to subscribers about the new website.
The regex rule will handle most of your post redirects, but double-check it for any that may have slipped through. During the import process, WordPress can sometimes modify a post’s URL slug to avoid duplicates.
For instance, if two Substack posts have similar titles, WordPress might rename one to something like /my-post-title-2. In such cases, the regex rule won’t automatically catch the change.
To resolve it, go to your WordPress dashboard, navigate to Tools > Redirection, and open the ‘404s’ tab. This section records every instance where a visitor lands on a page that doesn’t exist.
If you notice an old Substack URL in the log, it means the redirect for that post didn’t work. Simply hover over the 404 entry and click ‘Add redirect’ to create a manual redirect for it.
