You can share folders and files with other computers using a network drive. Windows offers multiple ways for you to map a network drive. Mapping a network drive grants you to access shared files and folders on a network. This software lets you work with files stored on a network as if on your local computer.
It can be especially advantageous for businesses or organizations with multiple computers or servers that need to exchange files and resources seamlessly.
Pre-requisites
1. You should have administrator user access.
2. Network Discovery feature should be enabled on your VPS.
Configure Network Discovery in Windows
Computers, servers, and printers on the same network can be discovered by Windows using a feature called network discovery. It allows you to share any folder or file with other devices on the same network. Ensure you have enabled network discovery on your computer before mapping a network drive.
How to enable network detection in Windows Server 2016/2019?
Network detection is disabled by default in Windows Server 2016/2019. If the network detection is disabled and you attempt to map a drive, you will receive the following error. To fix it, you need to enable network detection in Windows Server.

There are three basic levels of configuration of Netwok discovery
Enable: This option grant the server to see other computers and devices on the network. It also allows other people to view active servers.
Disable: It prevents both our server and other devices on the network from seeing each other.
Customized: This option allows us to restrict the settings associated with network discovery.
Step 1: Click the Start button and then the Control Panel option.

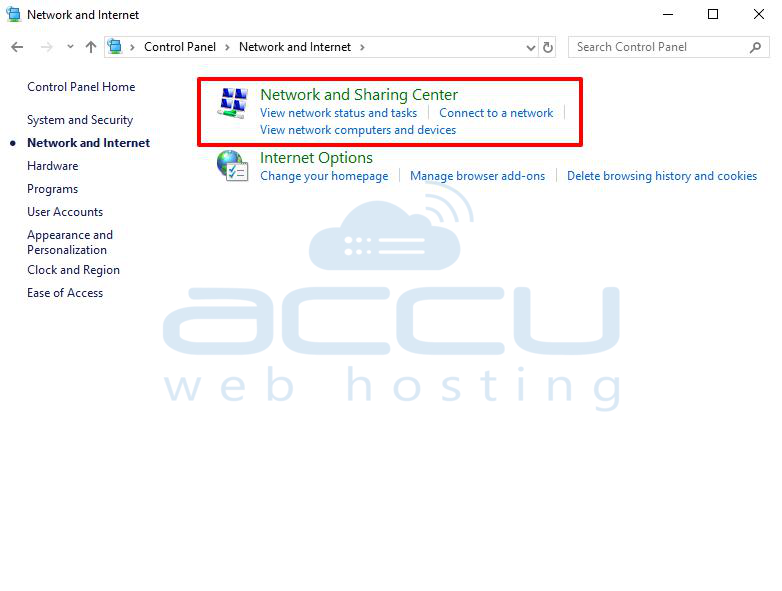
Step 2: Then click on the Network and Internet option.

Step 3: After then, click on the Network and Sharing Center.
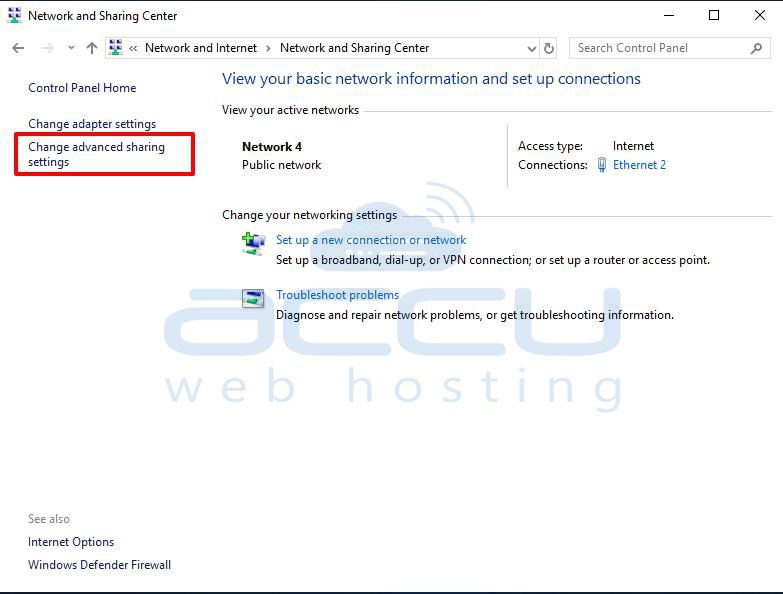
Step 4: Click on Change advanced sharing settings in the Network and Sharing Center window.
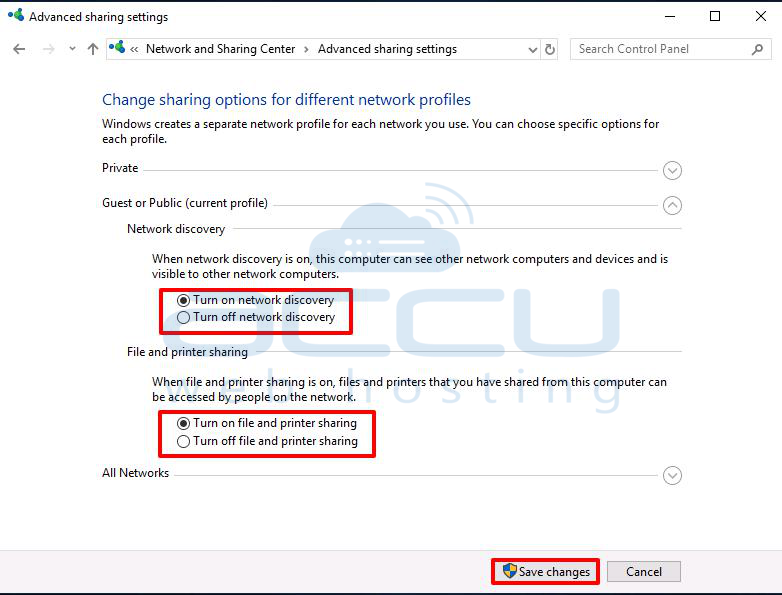
Step 5: Go to the Advanced sharing settings window's Guest or Public profile section. Under Network discovery, check the Turn on Network discovery box.
Step 6: Go to the File and Printer sharing and check Turn on file and printer sharing box. After then, click on the Save Changes button.
Step 7: Go to the File Explorer and verify that devices are identified on the network.

How to map a Drive on Windows server?
There are three ways to map the drive as Network drive in the Windows Server.
1. Map a Windows Server Drive Using File Explorer
Once you have enabled network discovery, you can map a Windows Server drive using File Explorer.
Below are the steps on how to map a Windows Server Drive using File Explorer.
Step 1: Press Win + E to open File Explorer.
Step 2: In the File Explorer window, Right click on the This PC option and then click the Map network drive option.

Step 3: In the Map Network Drive window, go to the Drive field and select a unique drive letter from the drop-down list. Here, we have selected Z as an example. You will use this drive to access the shared folder from your computer.
Step 4: In the folder field, enter the path of the shared folder you want to map. This can be a local server path, such as \\Servername\Sharedfolder\ or a network path, such as \\ServerName\SharedFolder.
Step 5: To access the Shared folder with a username and password, check the box Connect using different credentials and enter the required information.
Step 6: Click on the Finish button to complete the mapping process.

Step 7: Once you click on it, it will map the folder to the specified drive in File Explorer. You can access the shared folder anytime by double-clicking on the Drive. You can see that Z drive is mapped.

2. Use Windows PowerShell for Mapping
Windows PowerShell is a Windows-based command-line utility that provides robust tools and commands. You can use Powershell to map a network drive.
Follow the below-mentioned step to map a drive using Windows PowerShell:
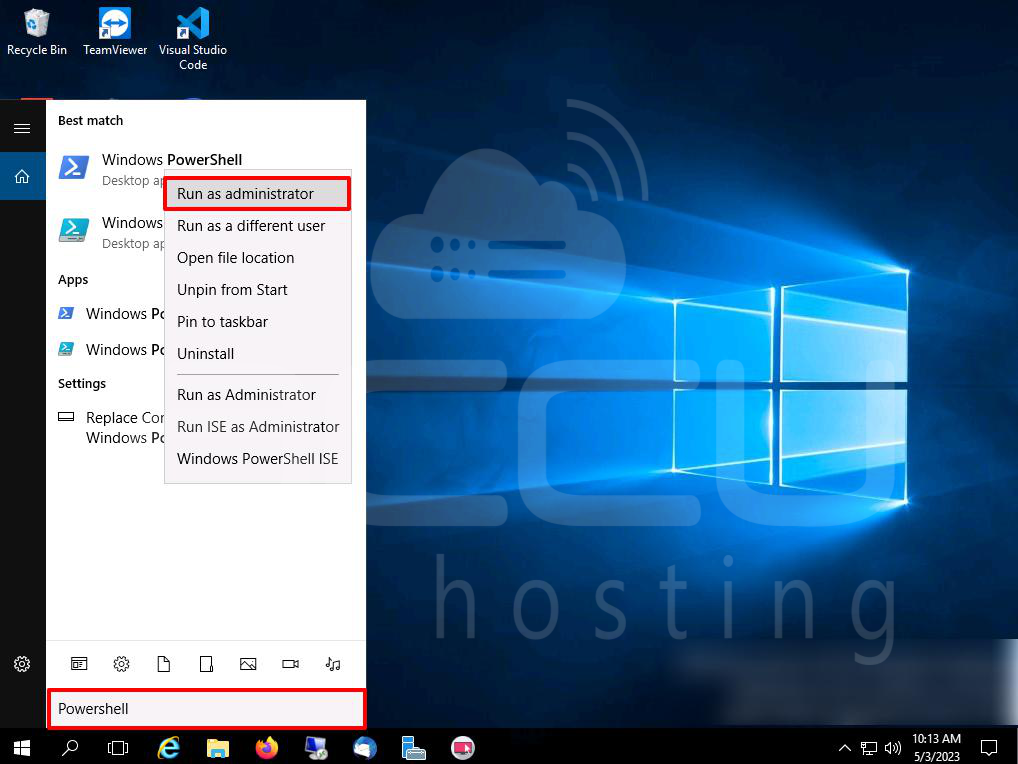
Step 1: Go to the Taskbar at the bottom of the screen and click the Search icon.
Step 2: In the search box, type PowerShell. Choose the best match and select the Run as administrator option.
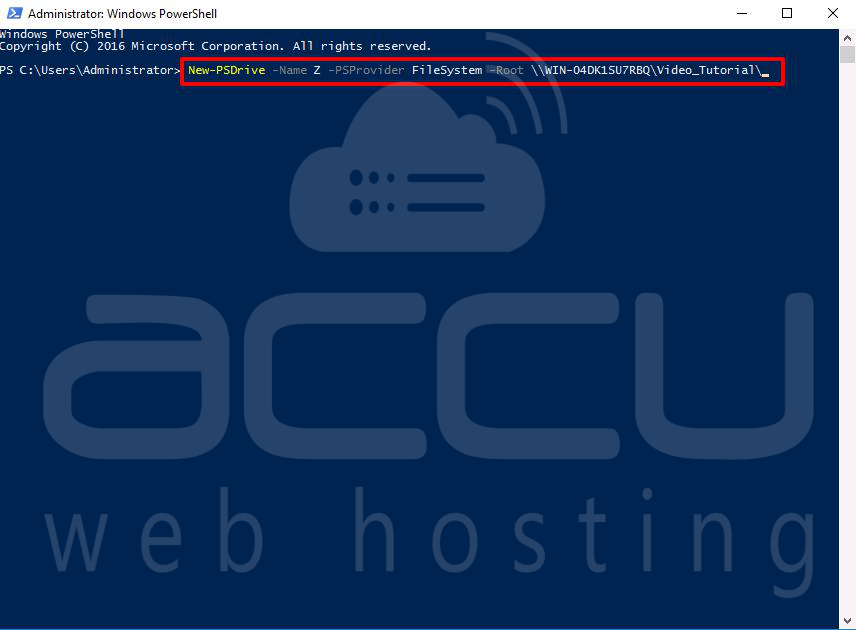
Step 3: In the PowerShell window, enter the following command. Replace the DRIVE_Name with the drive letter you wish to use and \\ServerName\SharedFolder with the path to the shared folder.
New-PSDrive -Name DRIVE_Name -PSProvider FileSystem -Root \\ServerName\SharedFolder\
Step 4: If you want to use a credential to access the Shared folder, add the -Credential parameter in the command, followed by a username and password.
For example:
New-PSDrive -Name Z -PSProvider FileSystem -Root \\ServerName\SharedFolder -Credential username password

Step 5: After then press enter to map the network drive. You can now access the mapped drive from File Explorer.

3. Use the Command Prompt for Mapping
You can use the Windows Command Prompt tools to map network drives just like you used PowerShell before.
Follow these simple instructions:
Step 1: Go to the Taskbar at the bottom of the screen and click the Search icon.
Step 2: In the search box, type cmd. Choose the best match and select the Run as administrator option.

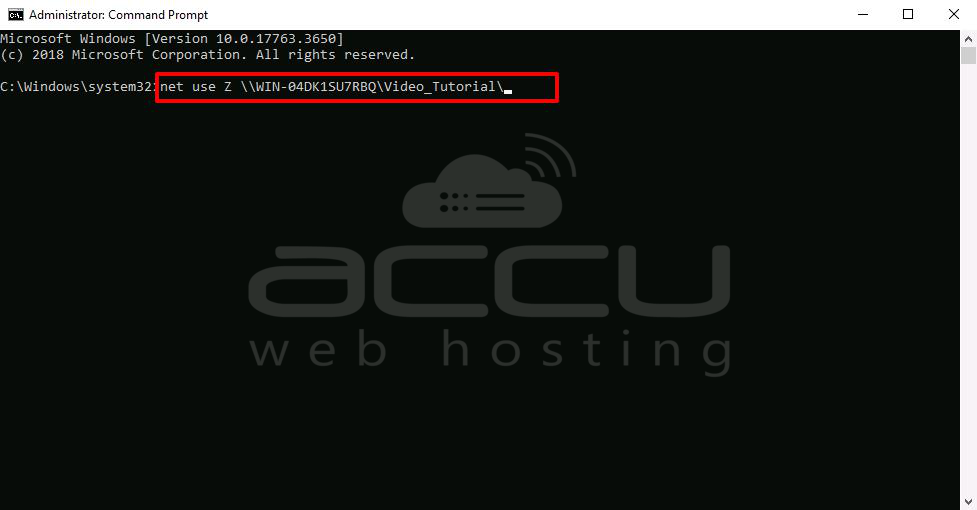
Step 3: In the command prompt window, type the following command. Replace DRIVE_Name with any drive letter and \\ServerName\SharedFolder with the shared folder's path:
net use DRIVE_Name \\ServerName\SharedFolder
Step 4: If you want to use a credential to access the Shared folder, you can add the /user parameter in the command, followed by a username and password.
For example:
net use DRIVE_Name \\ServerName\SharedFolder /user:username pass

Step 5: After making the necessary changes, press enter to run the command.
It takes a few seconds, and you can access the mapped drive with one click from File Explorer.

That's all.
