Please refer to the steps below to deploy your application with Visual Studio 2019 using the Web Deploy method.
Looking to deploy using Visual Studio 2015?
Please click on web deploy with Visual Studio 2015 for more details.
1. First, open Visual Studio 2019.
2. Go to the build and click on Configuration Manager.

3. In the Configuration Manager dialog box, select the Release option from the Active Solution Configuration drop-down, then Close the dialog box.

4. To deploy your web application, select your web application from Solution Explorer and right-click on your web application, and click on the Publish button.

5. On the next screen, click on Web Server (IIS) and click the Next button.
")
6. Select Web Deploy to publish your code and click Next.

7. Add the following details in the IIS configuration dialogue box
7.1 If URL of your Control Panel is: https://cp1.accu20.com -
- For Windows Server 2016 Customers, you need to use this link in Server field - https://64.27.52.66:8172/msdeploy.axd
- For Windows VPS Customers - Configure your VPS for Web Deploy
For Windows Server 2019 Customers, you can configure the web server with the web deployment details shared with you via email, after your Windows shared hosting order is executed. The details in email, will look like this:
Web Deployment Details (to publish your website using Web Deploy method):
Protocol: Web Deploy
server: https://64.27.52.66:8172/msdeploy.axd
Username: demovps2
Password: *your password*
Site Name: demovpstest.com
Destination URL: http://demovpstest.com
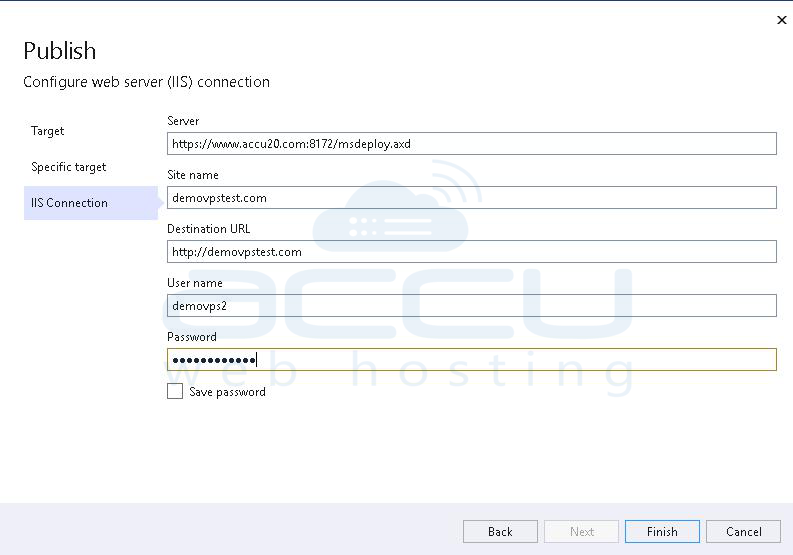
Please refer below points to know which details needs to be added under different fields in the Publish dialog box.
- Under the Site name option, specify the name of your website.
- Under Destination URL, specify your website's Fully Qualified Domain Name (FQDN).
- Under the Username option, specify the username with the necessary permissions (IIS Manager Permissions) on the web server for web deployment.
- Finally, specify the Password of that username.
If you want to save your credentials for future use, check the Save Password checkbox.

7.2 If URL of your Control Panel is: https://cp.accu20.com, then -
- For Windows Server 2016 Customers, you need to use this link in Server field - https://www.accu20.com:8172/msdeploy.axd
- For Windows VPS Customers - Configure your VPS for Web Deploy
-
For Windows Server 2019 Customers, you can configure the web server with the web deployment details shared with you via email, after your Windows shared hosting order is executed. The details in email, will look like this:
Web Deployment Details (to publish your website using Web Deploy method):
Protocol: Web Deploy
server: https://www.accu20.com:8172/msdeploy.axd
Username: demovps2
Password: *your password*
Site Name: demovpstest.com
Destination URL: http://demovpstest.com - You can fill the fields according to your hosting details like Site Name, Destination URL, User Name, Password.
8. Once all the details are added, click the Finish button.
9. On the next page, click the Publish button to deploy your web application to the server.
