In the following article, we will walk through how to set up Windows Update manually in Windows Server 2016.
First of all, we need to validate the current Windows Update settings using SCONFIG.
To do that, open the command prompt or Windows PowerShell session with Administrator permissions.
Step 1: Type the following command and press Enter.
# sconfig

Note: This may take some time as the tool will inspect your system.
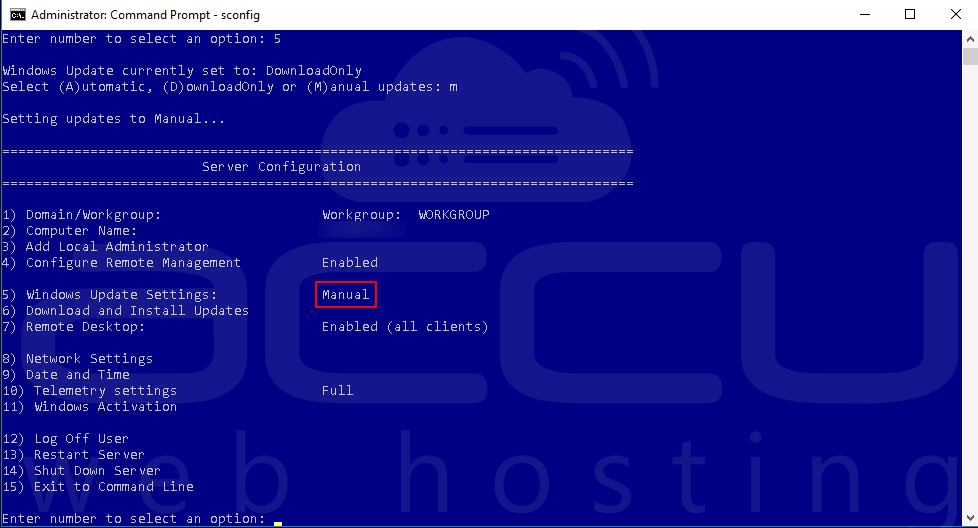
Step 2: Option (5) shows the current settings for windows update.

Change Windows Update settings.
To change Windows Update settings using sconfig, follow these steps.
Step 1: Open a command prompt or Windows PowerShell session with Administrator permissions.
Step 2: Initiate the following command and press enter
# sconfig
Step 3: Press 5 and then enter. This will bring the following options.
Automatic - This will configure your server to scan for updates and download and install updates automatically.
DownloadOnly - This will configure your server to scan for updates, download them, and notify the admin if the updates need to be installed. (This is the default setting in Windows Server 2016)
Manual - This will stop the automatic updates. The system will never check for updates.

Step 4: Press (M) for setting it to manual and press enter.
Step 5: This will apply the configuration you have, and after the setting is applied, you will see the pop-up message similar to the image below.

Step 6: Click ok to dismiss the notification. It will refresh the menu, and option 5 will show the new configuration.
That's it, now Windows will never search for updates.
