Steps to identify which WordPress plugin is generating an excessive number of Action Scheduler entries
A sudden increase in WordPress database size is often caused by the Action Scheduler system, which is commonly used by WooCommerce and other plugins to handle background tasks such as email processing, webhooks, and scheduled cleanups.
If a plugin enters a retry loop, encounters repeated API failures, or schedules excessive tasks, the wp_actionscheduler_actions and wp_actionscheduler_logs tables can grow rapidly and consume significant database space. Below are five methods to identify the plugin responsible for generating excessive Action Scheduler entries, along with recommendations for cleanup and preventing future database bloat.
Method 1: Query the Action Scheduler Tables via phpMyAdmin (Most Reliable)
This method is the most dependable because it bypasses the WordPress admin interface entirely. When your database is bloated, the WordPress backend may throw "504 Gateway Timeout" or "Allowed Memory Size Exhausted" errors. Accessing the database directly ensures you can read the data.
Step 1: Access the Database
-
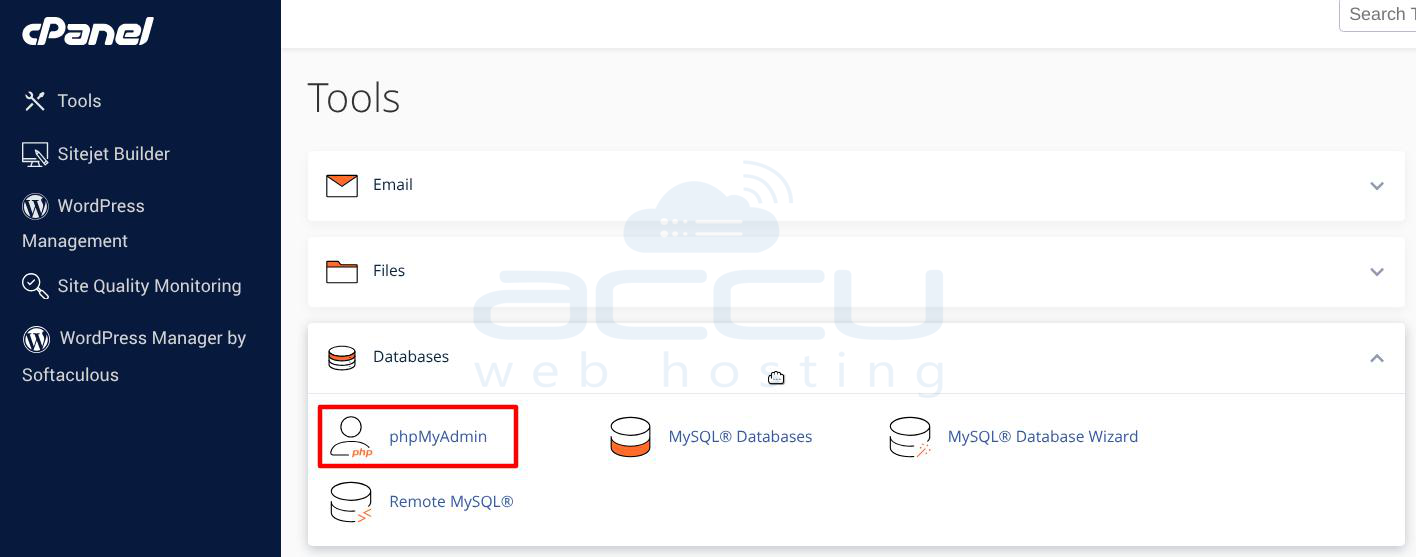
Log in to your hosting account control panel.
-
Locate the Databases section and click on phpMyAdmin.
-
In the left-hand sidebar, click on the name of your specific WordPress database. (Note: If you host multiple sites, check your site’s wp-config.php file to confirm the correct database name).
Step 2: Run the Hook Breakdown Query
-
Click on the SQL tab in the top navigation bar of phpMyAdmin.
-
Paste the following query into the SQL editor box. This query counts how many rows exist for each action hook, grouping them by name, and lists the heaviest offenders first:
SELECT hook, COUNT(*) AS total
FROM wp_actionscheduler_actions
GROUP BY hook
ORDER BY total DESC
LIMIT 20;
3. Click the Go button in the bottom right to execute the query.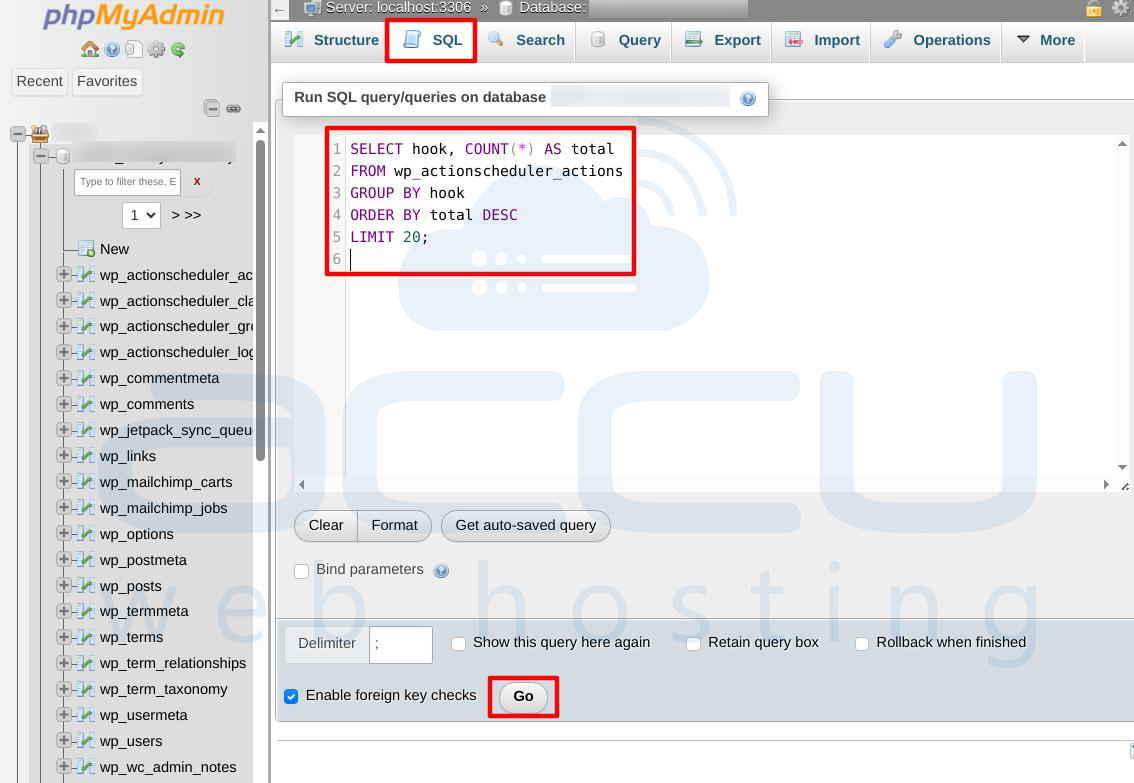
Step 3: Analyze the Results & Map Hooks to Plugins
The output will display a table containing your most dominant hooks. Most well-coded plugins use a distinct prefix for their hooks. You can match the hook name in your results against this standard prefix cheat sheet: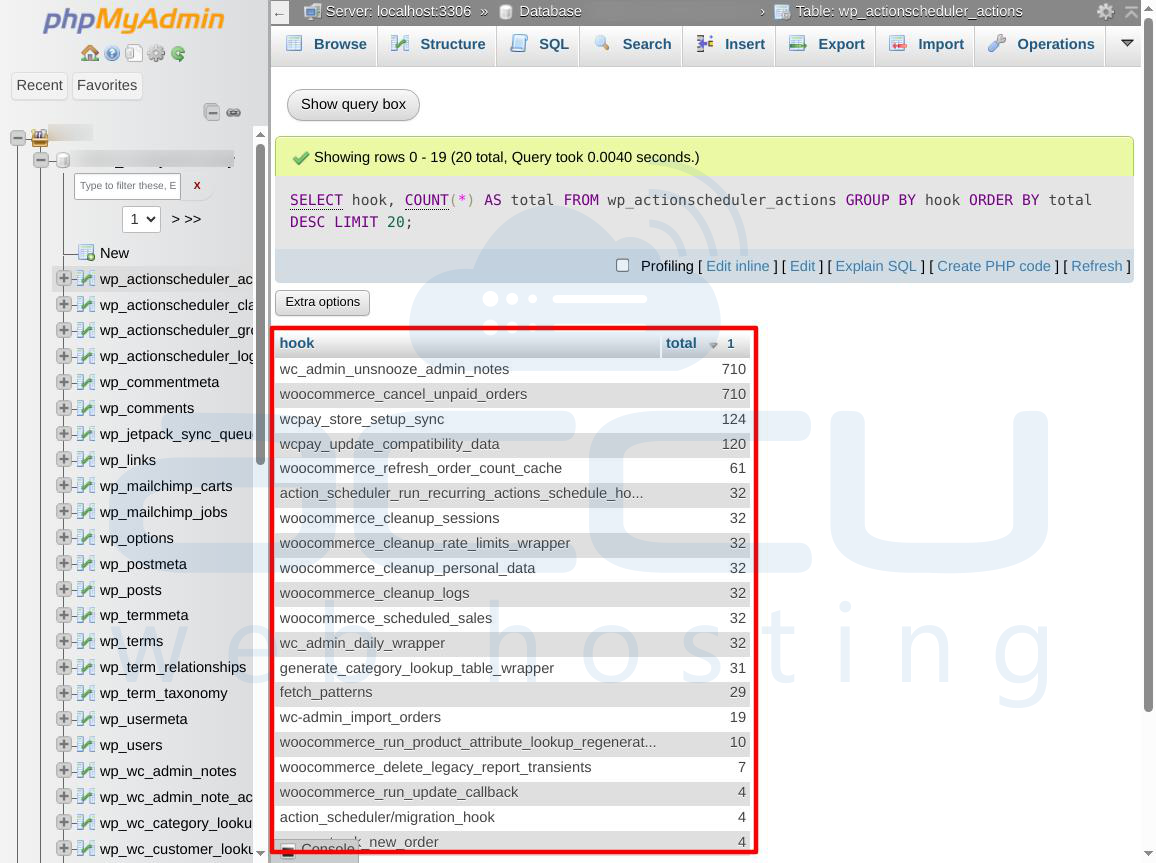
If a specific hook like mailpoet_sending_queue shows a total count in the hundreds of thousands, you have successfully isolated the responsible plugin.
Method 2: Identify the Status of the Largest Queues
Knowing which hook is filling the table is only half the battle; knowing the status of those hooks tells you why the system is failing to purge them. Action Scheduler items generally cycle through states like pending, in-progress, complete, or failed.
Step 1: Execute the Status-Grouped Query
-
Inside phpMyAdmin, clear your previous query and navigate back to the SQL tab.
-
Enter the following query, which breaks down the volume of hooks further by isolating their current operational status:
SELECT hook, status, COUNT(*) AS total
FROM wp_actionscheduler_actions
GROUP BY hook, status
ORDER BY total DESC;
3. Click Go to execute.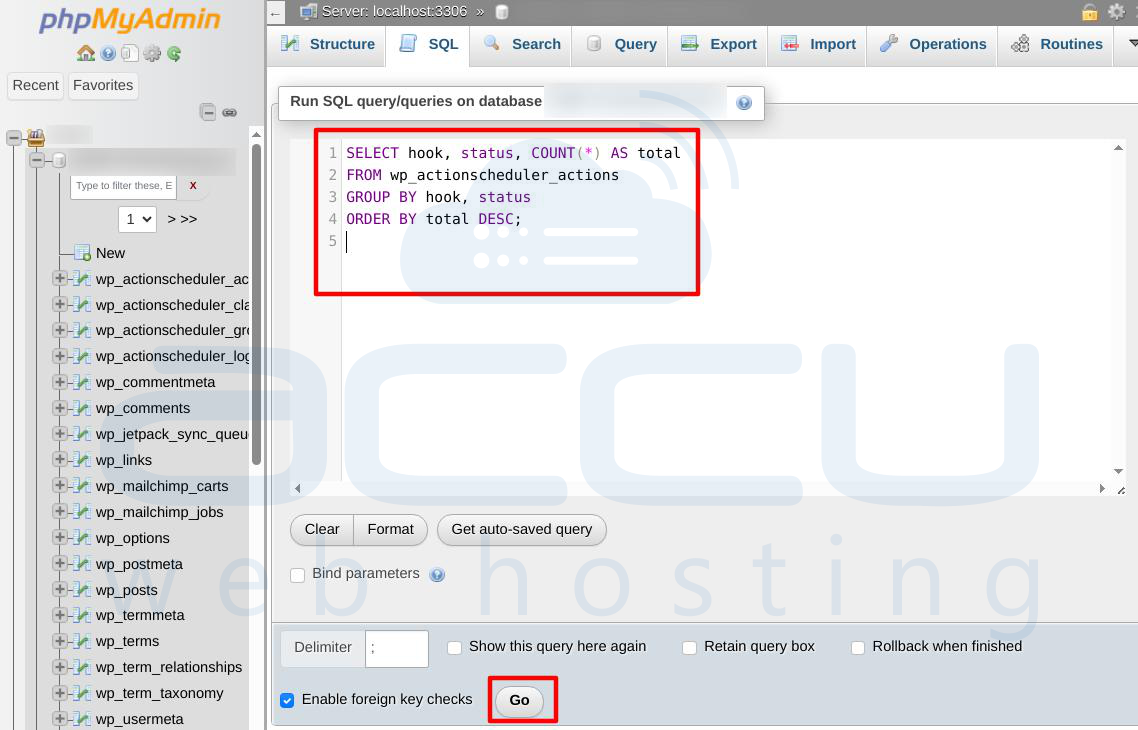
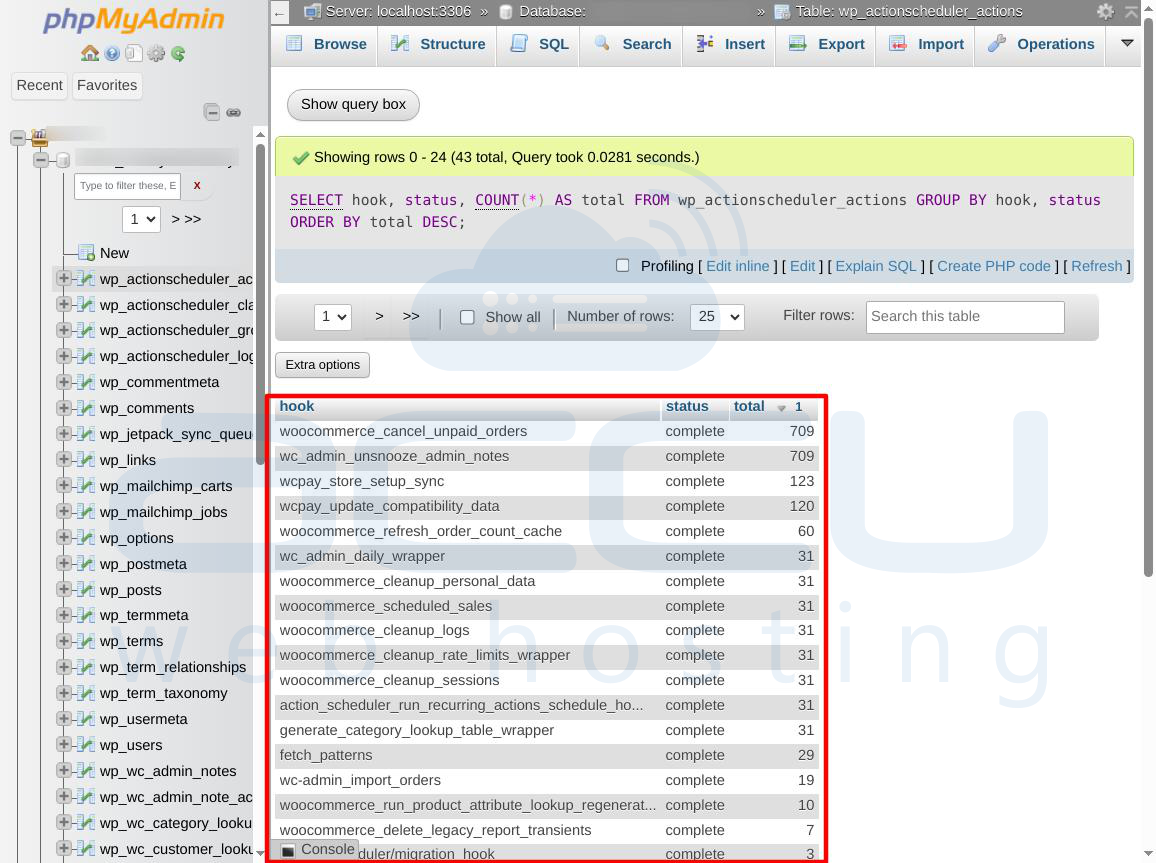
Step 2: Interpret the Status Matrix. Review the status column carefully to diagnose the underlying architectural bottleneck:
-
pending dominates: If you see hundreds of thousands of pending items, the plugin is scheduling jobs faster than your server can execute them, or your system CRON (wp-cron.php) is failing to trigger.
-
failed dominates: If the count is high for failed statuses, a background task is consistently crashing (often due to external API timeouts or memory limitations). Many plugins are designed to continuously retry failed tasks indefinitely, creating an endless log loop.
-
in-progress dominates: This indicates jobs are starting but freezing mid-execution. This usually points to low PHP script execution timeouts (max_execution_time) or PHP memory depletion.
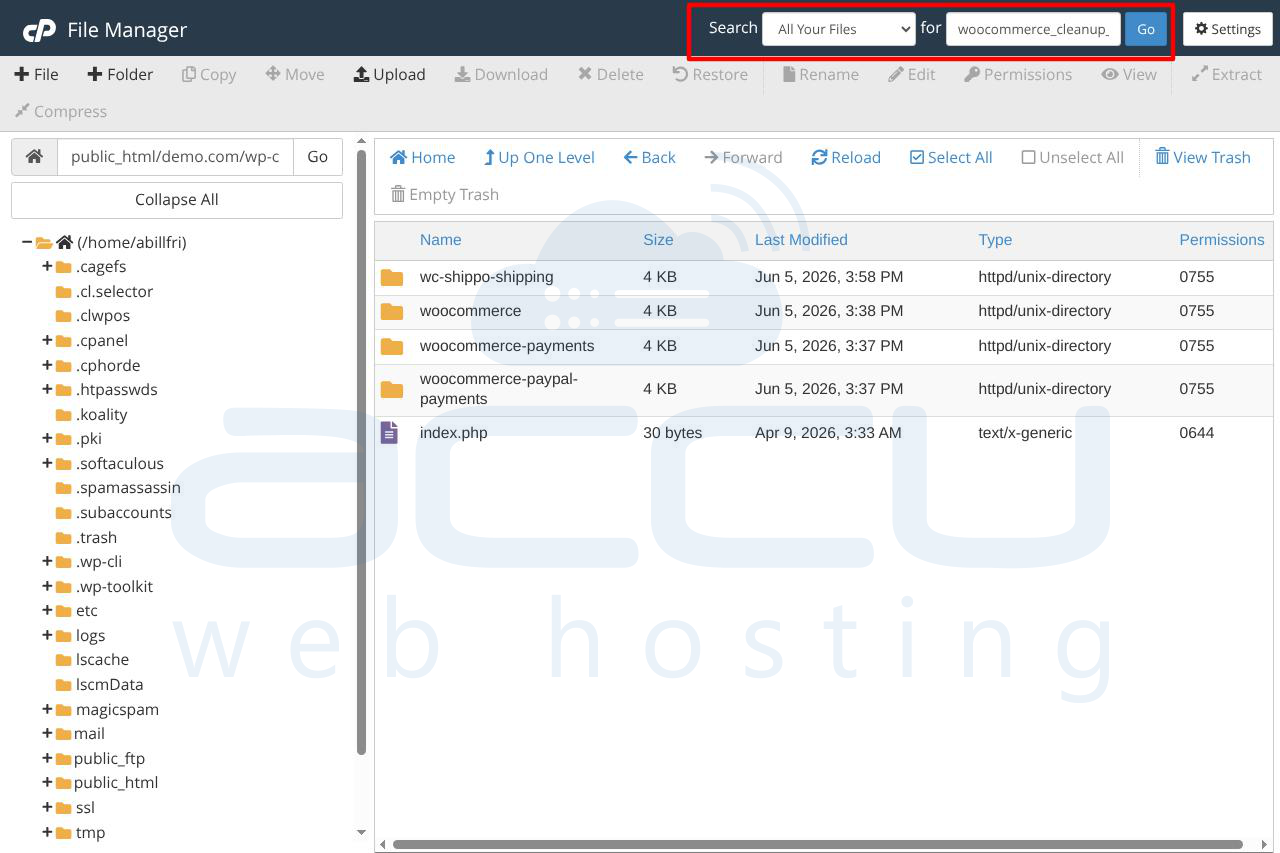
Method 3: Search Plugin Files via cPanel File Manager
Occasionally, a poorly documented plugin or a custom-coded theme will use generic hook names (e.g., run_custom_sync or check_data_update) that do not clearly indicate their origin. You can track these down by searching through the physical source code files of your site.
Step 1: Open File Manager
-
Navigate back to your hosting control panel dashboard.
-
Click on File Manager and open the root directory of your website (typically public_html or yourdomain.com).
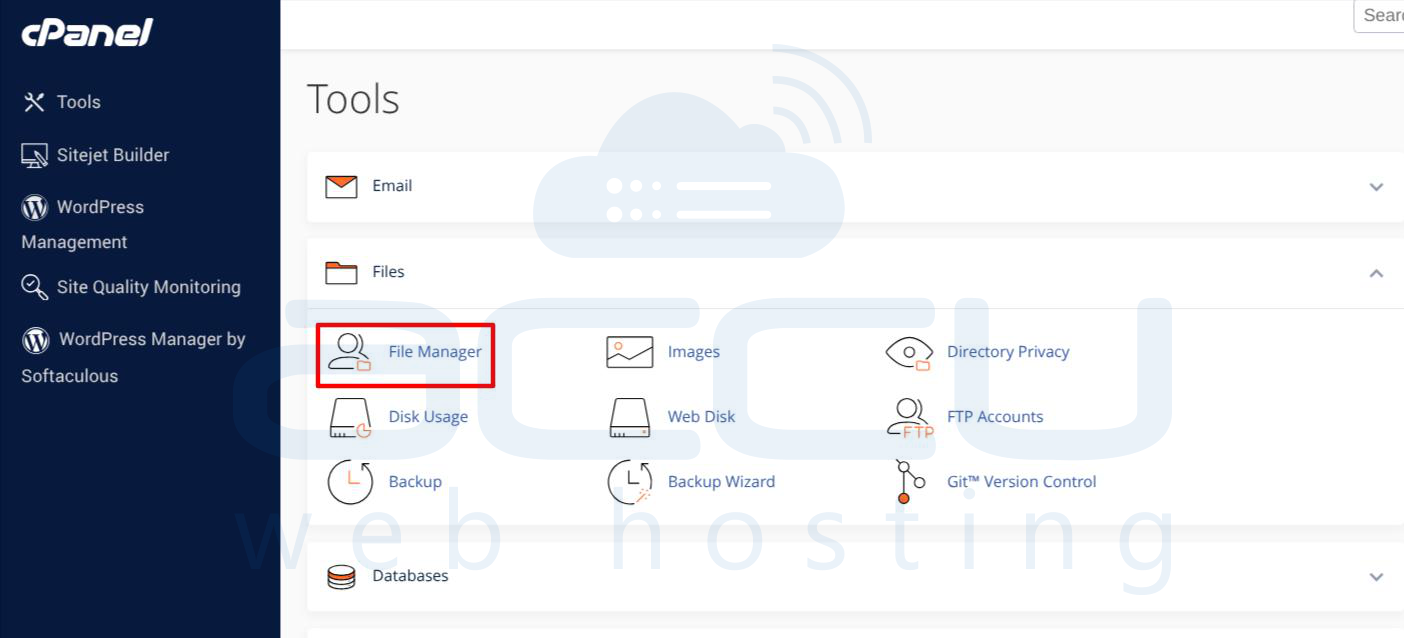
3. Double-click to navigate down to the plugin directory: wp-content/plugins/.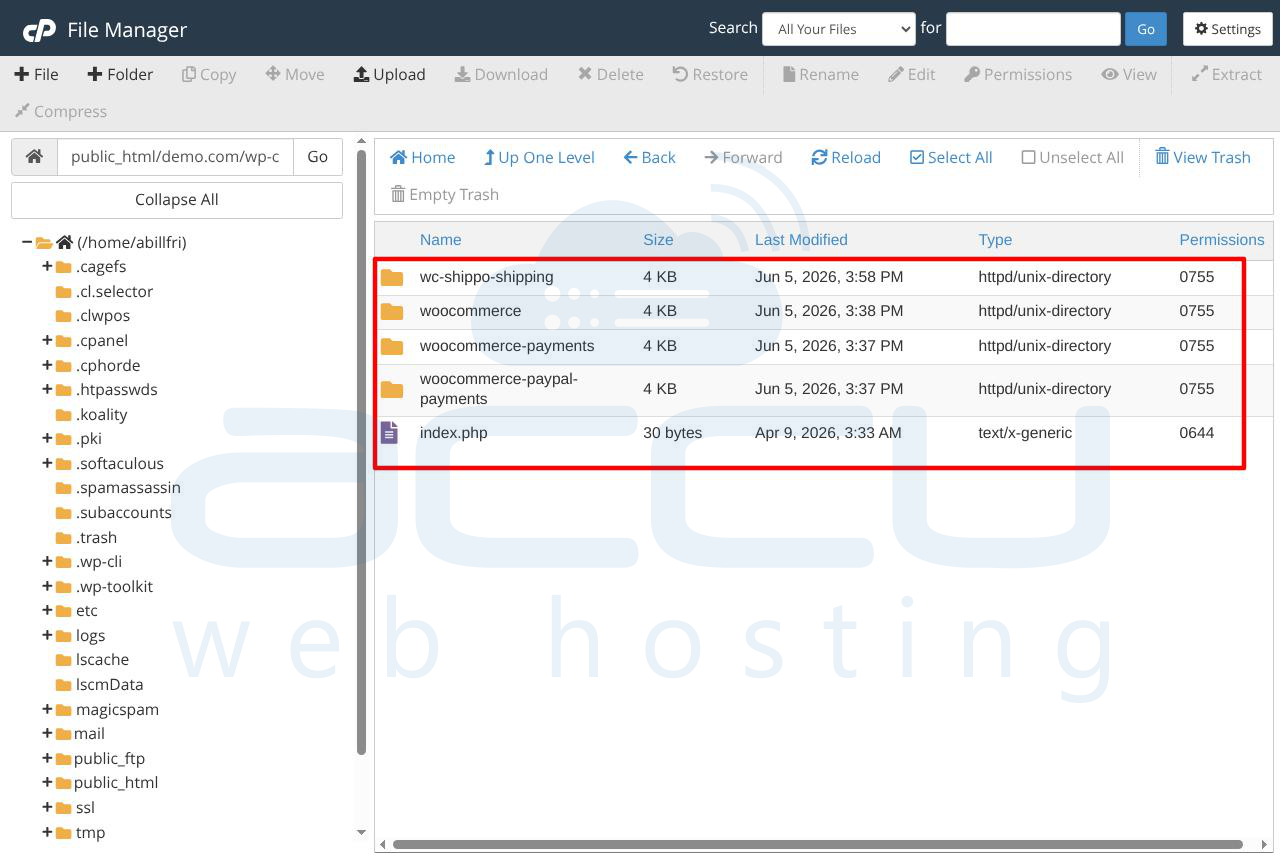
Step 2: Search for the Hook Name
-
Locate the Search field, usually positioned in the top-right corner of the File Manager interface.
-
Ensure your search parameters are set to search "All Files" or current subdirectories.
-
Type the exact hook name you uncovered during your SQL queries (for example: mailpoet_sending_queue) and hit Enter.
Step 3: Inspect Code Hooks.
If the file search is restrictive or your hosting file manager lacks in-file text string searching, look for the underlying functions that register background tasks. Plugins register these actions using explicit PHP hooks. Search for these terms instead:
-
as_schedule_single_action
-
as_schedule_recurring_action
The file path returned by the search will pinpoint the specific sub-folder inside /wp-content/plugins/, revealing the name of the software component driving the table growth.
Method 4: Utilize the Action Scheduler Admin Interface
If your WordPress admin dashboard is still operational and loading at a functional speed, WordPress provides a built-in graphical user interface (GUI) to view, filter, and run these background tasks manually.
Step 1: Locate the Native Interface
Depending on your active plugins, navigate to one of the following locations inside your WordPress dashboard:
-
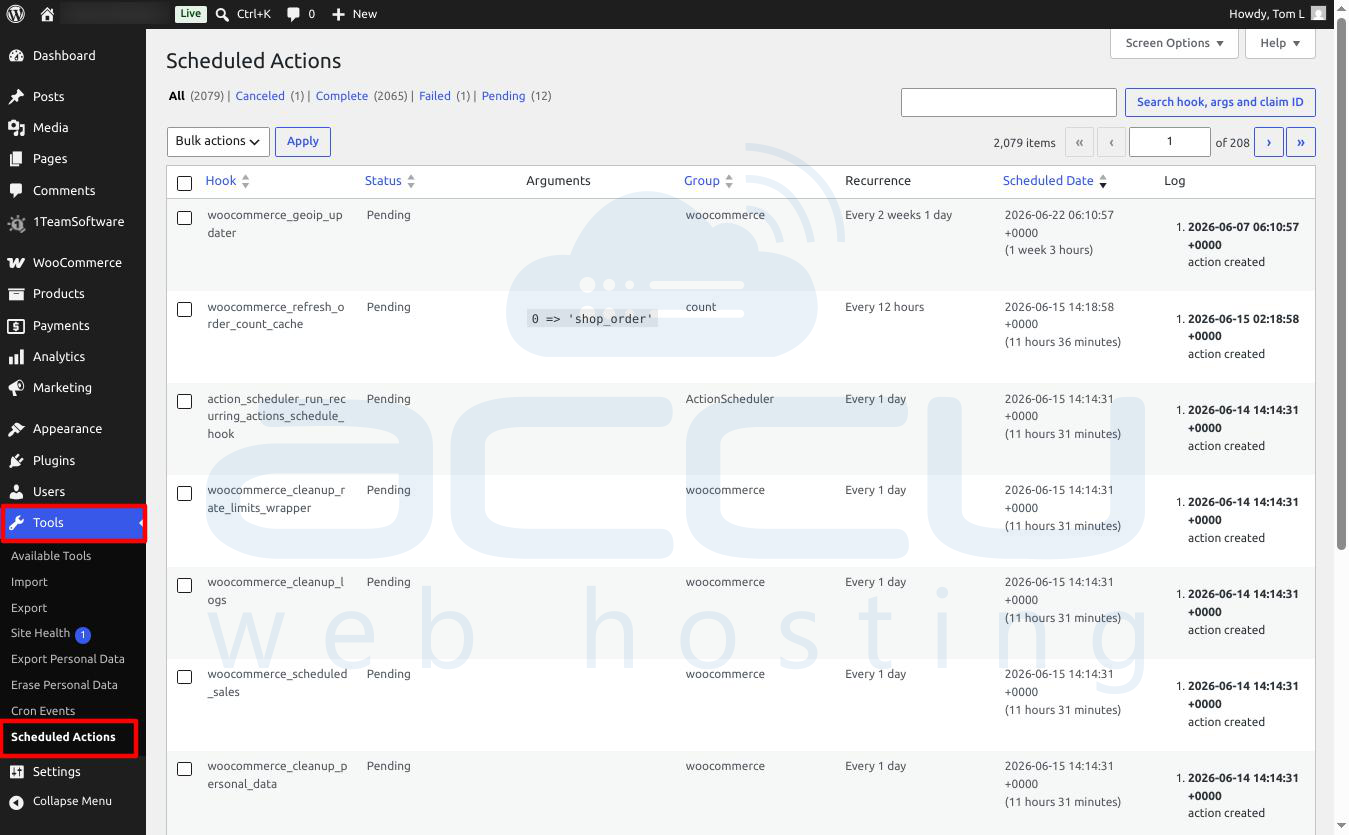
Standard Path: Go to Tools → Scheduled Actions.
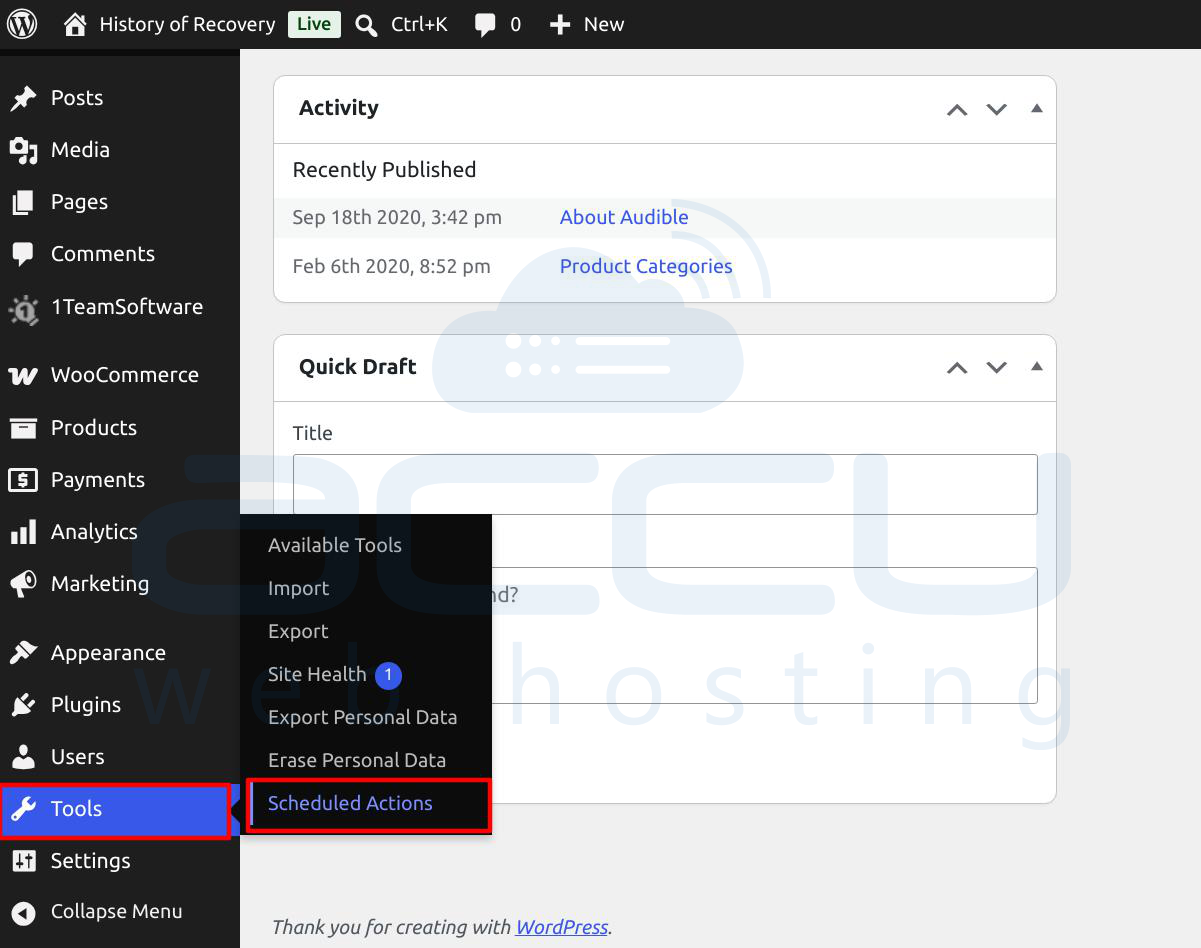
WooCommerce Path: Go to WooCommerce → Status and click the Scheduled Actions tab at the top.
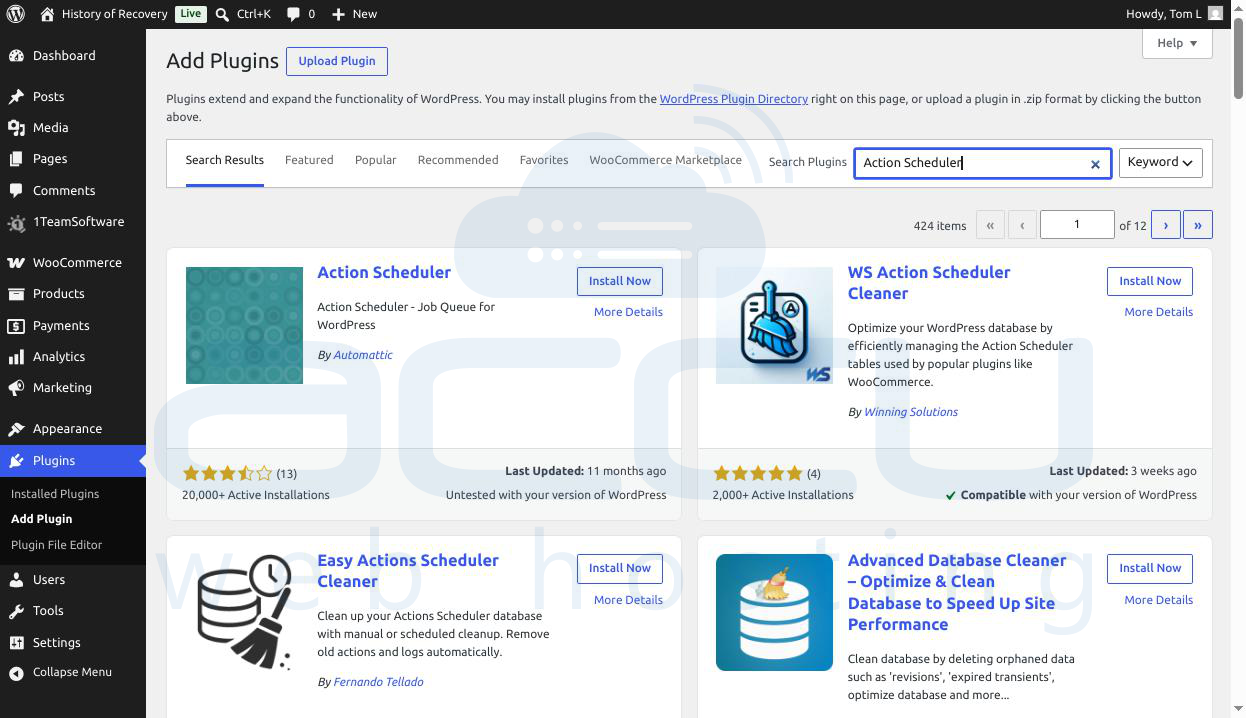
(Note: If you do not run WooCommerce and your theme does not expose this tool, you can temporarily install a free standalone developer plugin called "Action Scheduler" from the WordPress plugin repository to force this menu to appear.)
Step 2: Analyze and Filter the Logs
The admin interface mirrors the database queries cleanly via a visual table.
1. Click through the status filter tabs: Pending, Failed, and In-progress, Cancelled.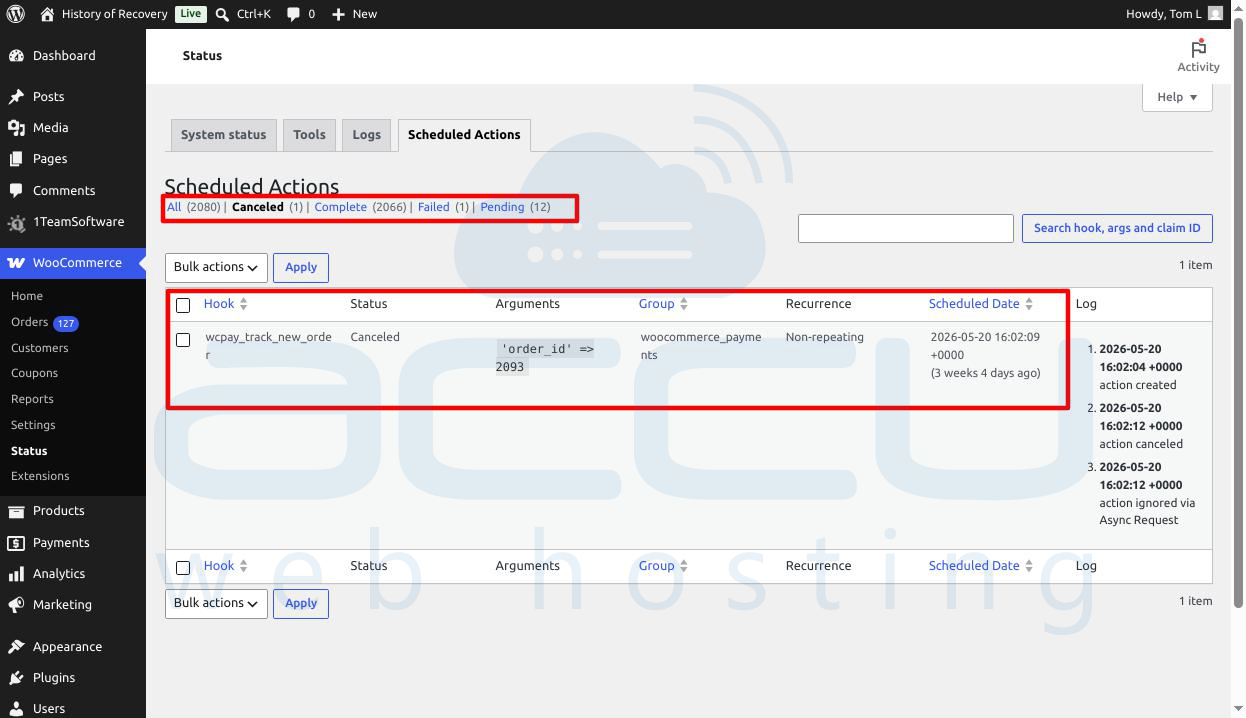
2. Sort the columns by Hook name or Scheduled Date.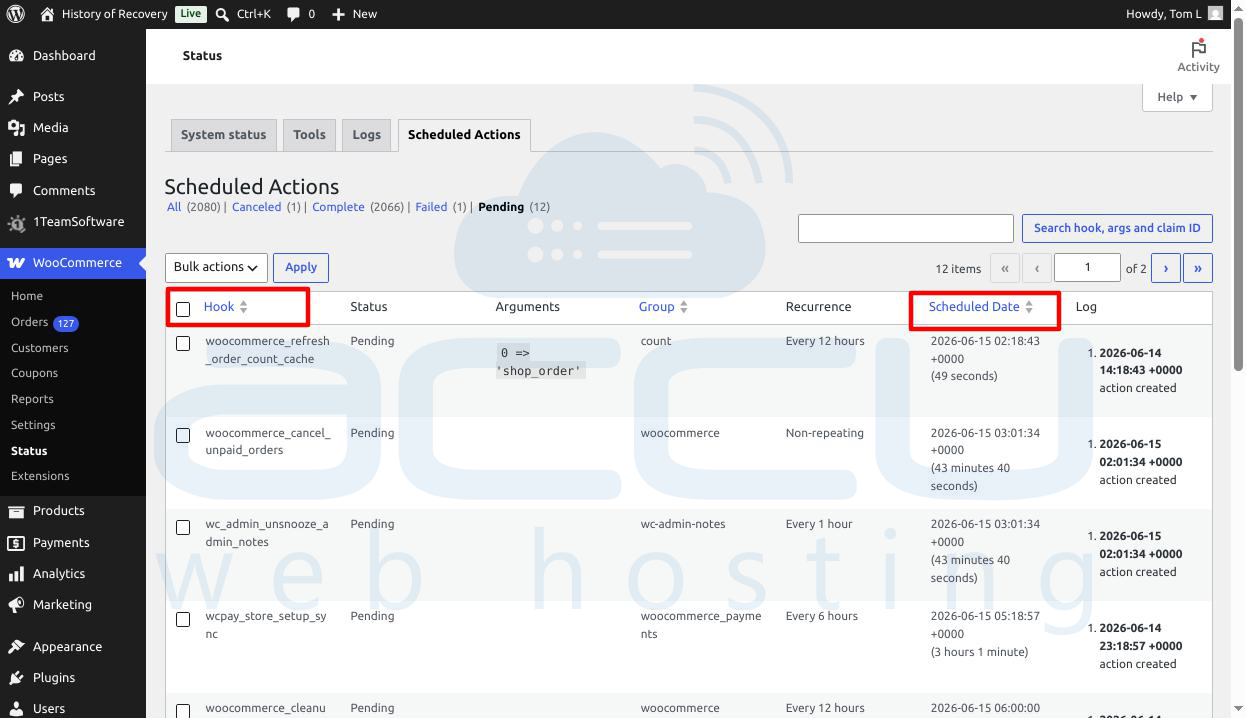
3. Look for repetitive patterns, such as an action scheduled to execute every single minute, or rows upon rows of identical tasks throwing fatal error strings in their logs. This visualization makes it easy to spot a plugin that has gone rogue.
Method 5: Disable Suspected Plugins and Monitor Growth Rate
If database queries and file searches yield ambiguous names, or if multiple plugins appear to be misbehaving simultaneously, you can use a process of elimination to confirm the source.
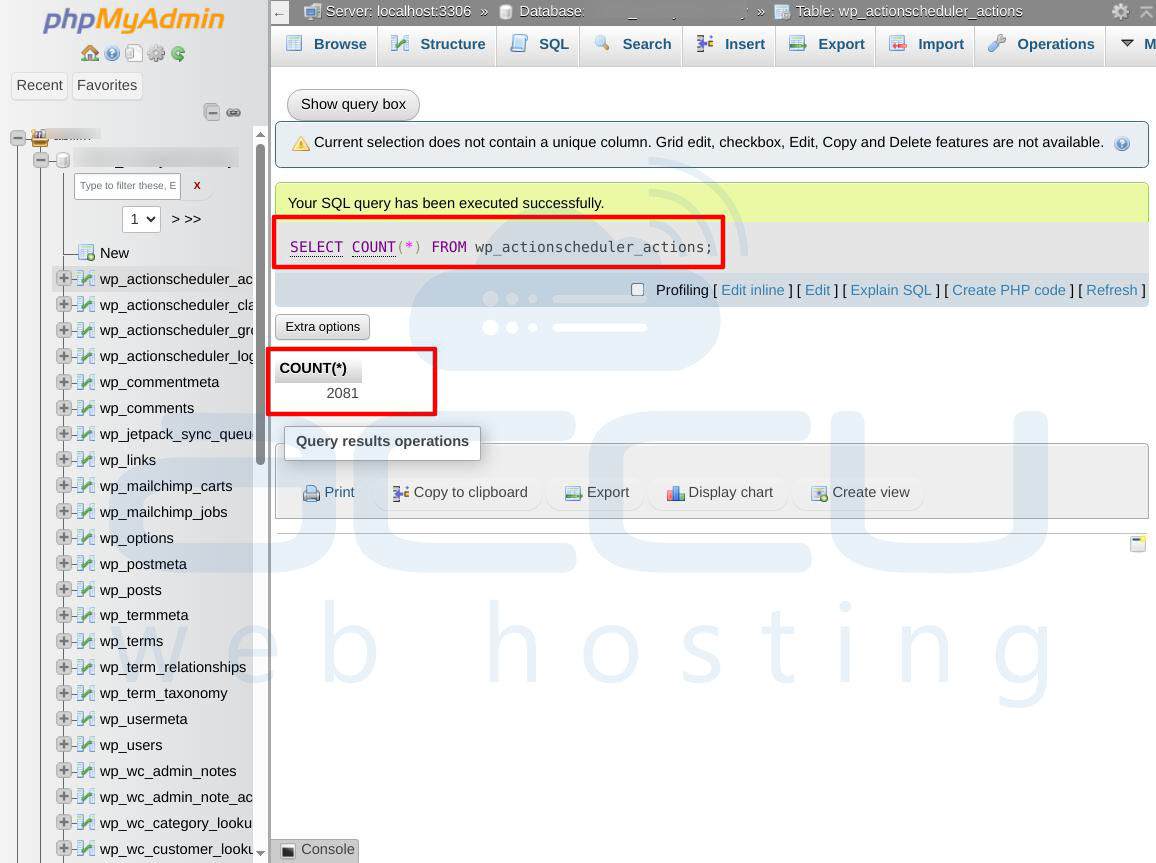
Step 1: Establish a Performance Baseline
-
Go to phpMyAdmin → SQL tab.
-
Run a simple, absolute count query to see exactly how many records currently inhabit the main table:
SELECT COUNT(*) FROM wp_actionscheduler_actions;
-
Note the exact integer returned.
Step 2: Deactivate the Target Plugin
-
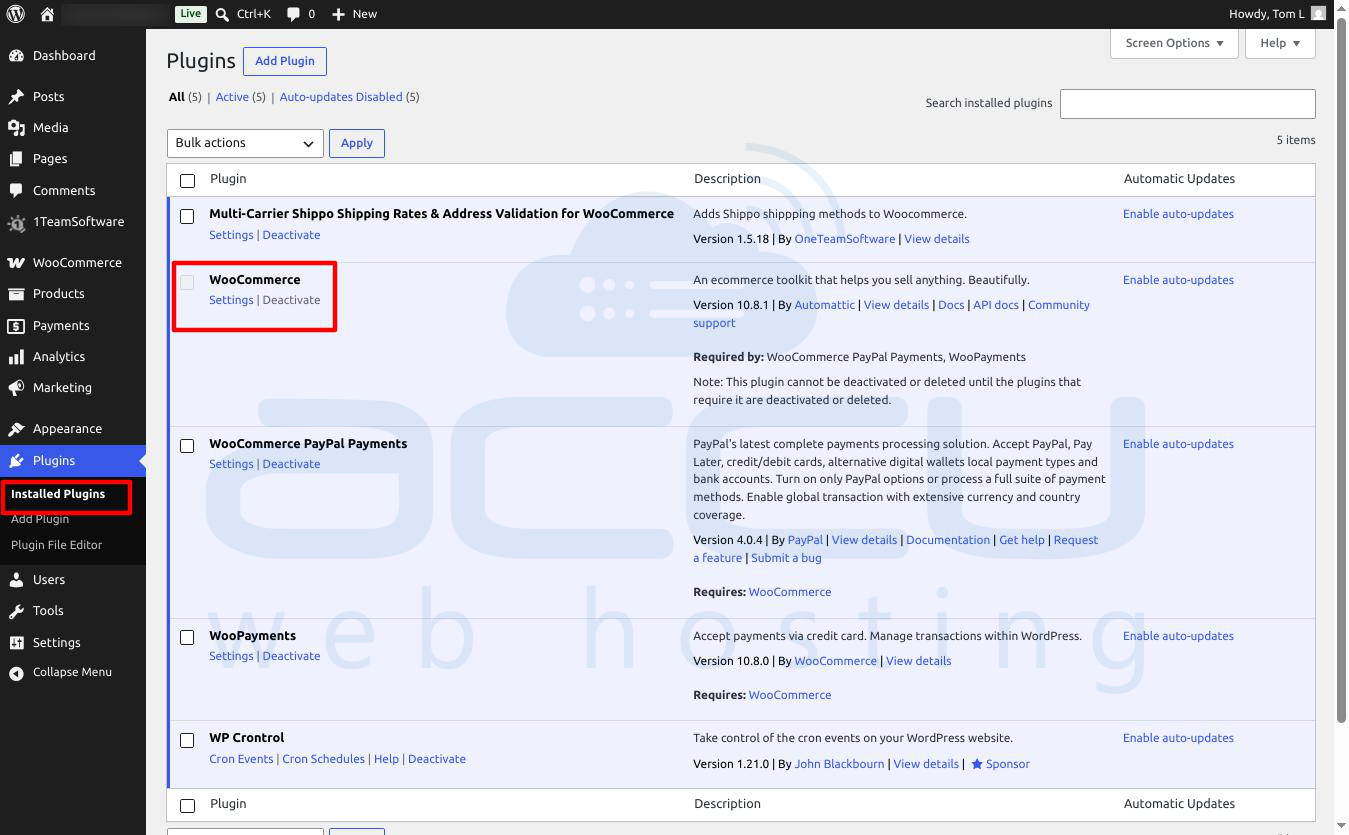
Go to your WordPress admin dashboard → Plugins → Installed Plugins.
-
Select the plugin you suspect is causing the problem and click Deactivate.
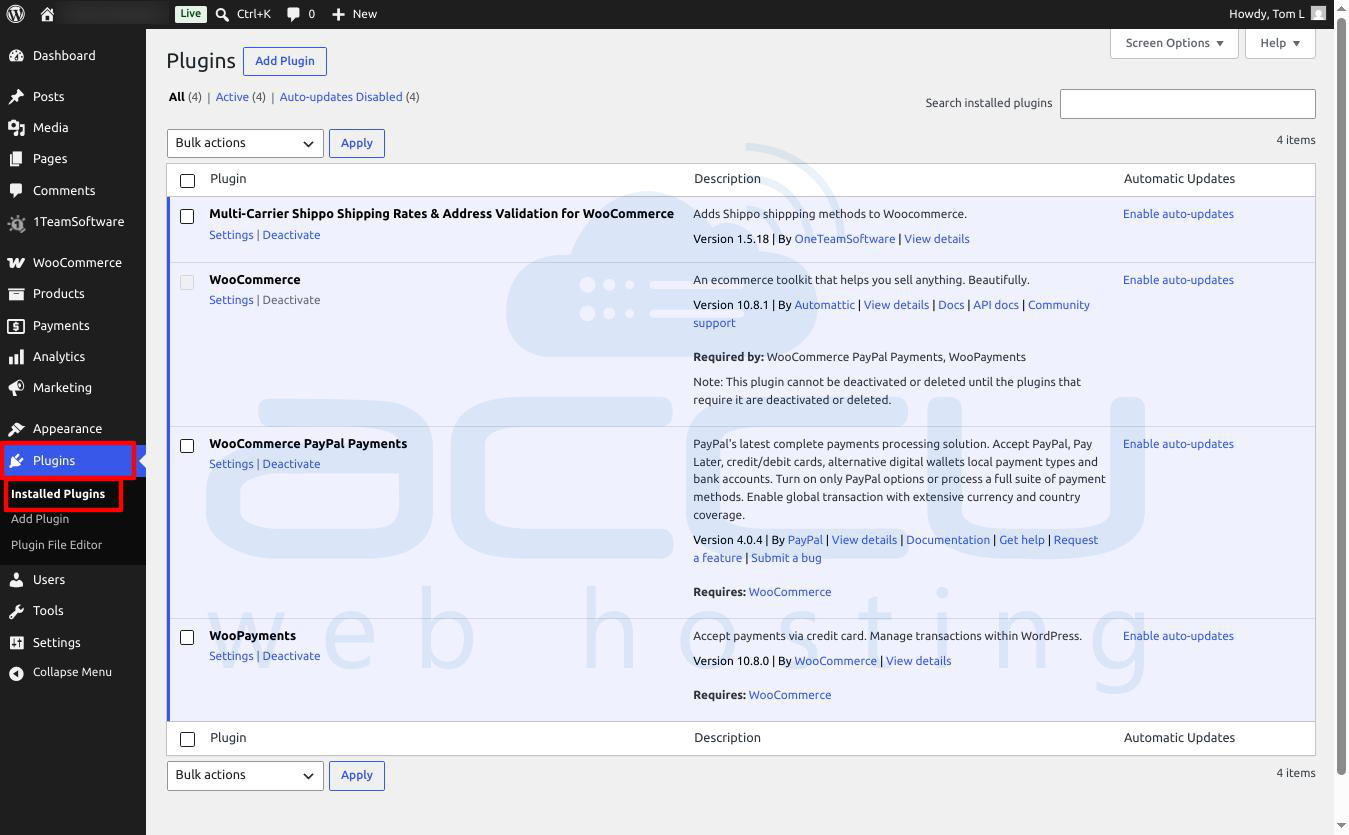
3. Allow the website to run under normal user traffic for 15 to 30 minutes.
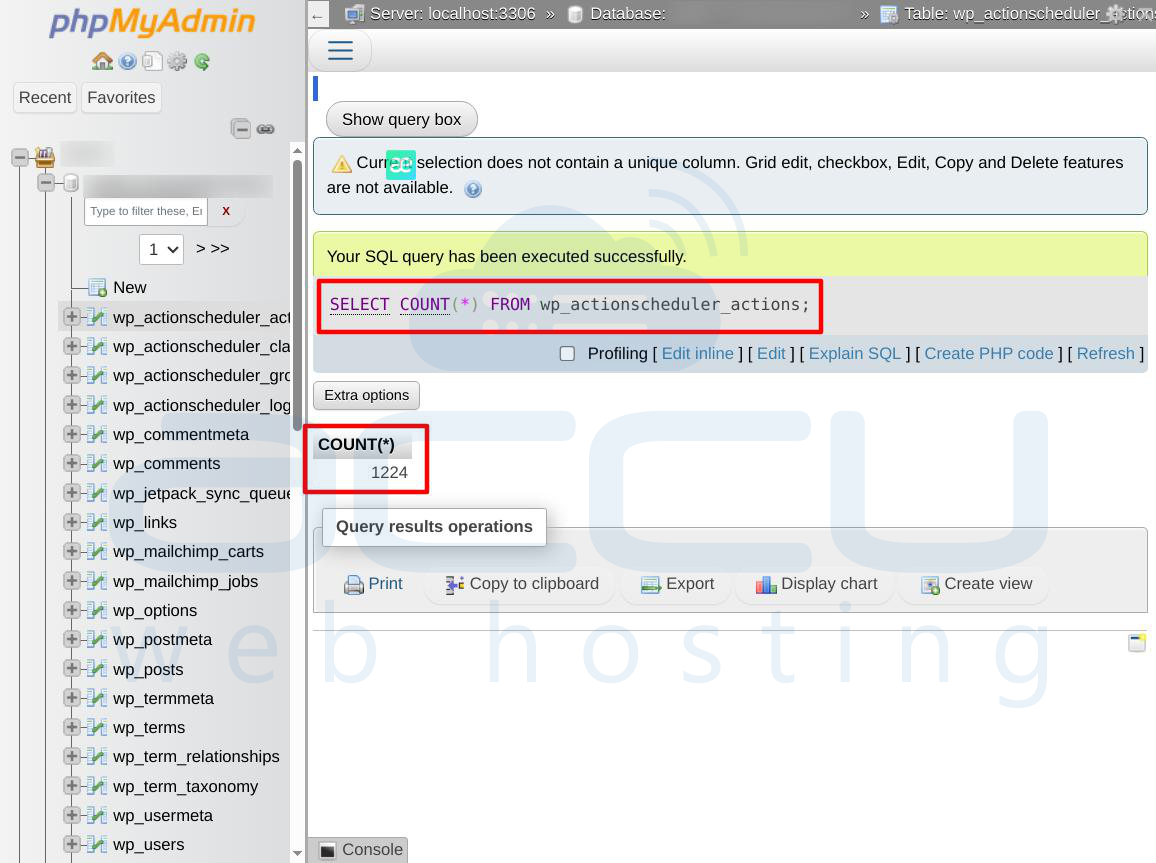
Step 3: Re-Evaluate Growth Rate
-
Run the absolute count query again:
SELECT COUNT(*) FROM wp_actionscheduler_actions;
2. If the total number has completely halted or its rate of growth dropped dramatically, you have found the culprit.
3. Alternatively, you can run a targeted grouping query during this window to see if a specific hook completely stopped printing new logs:
SELECT hook, COUNT(*) FROM wp_actionscheduler_actions GROUP BY hook ORDER BY COUNT(*) DESC;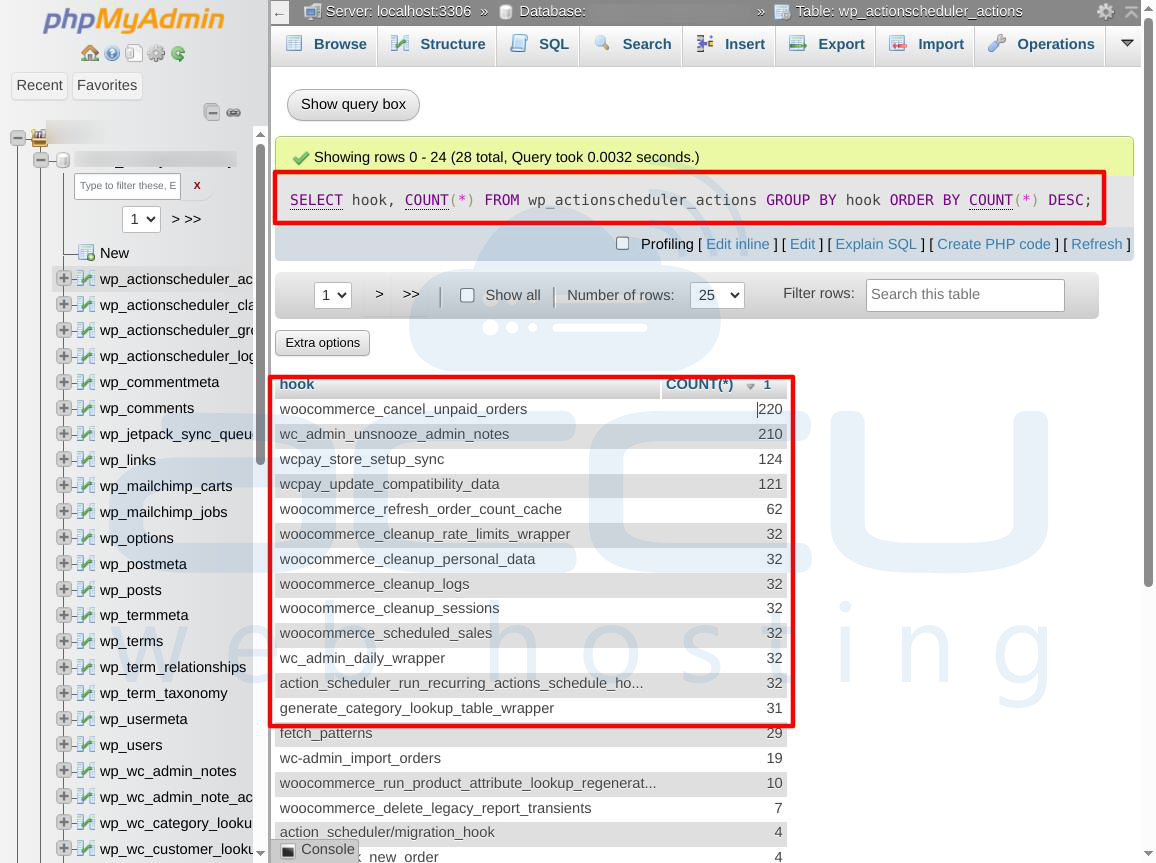
Summary: How to Clean Up the Bloated Tables Safely?
Once you have identified the misbehaving plugin, you should fix the underlying issue by updating the plugin, adjusting its internal settings, or contacting its developers.
After addressing the root cause, you can safely wipe out the millions of bloated log entries to reclaim your server's disk space and optimize database performance.
Recommended method to configure automatic cleanup and retention policies for WordPress Action Scheduler logs
By default, the Action Scheduler framework retains logs of completed, failed, or canceled actions for 30 days before purging them. On high-traffic websites or sites running intensive plugins like MailPoet, Rank Math, or WooCommerce Subscriptions, a 30-day window can capture millions of rows, leading to severe database lag.
Implementing an automated cleanup policy ensures that old logs are recycled systematically, keeping your database lean and your server responsive. Below are five comprehensive, step-by-step methods to configure and enforce these retention policies.
Method 1: Verify and Enable WP-Cron (The Core Framework)
Action Scheduler does not clear its own tables on a real-time basis. Instead, it hooks into the native WordPress Cron system (wp-cron.php) to execute its background pruning routines. If WP-Cron is broken or disabled, old actions will accumulate indefinitely.
Step-by-Step Implementation:
-
Access the WordPress Dashboard: Log in to your WordPress administrative area.
-
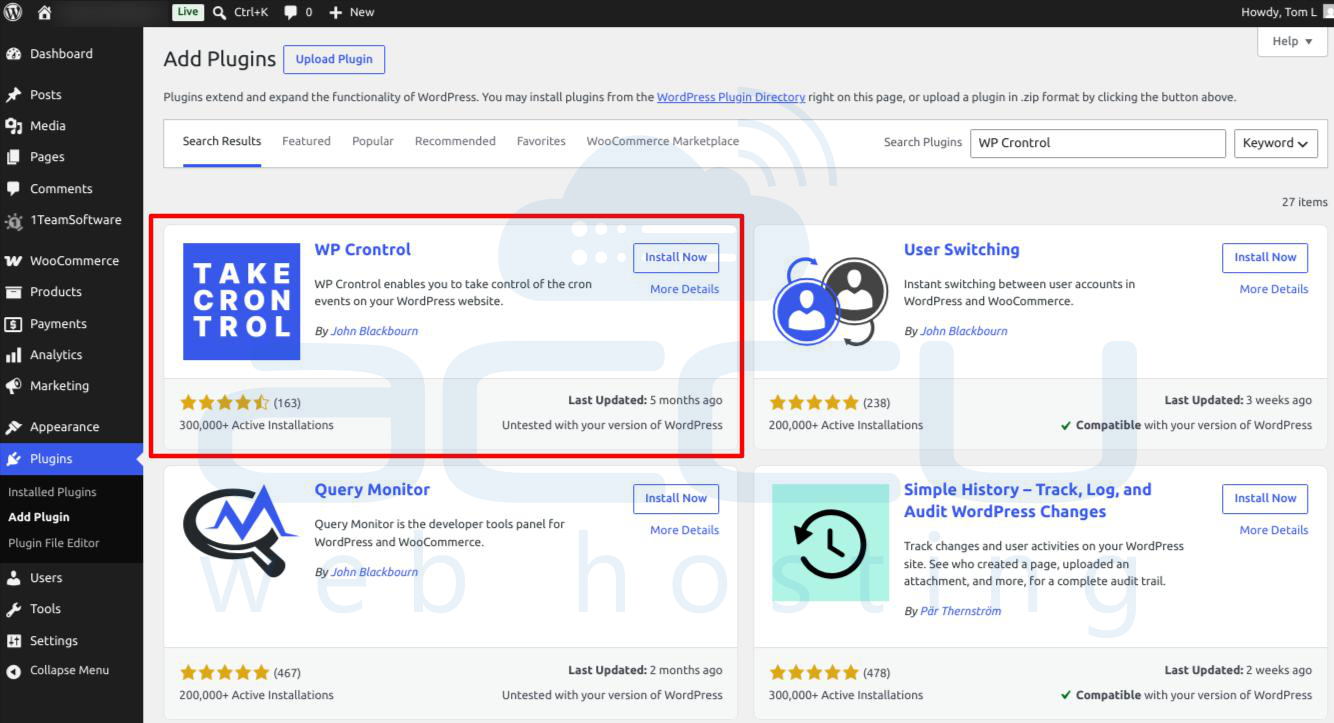
Install a Cron Monitor: Go to Plugins → Add New and install WP Crontrol (a reliable utility to inspect scheduled system tasks).
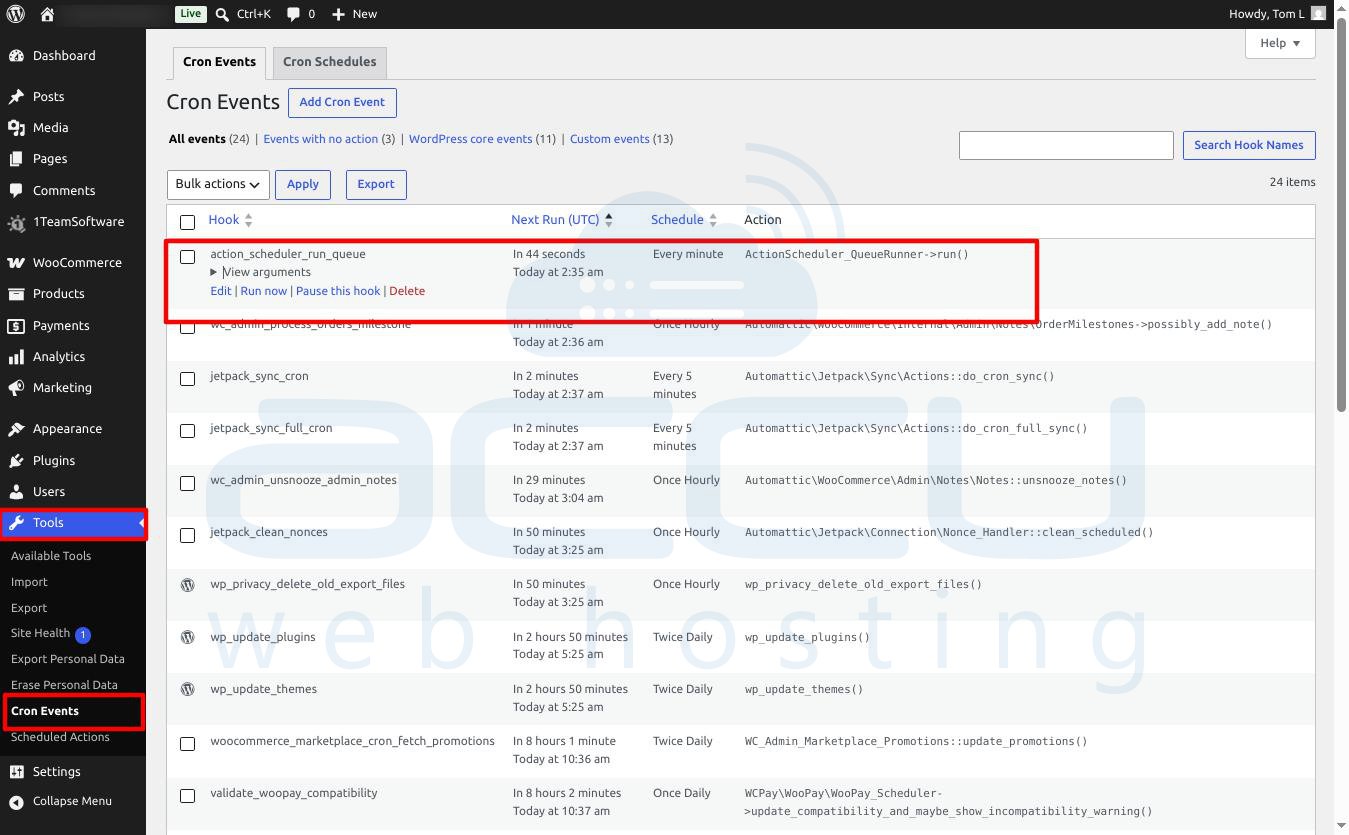
3. Verify the Clean Routines: Navigate to Tools → Cron Events. Scroll through the list and look for the hook named action_scheduler_run_queue. Ensure its status is active and scheduled to run at regular, frequent intervals.
-
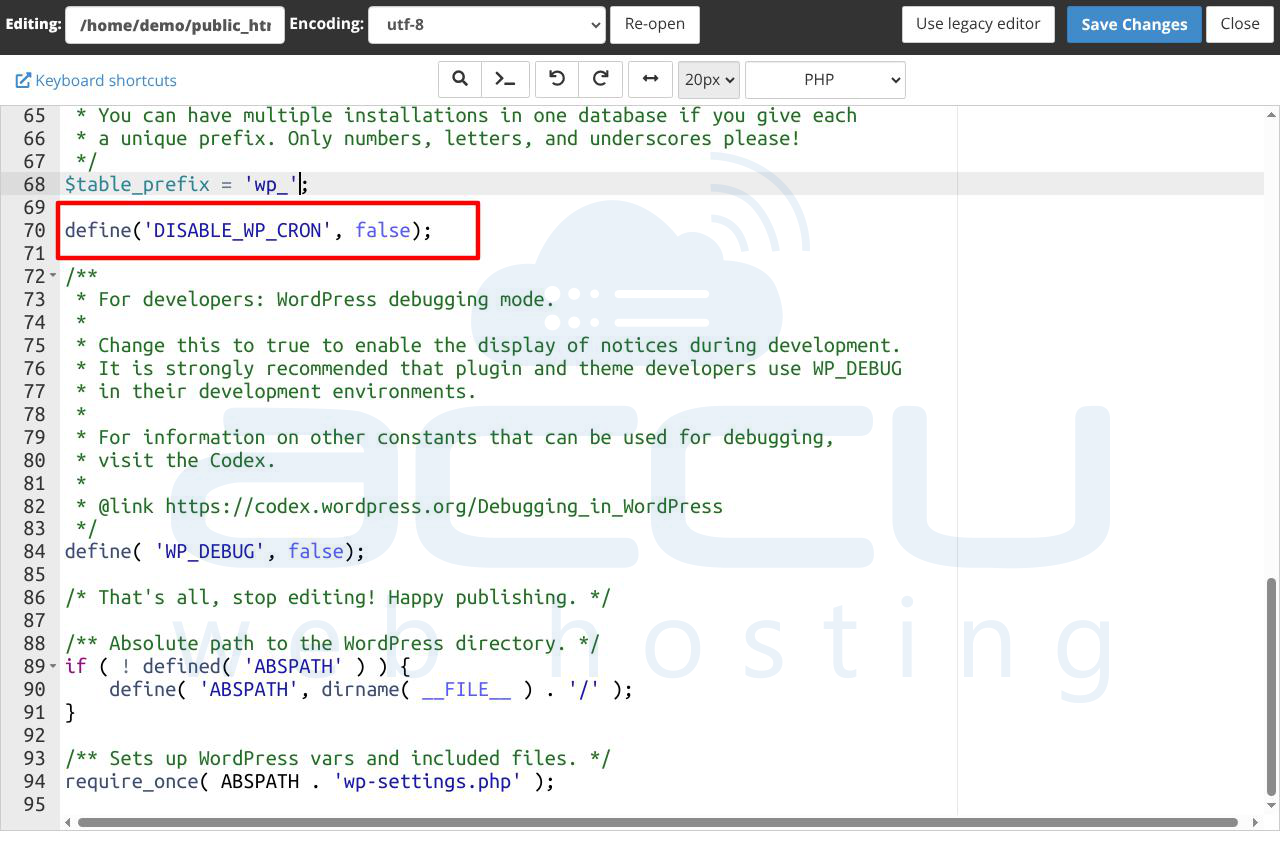
Inspect the Core Configuration File: Open your hosting provider's File Manager or connect via FTP, and open the wp-config.php file located in your root directory.
-
Remove Restrictions: Scan the file for the following line:
define('DISABLE_WP_CRON', true);
If this line exists, WP-Cron is disabled. Change `true` to `false`, or delete the line entirely to re-enable automatic core scheduling.
Confirm Automation: Check back on your Tools → Scheduled Actions page over the next 24 hours to ensure that processed actions are being dropped systematically.
Method 2: Adjust Retention Periods via Individual Plugin Settings
Many premium plugins that rely heavily on background data processing build custom retention and pruning tools directly into their native administrative setting panels.
Step-by-Step Implementation:
-
Locate the Heavy App:
Log in to your WordPress dashboard and navigate to the primary settings panel of the plugin generating the highest task load (e.g., WooCommerce, MailPoet, AutomateWoo, or your preferred backup/import tool).
-
Find the Log Controls: Look for tabs labeled Advanced Settings, Tools or Privacy Specifically search for configuration options matching these terms:
Log Retention
Data Purging / Cleanup
Historical Data Settings
3. Shorten the Window: Reduce the storage timeline. If the plugin defaults to keeping data for 30 to 90 days, scale it back down to a more sustainable 7 days or 15 days.
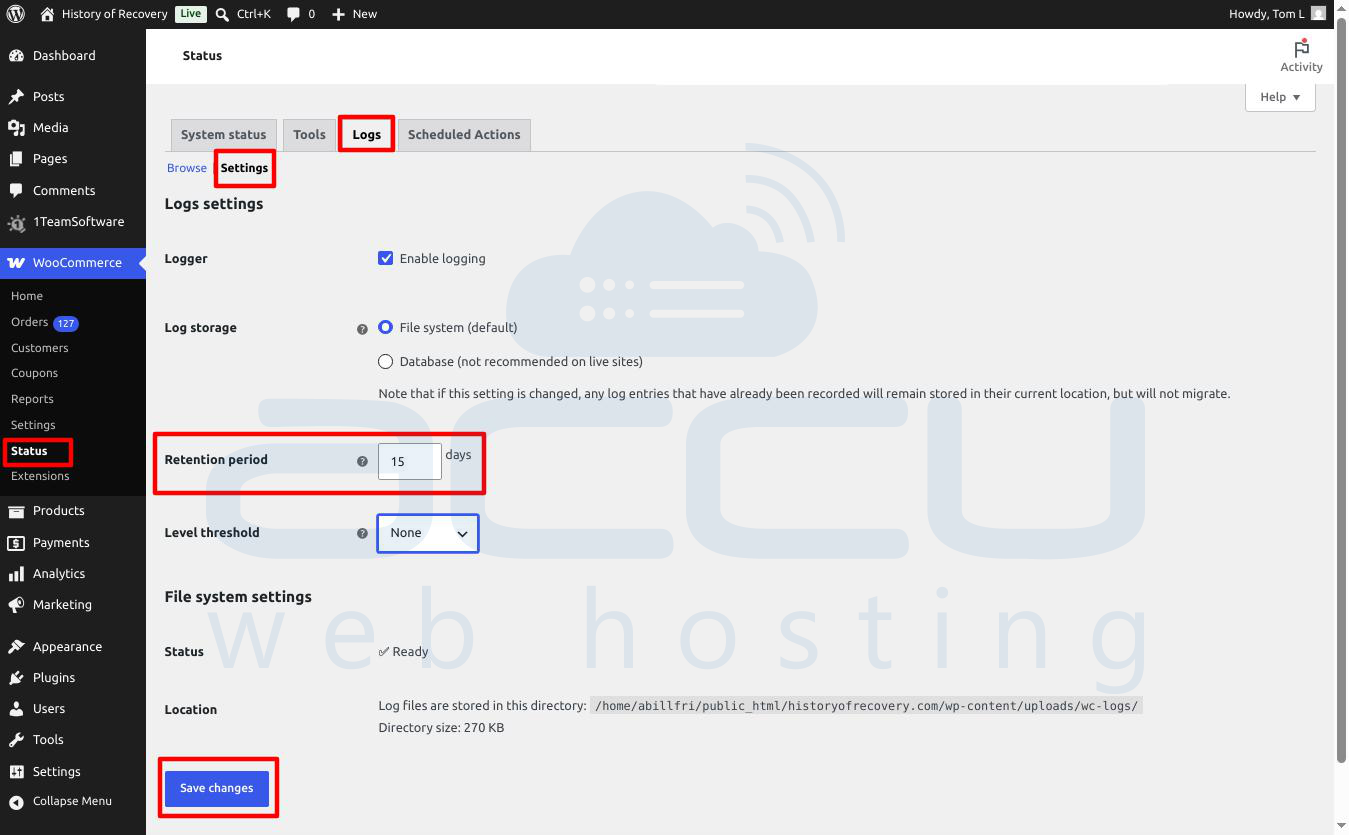
4. Commit Changes: Save your configurations. The plugin will now modify its internal scheduling instructions to flush out expired background entries faster.
Method 3: Configure a Custom Retention Policy via Code (Most Efficient)
If you have administrative access to your site's codebase, you can use a native Action Scheduler filter to universally override the default 30-day retention period. This forces the system to drop completed and canceled logs much faster.
Step-by-Step Implementation:
-
Access Theme Files: Log in to your hosting File Manager or use an FTP client.
-
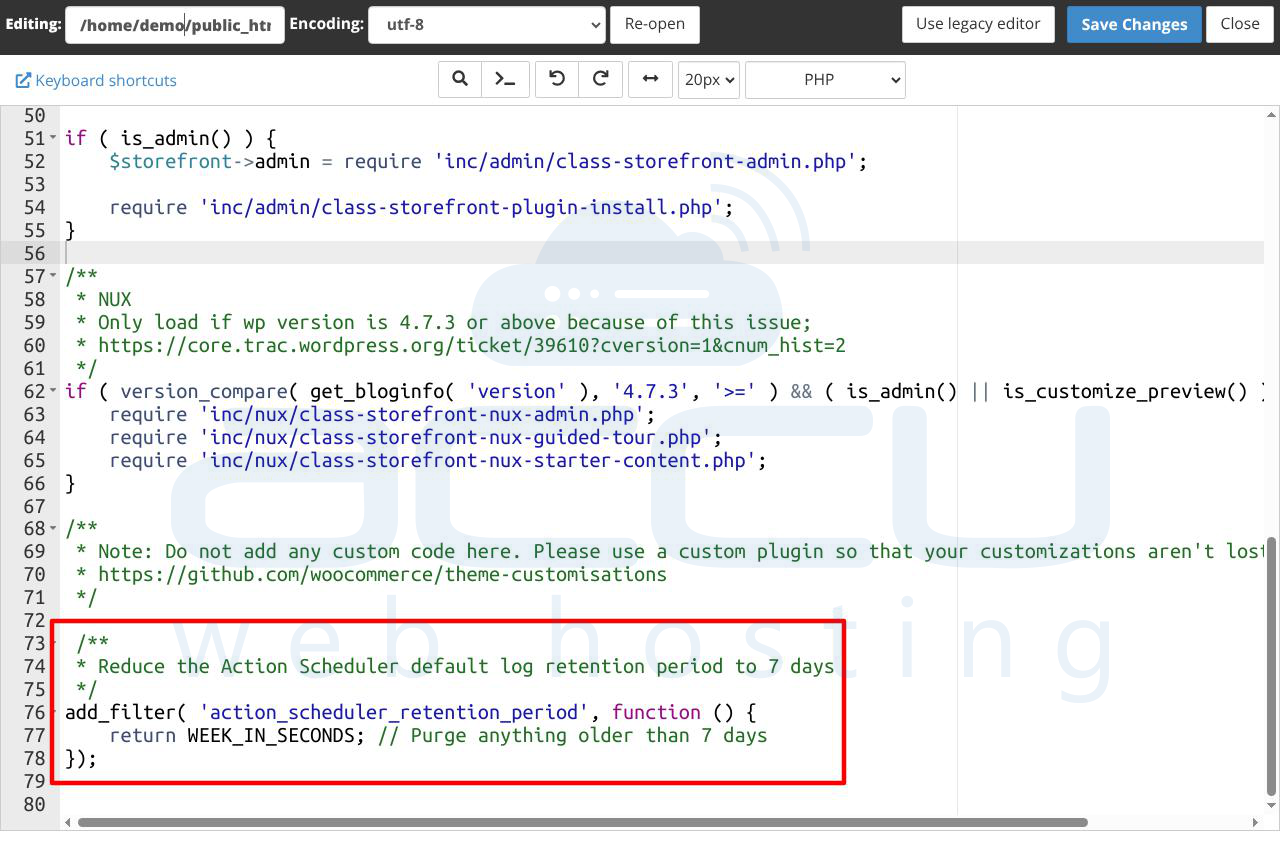
Locate your Functions File: Navigate to `/wp-content/themes/your-active-child-theme/functions.php`.(Note: Using a child theme or a site-specific code snippets plugin prevents your changes from being overwritten during theme updates).
-
Inject the Filter: Open the file in an editor and append the following code snippet to the bottom of the file:
/**
* Reduce the Action Scheduler default log retention period to 7 days
*/
add_filter( 'action_scheduler_retention_period', function () {
return WEEK_IN_SECONDS; // Purge anything older than 7 days
});
Alternative Time Intervals:
You can adjust the return value to match your precise data retention requirements:
-
For a 7-Day Window: Use return WEEK_IN_SECONDS;
-
For a 14-Day Window: Use return 14 * DAY_IN_SECONDS;
-
For a 3-Day Window (Ua-Lean): Use return 3 * DAY_IN_SECONDS;
-
Save and Run: Save your edits. The next time WP-Cron triggers the Action Scheduler queue, any task completed or canceled outside of your new window will be deleted from the database.
Method 4: Schedule Manual or Scripted Cleanups via phpMyAdmin
If your database is already heavily bloated, background PHP scripts might timeout before they can prune the data. You can bypass PHP memory limits by issuing a relational cleanup command directly inside phpMyAdmin.
Step-by-Step Implementation:
-
Open your Database Manager: Open phpMyAdmin through your hosting control panel and click on your active WordPress database.
-
Secure a Safeguard Backup: Click the Export tab at the top, select the "Quick" method, and click Go to download a structural backup copy of your database before modifying data.
-
Execute the Purge Query: Click on the SQL tab and execute the following query. This statement targets the core action table, cross-references logs tied to those actions by ID, and deletes entries marked complete or canceled that are older than 30 days:
DELETE a, l
FROM wp_actionscheduler_actions a
LEFT JOIN wp_actionscheduler_logs l
ON a.action_id = l.action_id
WHERE a.status IN ('complete', 'canceled')
AND a.scheduled_date_gmt < DATE_SUB(UTC_TIMESTAMP(), INTERVAL 30 DAY);

Note: You can change INTERVAL 30 DAY to INTERVAL 7 DAY if you want to clear out more historical data).
-
Optimize the Disk Space: Deleting thousands of rows leaves behind structural "gaps" or overhead in your database files. To reclaim physical disk space immediately, run this optimization statement right after the deletion query finishes:
OPTIMIZE TABLE wp_actionscheduler_actions;
OPTIMIZE TABLE wp_actionscheduler_logs;
Method 5: Monitor and Manage Scheduled Actions from WordPress
Automated cleanup rules require routine human oversight to catch new system conflicts before they escalate into out-of-control database bloat.
Step-by-Step Implementation:
-
Locate the Admin Interface: In WordPress, head over to Tools → Scheduled Actions (or WooCommerce → Status → Scheduled Actions).
 2. Audit the Filters: Systematically click through the status tabs:
- Complete: Check the timestamps. If you applied Method 3, you shouldn't see logs stretching back past 7 days.
- Failed: Inspect these regularly. If tasks fail continuously, investigate the source plugin. Failed tasks do not always auto-purge because the system treats them as errors requiring administrative review.
- Pending: If this number grows consistently into the tens of thousands, it means your current server configuration cannot process actions as fast as plugins are adding them.
3. Resolve Core Errors: If a specific background plugin is throwing repetitive script failures, update the plugin, reset its underlying connection tokens, or replace it to stop the error loops from filling up your storage.
Summary of the Recommended Best Practices
To maintain a healthy WordPress database without running manual queries constantly, implement a tiered maintenance strategy based on your situation:
For standard site owners with access only to the WordPress Dashboard and hosting control panel, the best path is to verify that WP-Cron is enabled and running smoothly, then check individual plugin settings to shorten any native retention paths.
For developers or advanced users with file access, the most reliable approach is to implement the action_scheduler_retention_period filter directly inside the theme's functions file to enforce a permanent 7-day retention limit.
For emergency recovery when a database crashes or locks up due to table size limits, the immediate solution is to log directly into phpMyAdmin, execute the manual DELETE and OPTIMIZE commands to clear the heavy backlog, and then apply the code filter to prevent the logs from building up again.
Conclusion
Excessive Action Scheduler entries are usually caused by a plugin generating large numbers of scheduled, failed, or pending tasks. To identify the source, review Action Scheduler hooks through phpMyAdmin, the Scheduled Actions interface, or plugin files. Once the responsible plugin is identified, resolve the underlying issue, remove unnecessary logs, and implement retention policies to prevent future database growth.
