Introduction:
TigerBeetle is a high-performance distributed database designed for financial transactions and accounting systems. It is built for reliability, speed, and strong consistency, making it suitable for fintech platforms, payment systems, ledgers, and banking applications.
In this article, we will explain how to deploy TigerBeetle on a Debian 12 VPS using the official binary release. The tutorial also covers creating a database replica, starting the server, and testing the deployment.

Prerequisites:
Before you begin, make sure you have:
- A Debian 12 VPS
- Root or sudo user access
- At least 2 GB RAM recommended
Update your system packages first:
sudo apt update && sudo apt upgrade -y

Install required utilities:
sudo apt install wget curl unzip -y

Step 1: Download TigerBeetle:
Visit the official download page:
You can download the latest Linux binary directly using:
wget https://github.com/tigerbeetle/tigerbeetle/releases/latest/download/tigerbeetle-x86_64-linux.zip

Extract the archive:
unzip tigerbeetle-x86_64-linux.zip
Make the binary executable:
chmod +x tigerbeetle
Move it to a system path:
sudo mv tigerbeetle /usr/local/bin/
Verify the installation:
tigerbeetle version
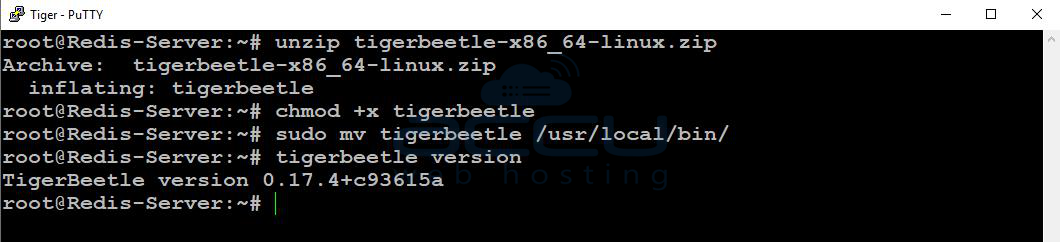
You should see the installed version displayed.
Step 2: Create a Data Directory
Create a dedicated directory for TigerBeetle data:
sudo mkdir -p /var/lib/tigerbeetle
Set proper permissions:
sudo chown -R $USER:$USER /var/lib/tigerbeetle
Move into the directory:
cd /var/lib/tigerbeetle

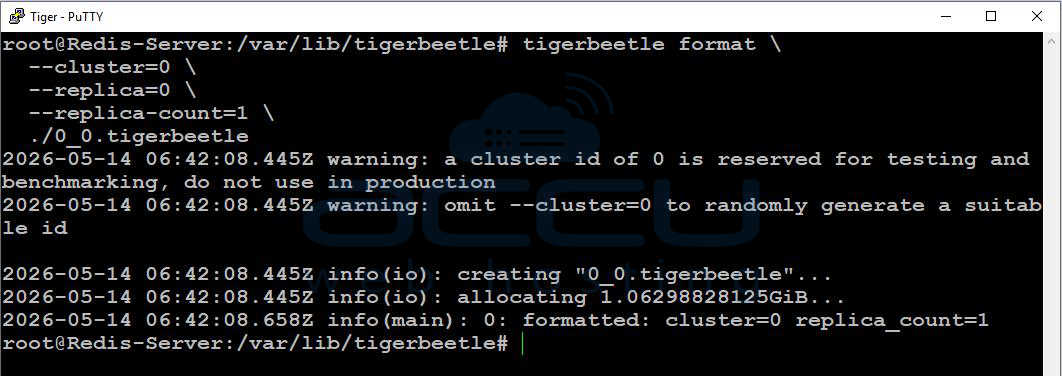
Step 3: Format the TigerBeetle Replica
TigerBeetle requires a replica file before starting.
Create the replica:
tigerbeetle format \
--cluster=0 \
--replica=0 \
--replica-count=1 \
./0_0.tigerbeetle

Explanation:
- --cluster=0 defines the cluster ID
- --replica=0 defines the replica number
- --replica-count=1 specifies a single-node deployment
After completion, a replica file named 0_0.tigerbeetle will be created.
Step 4: Start the TigerBeetle Server
Run the server with:
tigerbeetle start \
--addresses=3000 \
./0_0.tigerbeetle
TigerBeetle will now listen on port 3000.
You should see logs indicating that the server has started successfully.
Step 5: Create a Systemd Service
To keep TigerBeetle running in the background and start automatically on boot, create a systemd service.
Create the service file:
sudo nano /etc/systemd/system/tigerbeetle.service
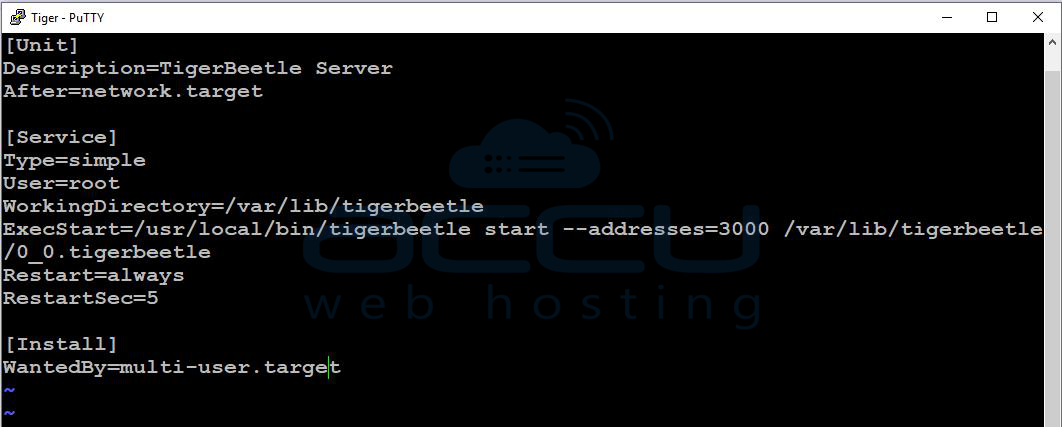
Add the following configuration:
[Unit]
Description=TigerBeetle Server
After=network.target
[Service]
Type=simple
User=root
WorkingDirectory=/var/lib/tigerbeetle
ExecStart=/usr/local/bin/tigerbeetle start --addresses=3000 /var/lib/tigerbeetle/0_0.tigerbeetle
Restart=always
RestartSec=5
[Install]
WantedBy=multi-user.target
Save the file and reload systemd:
sudo systemctl daemon-reload
Enable the service:
sudo systemctl enable tigerbeetle
Start the service:
sudo systemctl start tigerbeetle
Check service status:
sudo systemctl status tigerbeetle

Conclusion:
You have successfully deployed TigerBeetle on a Debian 12 VPS. Your server is now configured to run automatically using systemd and is ready for integration with applications that require fast and reliable financial transaction processing.
For production deployments, consider using multiple replicas, secure networking, backups, and monitoring to improve reliability and fault tolerance.
If you encounter any issues during installation, please feel free to contact us via chat or support. Our support team will assist you with the installation process.
