Introduction:
If you are managing virtual machines using the Virtualizor panel, you may sometimes need to move a VPS from one server (node) to another within the same cluster.
This process is called VPS Migration.
In this guide, we will clearly explain:
- What VPS migration is
- The difference between Offline and Live migration
- When to use each method
- Step-by-step instructions
- Important precautions before starting
Best Practices:
✔ Always take a backup before migration✔ Use Offline migration for maximum safety✔ Perform migration during low-traffic hours
What is VPS Migration?
VPS Migration means transferring a Virtual Private Server from one physical server (node) to another server within the same Virtualizor cluster.
You may need to migrate a VPS for reasons such as:
- Hardware upgrades
- Node overload
- Maintenance work
- Hardware failure
- Load balancing
- Storage migration
Virtualizor provides a simple and secure way to perform this process.
Types of VPS Migration in Virtualizor:
Virtualizor supports two migration types:
| Migration Type | Downtime | Recommended For |
| Offline Migration | Yes (VPS is powered off) | Safe, simple migrations |
| Live Migration | Minimal or no downtime | Production servers |
1️: Offline VPS Migration
Offline migration means the VPS is shut down before being moved. This ensures full data consistency and is considered the safest method.
When to Use Offline Migration?
- When downtime is acceptable
- When strict data consistency is required
- For VPS with large disk sizes
- When there are network or storage compatibility concerns
How Offline Migration Works?
1. The VPS is powered off
2. Disk data is copied to the destination node
3. Configuration is updated
4. The VPS is started on the new node
Step-by-Step: Offline VPS Migration
Step 1: Log in to the Virtualizor Admin Panel
Step 2: Go to VPS List
Navigate to: Virtual Servers → List VPS
Select the VPS you want to migrate.
Step 3: Shut Down the VPS
Click Shutdown and wait until the status shows Powered Off.
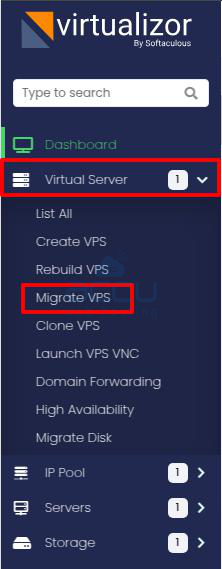
Step 4: Go to Migrate VPS
Navigate to: Virtual Server → Migrate VPS

Step 5: Select Source and Destination Node
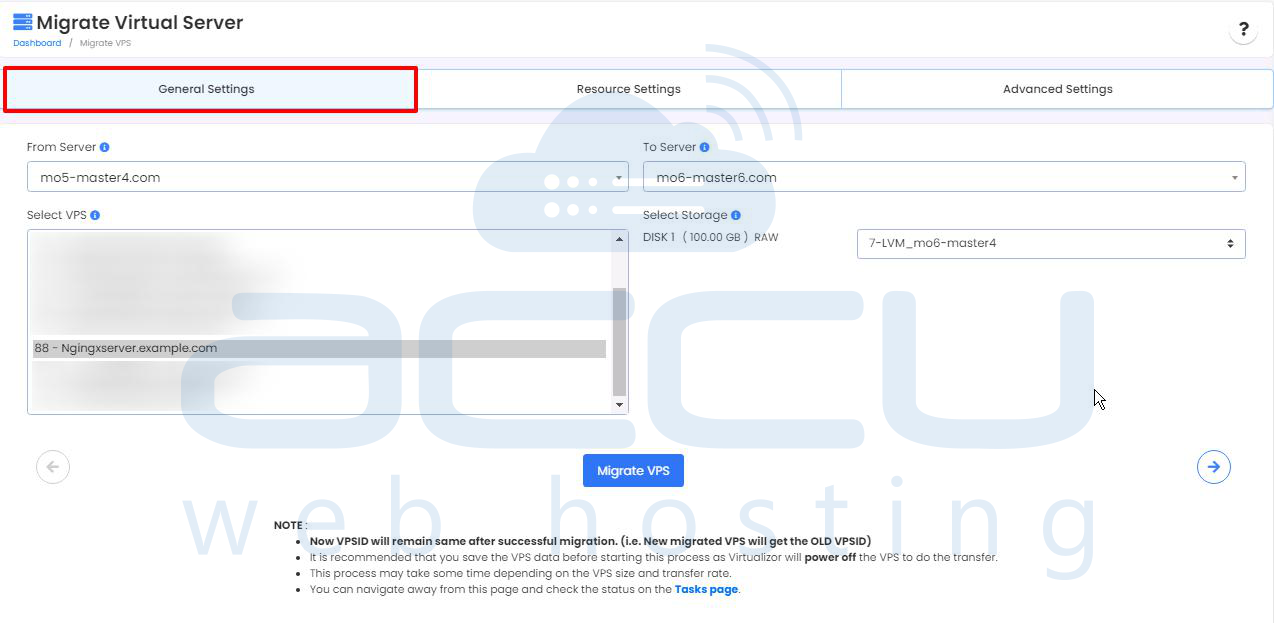
General Settings:
- From Server: Select the source node
- Select VPS: Choose the VPS to migrate
- To Server: Select the destination node

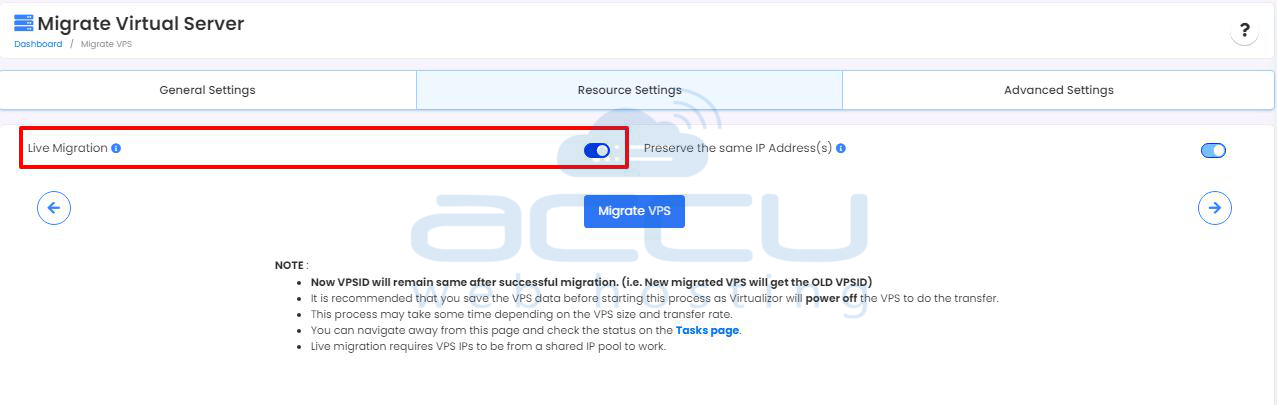
Resource Settings:
- Preserve the same IP Address(s): Enable this if the IP belongs to a common IP pool between both nodes. If not selected, new IPs will be assigned automatically.
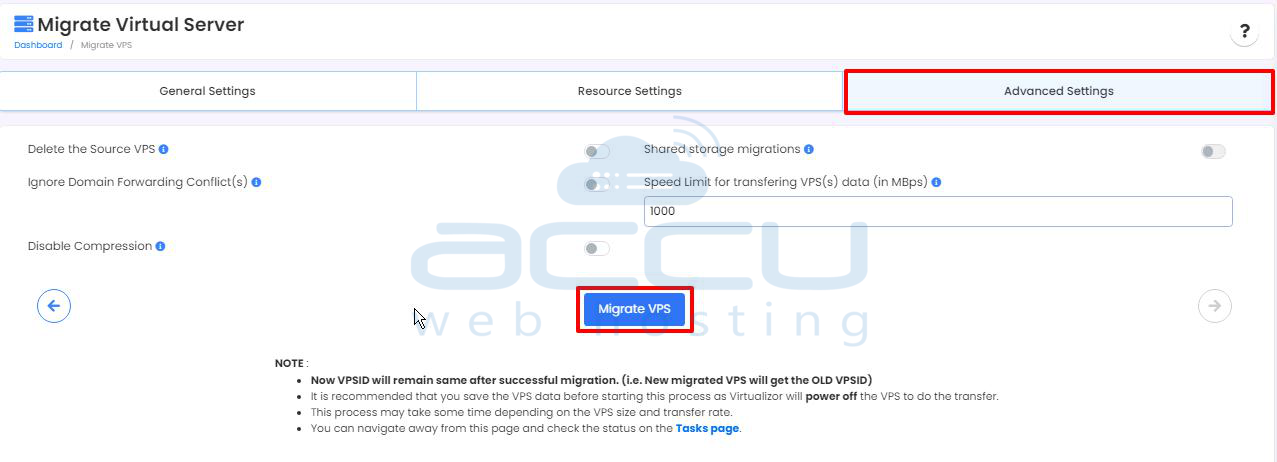
- Speed Limit for transferring VPS data (MBps): You can define a transfer speed. Default speed is 1000 MBps if not specified.
![]()
Important:
- The VPS ID will remain the same after migration.
- It is strongly recommended to take a backup before starting.
- The process duration depends on disk size and transfer speed.
Step 6: Start MigrationClick on the Migrate VPS button.
Virtualizor will:
- Copy disk data
- Update configuration
- Attach the VPS to the new node
Step 7: Start the VPS on the Destination Node
After completion:
- Start the VPS
- Verify services
- Check IP and connectivity
Advantages of Offline Migration
✔ Safest method ✔ No risk of data corruption ✔ Compatible with all virtualization types
2️: Live VPS Migration
Live migration allows you to move a VPS without shutting it down (or with only a few seconds of downtime).
Note: Live migration is mainly available for KVM virtualization and requires proper configuration, often including shared storage.
When to Use Live Migration?
- Production servers
- Business-critical applications
- Websites requiring high uptime
- Load balancing between nodes
How Live Migration Works?
1. VPS memory state is copied
2. Disk data is synchronized
3. Final memory sync occurs
4. VPS switches to the new node
Downtime is usually only a few seconds.
Requirements for Live Migration:
Before performing live migration, ensure:
- Both nodes are in the same cluster
- Same CPU architecture
- Shared storage (such as NFS or Ceph) is configured
- Passwordless SSH is enabled between nodes
- Compatible virtualization type (e.g., KVM)
Step-by-Step: Live VPS Migration
Step 1: Log in to the Virtualizor Admin Panel
Step 2: Navigate to Migrate VPS Virtual Server → Migrate VPS
Step 3: Select Source and Destination Node
General Settings:
- From Server: Select source node
- Select VPS: Choose VPS to migrate
- To Server: Select destination node
Resource Settings:
✔ Select Live Migration option
✔ (Optional) Preserve the same IP Address(s)
✔ Set transfer speed if required
Step 4: Start Migration Click on the Migrate VPS button.
Virtualizor will:
- Synchronize disk data
- Update configuration
- Switch the VPS to the new node
Step 5: Verify Migration
After completion:
- Confirm the VPS is running
- Test SSH access
- Check websites or applications
- Verify resource usage
Quick Comparison: Offline vs Live Migration:
| Feature | Offline | Live |
| Downtime | Yes | Very minimal |
| Safety | Very high | High |
| Complexity | Simple | Moderate |
| Production Safe | Yes | Yes |
| Recommended For | Small / Non-critical VPS | Business-critical VPS |
Conclusion:
Migrating a VPS within the same Virtualizor cluster is straightforward when proper checks are completed.
- Use Offline Migration when downtime is acceptable and maximum safety is required.
- Use Live Migration when uptime is critical, and your infrastructure supports it.
By following the steps and precautions outlined above, you can safely migrate VPS instances with minimal risk and service interruption.
