
Customize your WordPress dashboard to create a more efficient, organized, and user-friendly workspace tailored for client work or personal use to improve accessibility, functionality, and a professional appearance that aligns with your brand identity.
In this guide we will explore the ways to customize the WordPress admin dashboard.
Why Customize the WordPress Admin Dashboard?
The default WordPress dashboard includes many features that may not be useful for all users, especially non-technical ones. Customizing it allows you to remove clutter and emphasize essential tools.
- Improved User Experience: Make navigation easier for admins and clients.
- Better Branding: Customize logos, colors, and login pages to match your brand.
- Improve Security: Hide unnecessary menus and restrict access for certain users.
- Increased Productivity: Remove clutter and keep only essential tools visible.
- Custom Workflow: Add custom widgets, notifications, and shortcuts for efficiency.
How to Customize the WordPress Admin Dashboard?
1. Customize Your Login Page
1. Log in to your WordPress dashboard.
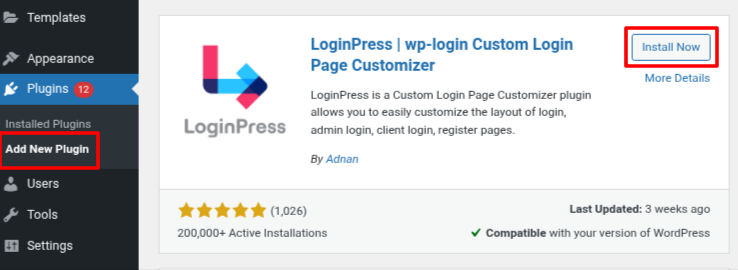
2. Go to Plugins > Add New Plugin.
3. Search for LoginPress in the search bar.
4. Click on Install Now and activate it.
5. Go to the LoginPress > Customizer.
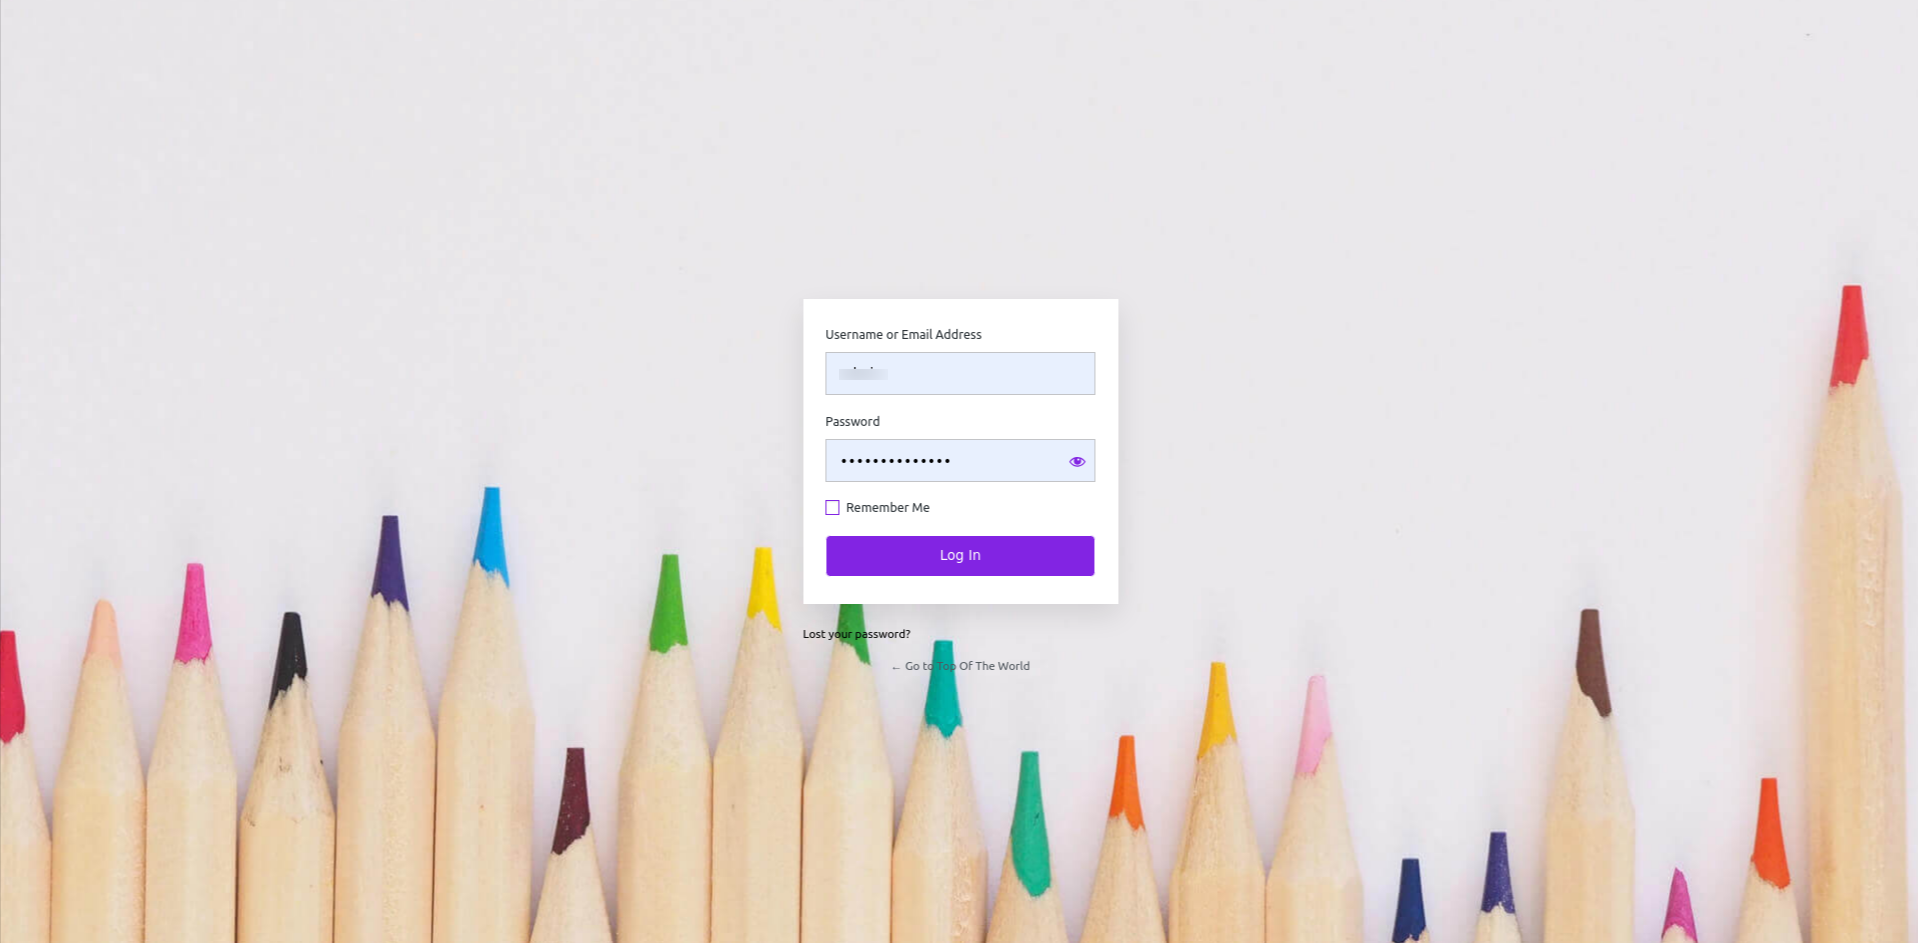
6. Choose the background image for the login screen.

You can customize the WordPress logo, form, and button here.
1. Logo Customization
- Upload a custom logo to replace the default WordPress logo.
- Adjust logo width, height, and bottom spacing for a precise layout.
- If you want to hide the logo, you can disable it.
2. Login Form Customization
- Set form transparency, height, width, and shadows for a sleek design.
- Customize the background color to enhance readability.
- Modify border style, padding, and spacing to refine the layout.
3. Button Styling
- Change the login button color, text, and hover effects for a better UI.
- Adjust the button size and shape to match your branding.
4. Remember Me and Forgot Password Styling
- Customize the text decoration, color, and hover effects.
- Adjust the font size for better visibility.
- Modify the footer background color for a cohesive look.
5. Click on Publish and check your new design by logging out of the current session.
2. Customize Dashboard Color
- Log in to your WordPress Dashboard.
- Click on Edit Profile at the top-right side of the page.
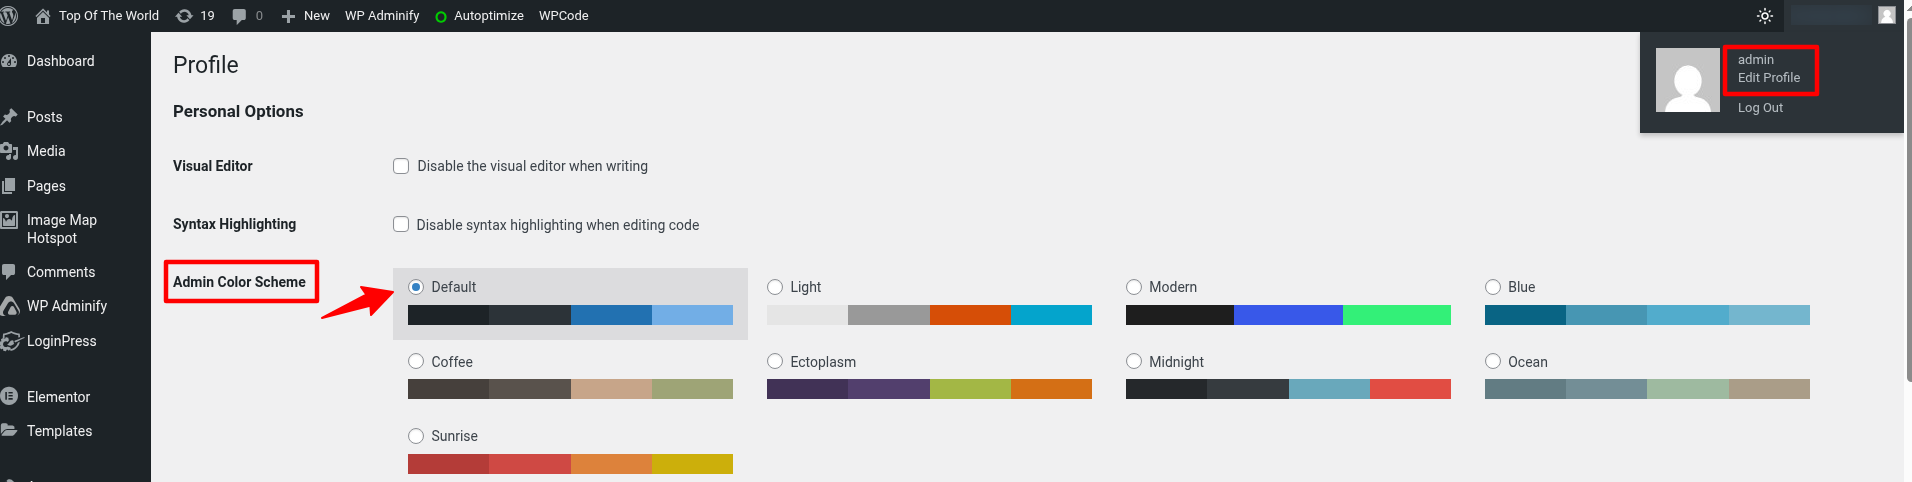
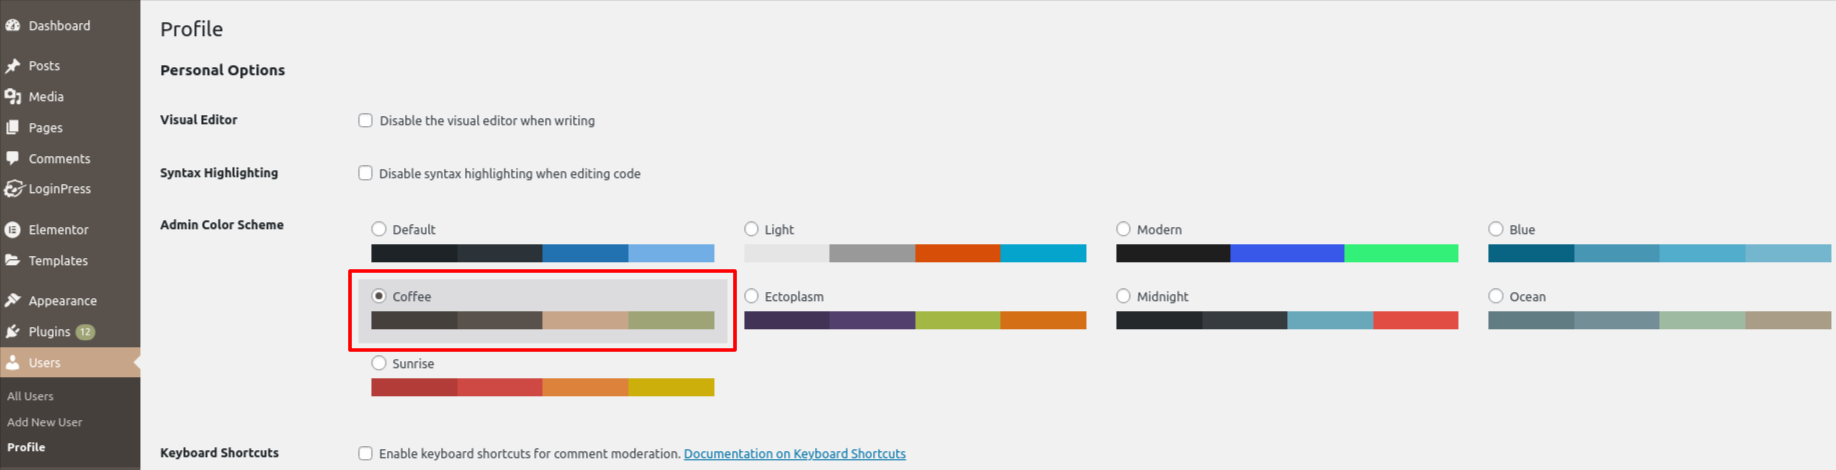
- You can see multiple color options at ”Admin Color Scheme”.
- Choose the color and click on Update Profile.
3. Remove WordPress Dashboard Widgets
When you log in to your WordPress admin area, the first screen you see is the Dashboard. It shows widgets like “At a Glance,” “Quick Draft,” “WordPress Events and News”, “Activity” and more. These are small boxes that display helpful information.
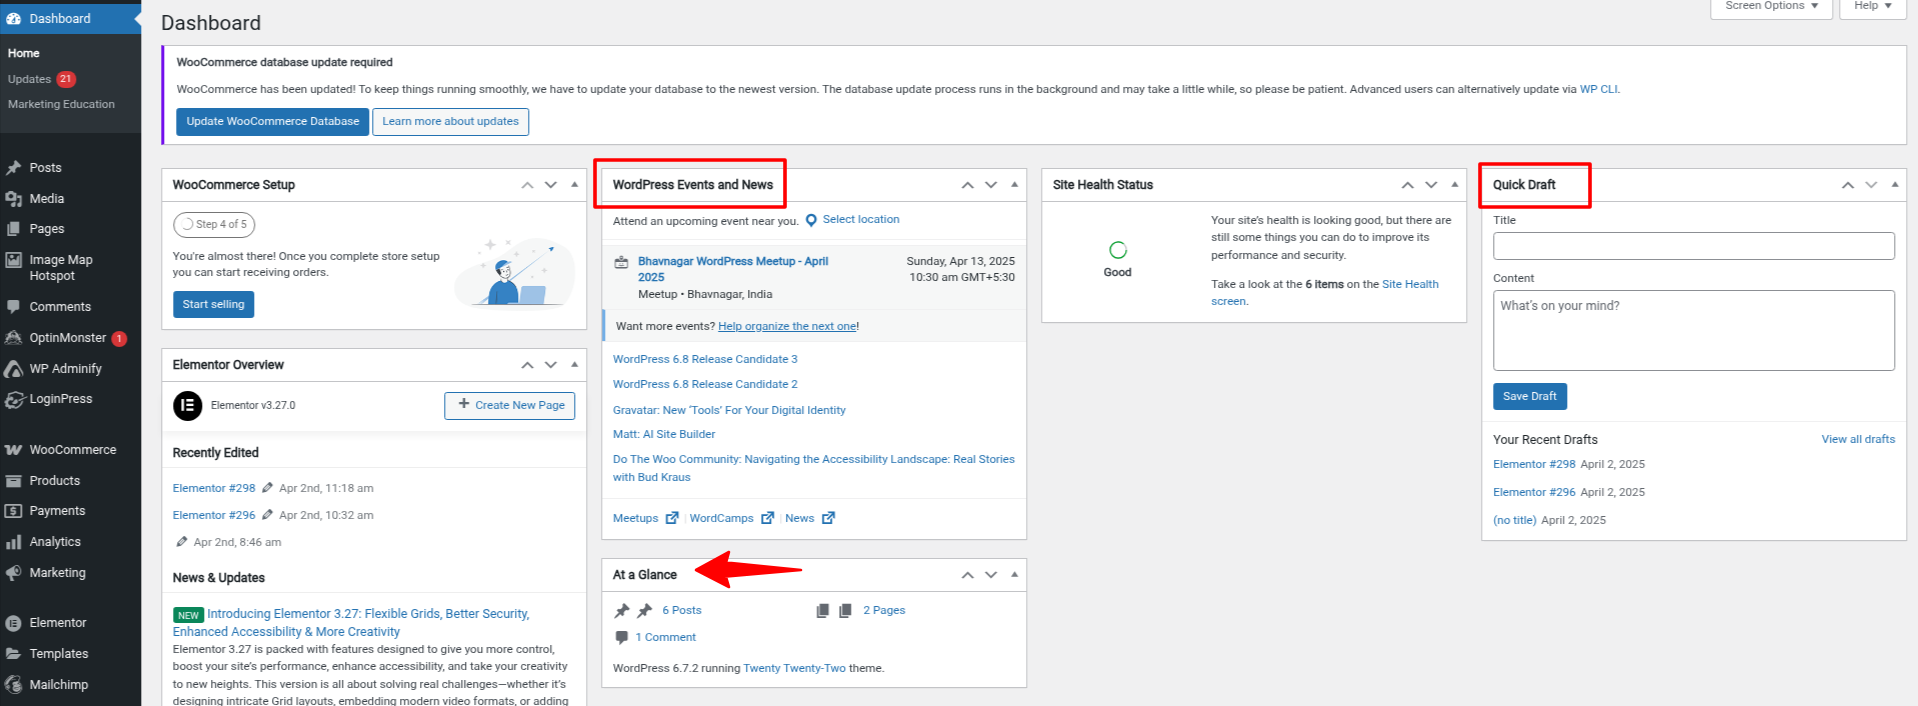
However, sometimes these widgets clutter the dashboard or show things you don’t need, especially if you're building a custom dashboard for clients or want a cleaner admin area.
WordPress gives you Screen Options at the top right corner of some pages, such as the dashboard, posts and pages, plugins, users, media library, comments, etc.
To remove Widgets:
- Go to the desired page where you want to hide the widgets.
- For example, on the Posts > All Posts, you can show or hide columns, change the number of posts displayed, or switch to an extended view.
On the post page, you can hide Author, Categories, Tags, Comments, and Date from the screen option tag.

4. Add Custom Admin Theme
- Log in to your WordPress dashboard.
- Go to Plugins > Add New Plugin.
- Search for WP Adminify and install and activate it.
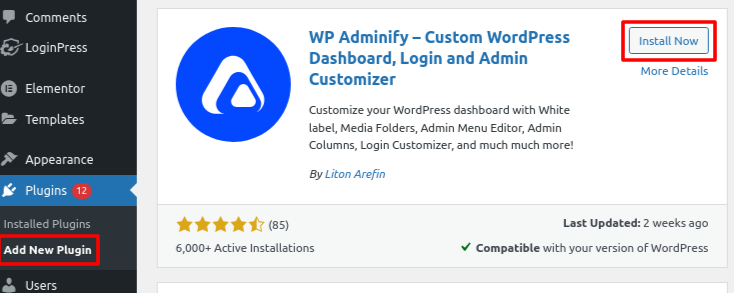
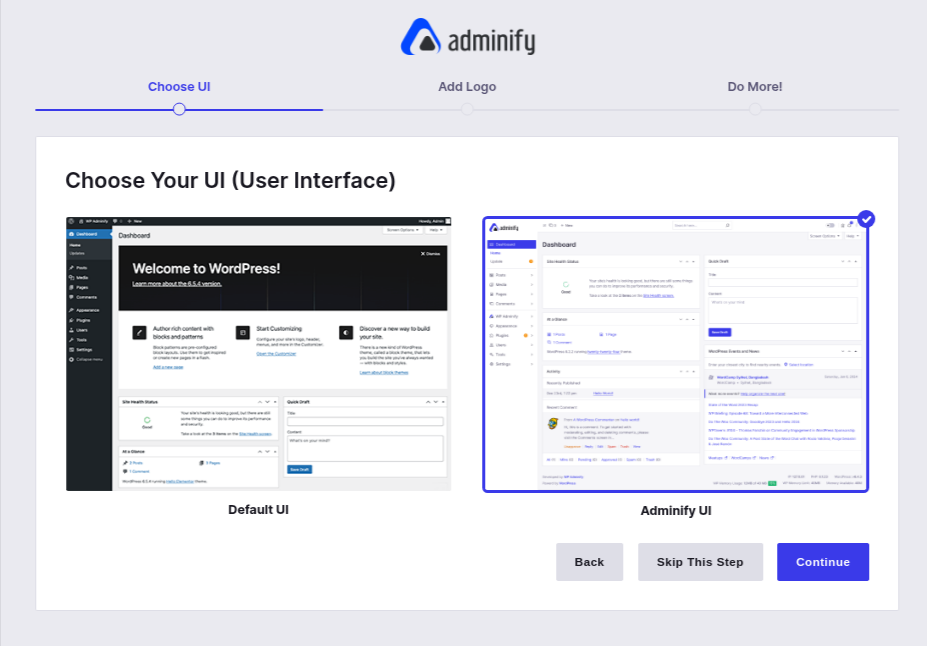
- After installation, go to the WP Adminify > Set up Wizard and click on Let’s Go.
- Choose the theme and click on Continue.
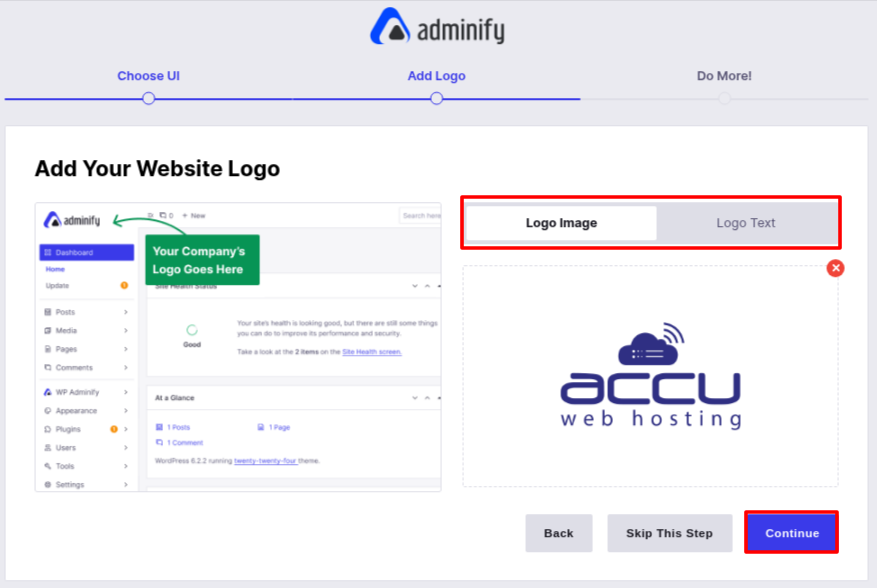
- Add the Logo Image or Logo Text.
- Click on Continue.
Return to your dashboard; you will see a new admin dashboard.

Here, you can switch between dark and light modes, adjust color schemes, and change fonts to match your brand.
One standout feature is the Admin Menu Editor, which lets you rename default WordPress menu items like dashboard, posts, pages, tools, and settings. You can also set a custom logo to match your client's terminology. The editor also enables you to rearrange and hide specific menu items for certain user roles.
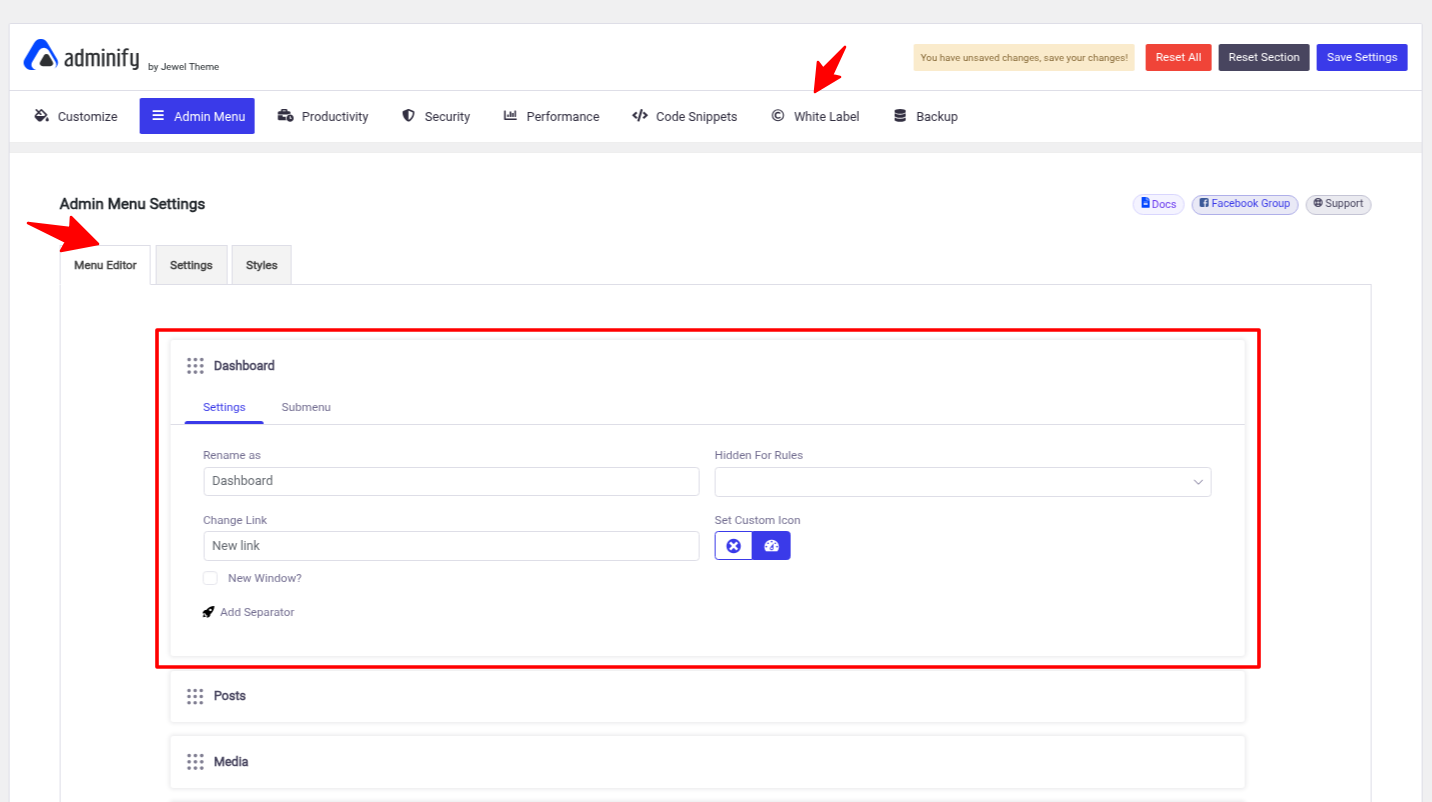
Beyond that, you can switch between vertical and horizontal layouts, choose menu styles like Folded, Rounded, or Default, and use submenu types like Accordion, Toggle, or Two-Step for better usability. The plugin also allows typography, colors, and padding customization for a visually consistent and modern dashboard.
Through the White Label settings, WP Adminify enables you to replace WordPress branding with your own, remove the “Howdy” greeting, edit the admin footer text, and even control dashboard widgets for different user roles. Altogether, WP Adminify helps you create a tailored, branded, and streamlined admin environment—beneficial for agencies, freelancers, or businesses managing multiple client websites.
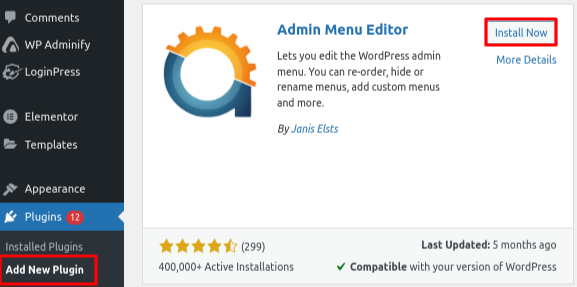
5. Show or Hide WordPress Admin Menu Items
- Install and activate the Admin Menu Editor plugin.
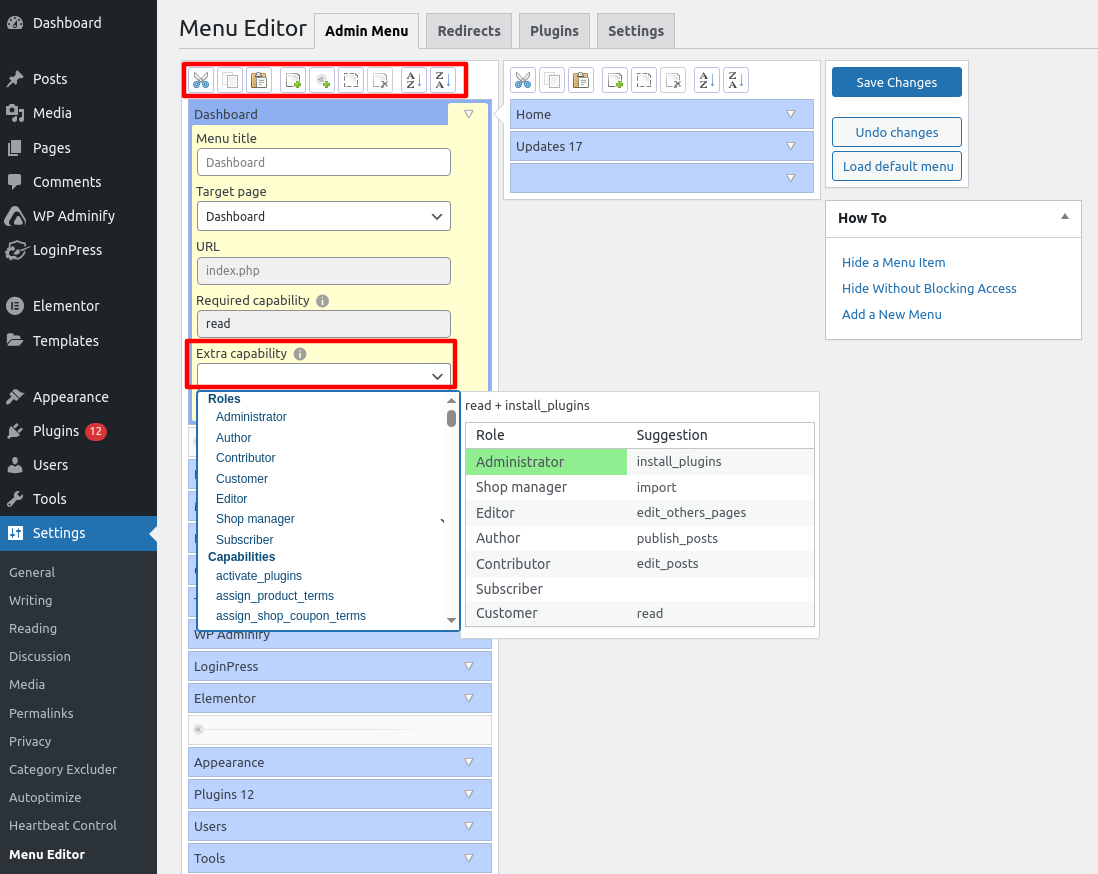
- Go to Settings > Menu Editor to manage the admin menu.
- The first column displays all the main menu items.
- Customize the menu by adding, removing, or rearranging items.
- Remove menu items by selecting them and clicking the Delete button.
- Control menu visibility by restricting access based on user roles under the Extra Capability setting.
6. Notifications and Admin Notices
WordPress allows you to display custom notifications & admin messages in the dashboard using a code. These messages can be useful for delivering alerts, updates, or information to administrators or users.
- Install and activate the WPCode plugin.
- Go to Code Snippets > +Add Snippet.
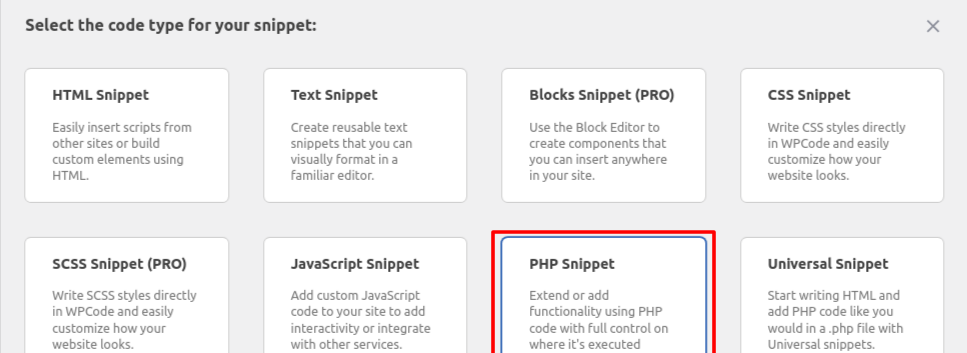
- Inside the Snippet Library tab, click on the + Add Custom Snippet button.
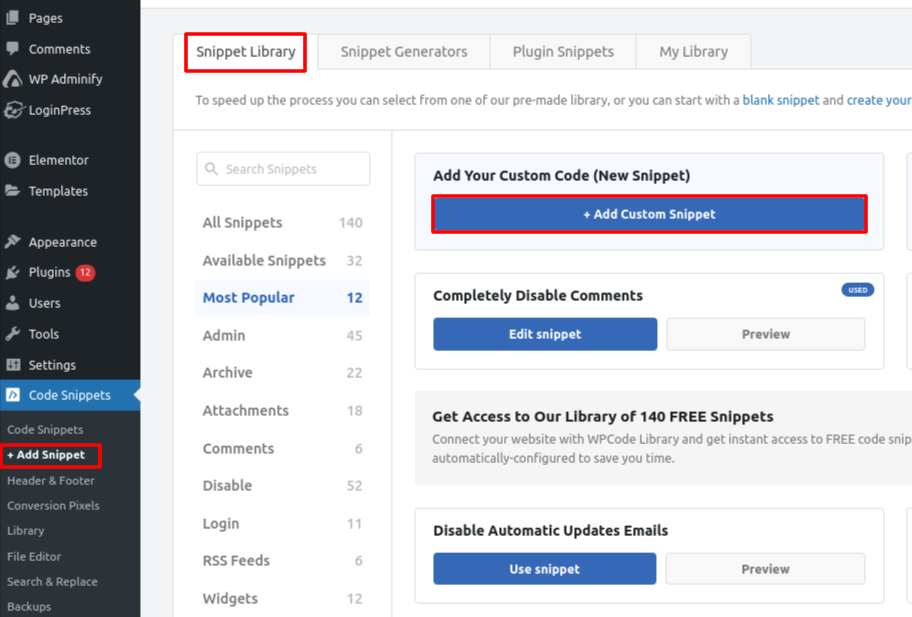
It will give you multiple options. You need to select the type of code you want to add.
Here, we choose PHP Snippet.
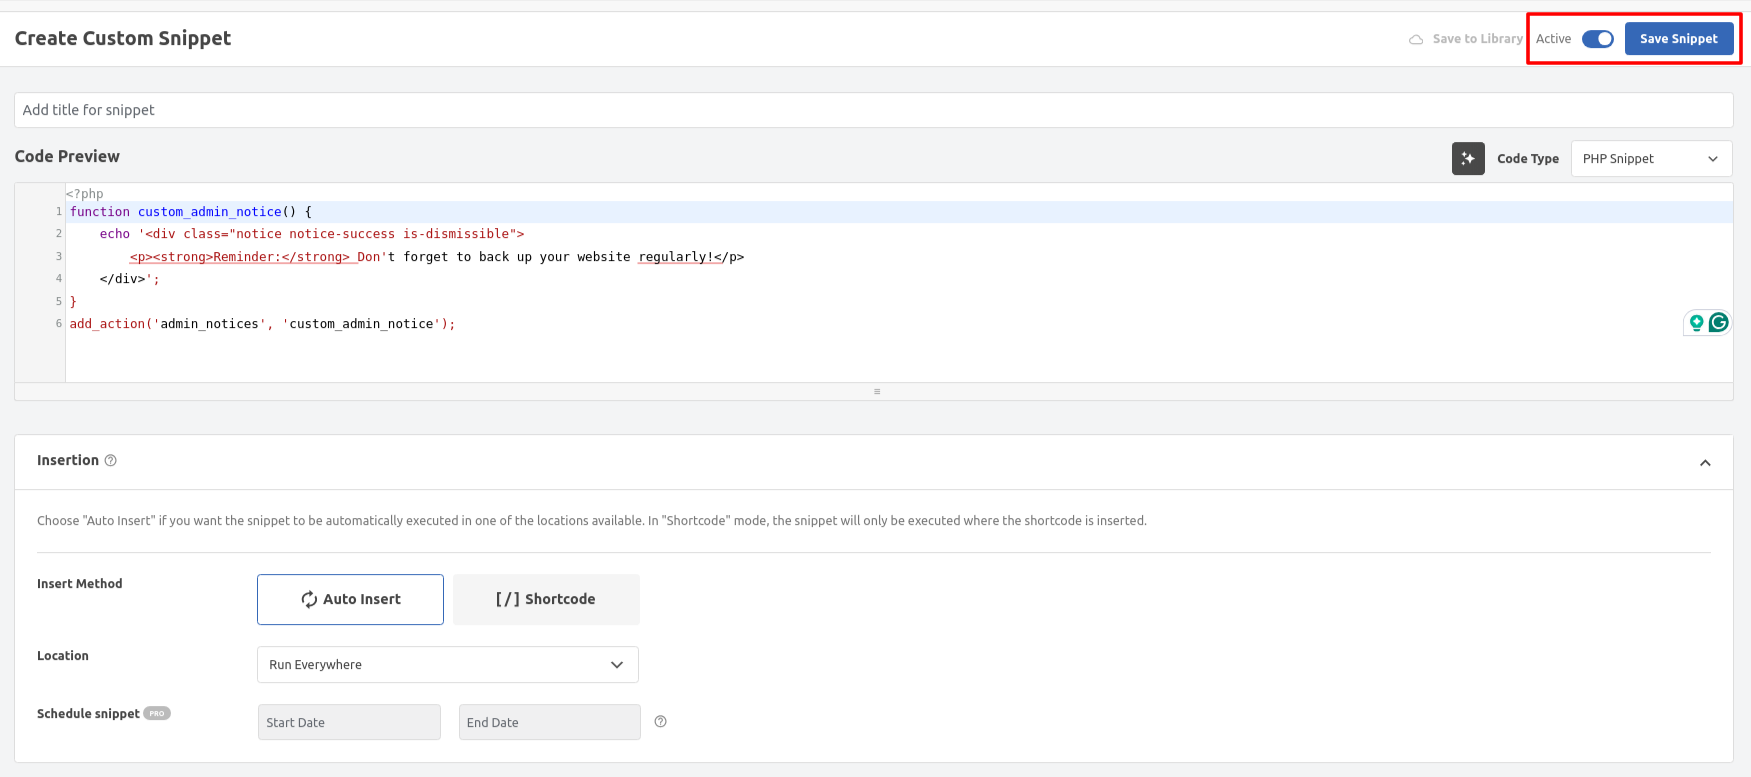
function custom_admin_notice() {
echo '<div class="notice notice-success is-dismissible">
<p><strong>Reminder:</strong> Don't forget to back up your website regularly!</p>
</div>';
}
add_action('admin_notices', 'custom_admin_notice');
- Activate and save the snippet.
7. White Label Your Admin Dashboard
- Log in to your WordPress dashboard.
- Go to Plugins > Add New Plugin.
- Search for White Label CMS and install & activate it.

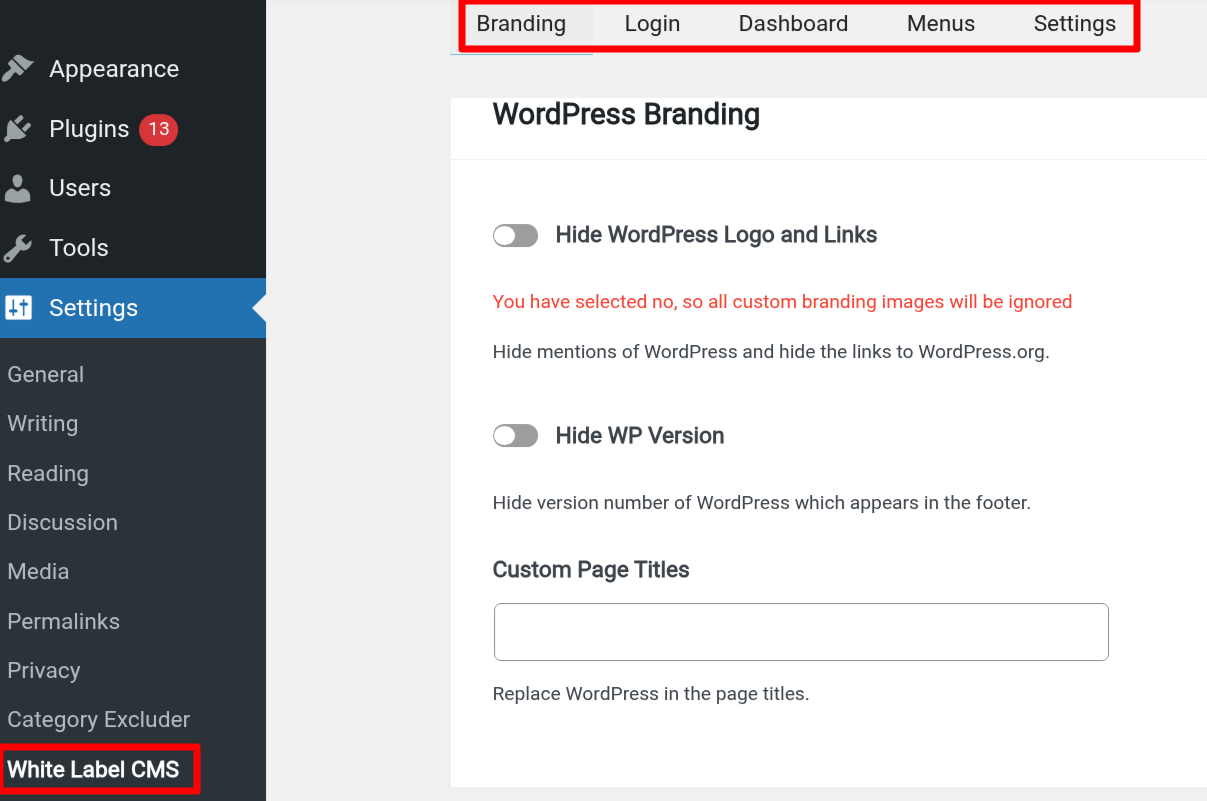
- In the sidebar, click on Settings > White Label CMS.
Here it allows you to customize:
Brand: You can upload a custom login logo, company logo, and background image. Change the favicon and set the admin footer text.
Login: Upload your logo, change the colors and layout of the login page, and set a custom message or welcome text.
Dashboard: Remove default WordPress widgets and create custom dashboard panels with messages or support links for clients. Also, manage user visibility based on their roles.
Menus: Hide unwanted menu items from the admin sidebar. Restrict access to certain settings or tools for specific user roles.
Help: Add your own documentation, links, or tutorials.
8. Customize the Block Editor Screen in WordPress
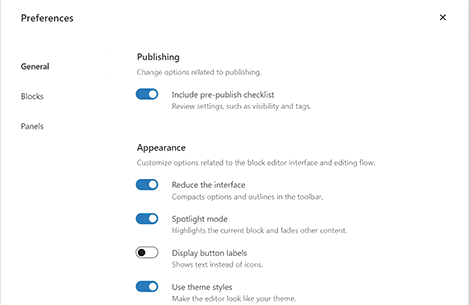
To adjust the editor settings, in your post or page, click the three-dot menu in the top-right corner and select Preferences. This opens a settings panel where you can:
- General Settings: Reduce the user interface for a more compact layout or enable Spotlight mode to focus only on the active block.
- Blocks Tab: Show or hide specific blocks based on your needs.
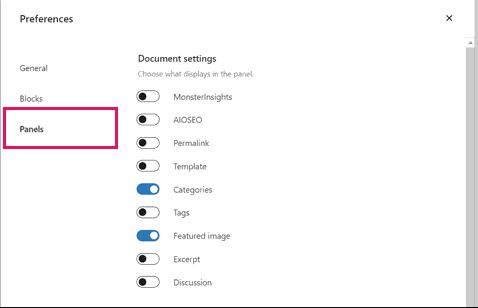
- Panels Tab: Decide which panels (like Tags, Categories, Featured Image, etc.) appear in the right-hand sidebar.
Additionally, clicking the Gear icon at the top will toggle the settings panel, helping you focus on full-width content layouts. You can also collapse unnecessary tabs inside the panel to keep the editor distraction-free.
Recommended Best Security Practices
1. Limit Dashboard Access by User Roles: Only allow users to access what they need. Use role-based permissions to hide menus, settings, and tools from users who shouldn’t see them
2. Hide Unused Dashboard Menus: Hide or disable unused or sensitive menus (like Tools or Plugins. This reduces the chances of accidental or malicious changes.
3. Enable Two-Factor Authentication (2FA): Always use 2FA for admin-level accounts. This adds a strong extra layer of protection even if login credentials are compromised.
4. Audit and Clean Up User Accounts: Regularly review and remove inactive or unnecessary admin accounts.
Customizing the WordPress admin dashboard can greatly improve usability and workflow—but only if done thoughtfully. Avoiding common mistakes like cluttering the interface, neglecting user role testing, and overusing plugins. By keeping the dashboard clean, user-focused, and lightweight, you can create a more efficient, secure, and accessible environment for all users.
Before installing any WordPress plugin, it's recommended to check user reviews and ensure compatibility with your WordPress version before installing.