Introduction
Nginx is a widely used web server that powers many high-traffic websites. Connection errors in Nginx can be tricky to fix because there are many possible reasons for them, and the error messages don’t always provide clear clues. These issues usually show up in the browser rather than as Nginx-specific errors. Many of them are related to connection problems, such as port settings or firewall rules.
This guide is based on tests done on an Ubuntu 20.04 server, but the solutions should work for most Nginx setups. Most errors can be fixed by adjusting Nginx’s configuration file, though the exact file locations may vary.
In this tutorial, you will learn what a browser connection error means for your Nginx server and how to troubleshoot and fix it to restore your website.
Checking Your Nginx Error Log
The errors and solutions in this guide cover common issues but not all possible problems. Some errors may trigger additional errors, making it harder to find the root cause. Your setup might also be different, so results can vary.
To check for errors in Nginx, use this command:

Fixing the "This Site Can’t Be Reached" Error
If you see a message like "This site can’t be reached" in your browser, it means your website is not loading. This can happen for many reasons, but here, we will focus on issues related to the Nginx setup.

Understanding the Error
- If you see ERR_CONNECTION_TIMED_OUT, it means the server is taking too long to respond.
- This is a browser error, not a direct Nginx error.
- The issue is likely related to server connectivity, firewall settings, or Nginx configuration.
Diagnosing the Issue
Since you are managing your own server, you need to check different possible causes:
- Is Nginx running?
- Are the firewall settings blocking access?
- Is the server correctly configured?
By running specific commands and checking settings, you can identify and fix the problem.
Step 1: Checking if Nginx is Running
Before troubleshooting further, check if Nginx is running on your system. You can do this by running the following command:
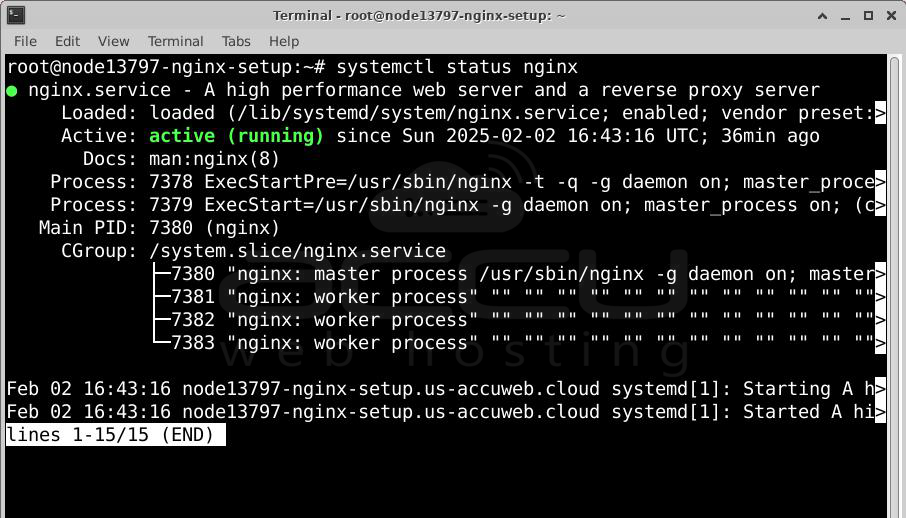
Understanding the Output
- If Nginx is running, you will see a line that says Active.
- If Nginx is not running, the status will show inactive (dead).
Starting or Restarting Nginx
If Nginx is not running, try starting it with:

If you recently changed the configuration, reload it using:

Then, check the status again to confirm it is running.
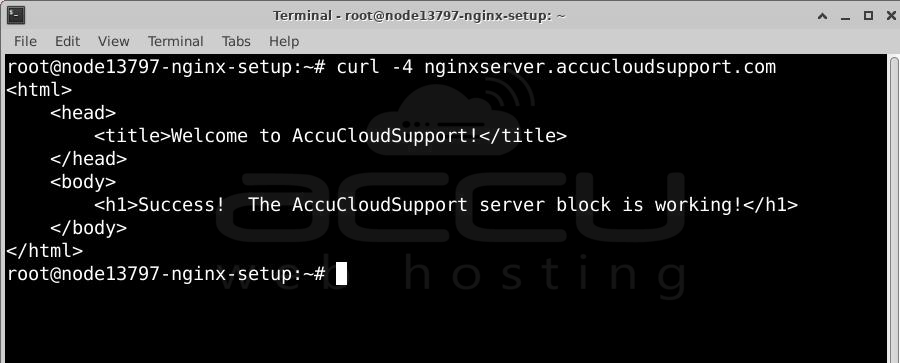
Testing the Connection
Once Nginx is active, open your browser and enter your server’s address, for example:
http://nginxserver.accucloudsupport.com
If you're unsure of your server's IP address, use this command to find it:
If the site is still not loading, the next step is to check your firewall settings.
Step 2: Checking and Updating Firewall Settings
To ensure your Nginx server can accept connections, you need to verify that your firewall is allowing traffic on the correct ports. By default:
- Port 80 is used for regular (HTTP) traffic.
- Port 443 is used for secure (HTTPS) traffic with SSL.
In this tutorial, we will focus on opening port 80 for HTTP traffic.
Step 1: Check Current Firewall Settings
If you are using UFW (Uncomplicated Firewall) on Ubuntu 20.04, check the firewall status with:
This command shows a list of open ports. If port 80 is missing, you need to add it.
Step 2: View Available Nginx Profiles
To see the available firewall profiles for Nginx, run:
You will see the following options:
Nginx Full – Allows both HTTP (80) and HTTPS (443) traffic.
Nginx HTTP – Allows only HTTP (80) traffic.
Nginx HTTPS – Allows only HTTPS (443) traffic.
Step 3: Allow HTTP Traffic on Port 80
To enable port 80, use:
Step 4: Confirm Firewall Changes
Check if the rule was successfully added:
Now, port 80 should be listed, meaning your server is open to receive HTTP traffic.
Step 3: Checking Your Nginx Configuration File
Before testing your website, make sure Nginx is correctly set up to listen on port 80. If the port is not set properly, or if the firewall is blocking it, your website will not load.
Step 1: Open the Configuration File
Use a text editor like nano to open your Nginx configuration file:
Step 2: Check the Listen Directive
The first few lines of the file should include:
server {
listen 80;
listen [::]:80;
root /var/www/accucloudsupport.com/html;
index index.html index.htm index.nginx-debian.html;
server_name nginxserver.accucloudsupport.com;
location / {
try_files $uri $uri/ =404;
}
}
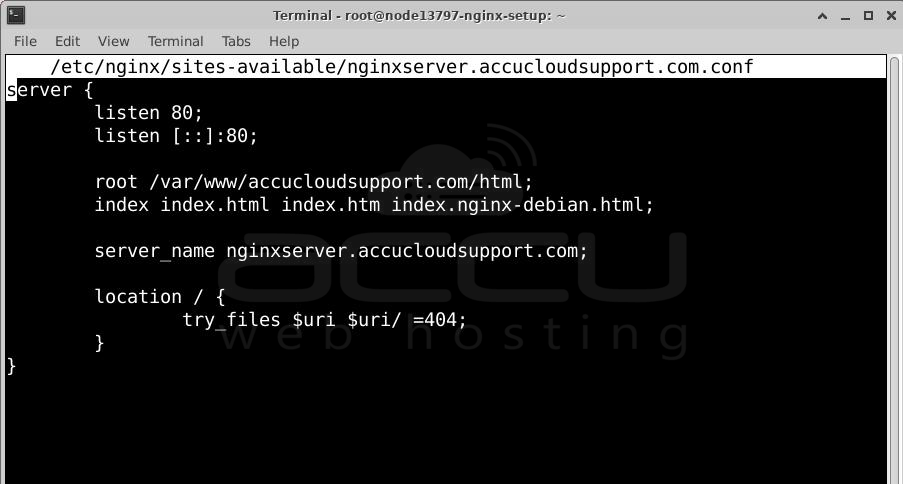
listen 80; -> This tells Nginx to accept connections on port 80 (HTTP).
listen [::]:80; -> This allows IPv6 connections.
server_name nginxserver.accucloudsupport.com; -> This should match your domain.
Make sure your domain name and root directory are correct, or the website won’t work.
Step 3: Save and Close the File
If you’re using nano, press:
CTRL + X -> Exit
Y -> Save changes
ENTER -> Confirm
Step 4: Check for Errors in the Configuration
Run the following command to check for syntax errors:

If everything is correct, you will see a success message.
If there are errors, Nginx will tell you what needs to be fixed.
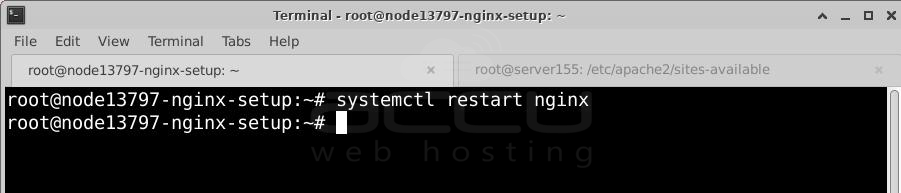
Step 5: Restart Nginx to Apply Changes
Step 6: Test Your Website in a Browser
Open a web browser and go to the website which you have created. Here, we are going to open the website which we have created.
http://nginxserver.accucloudsupport.com
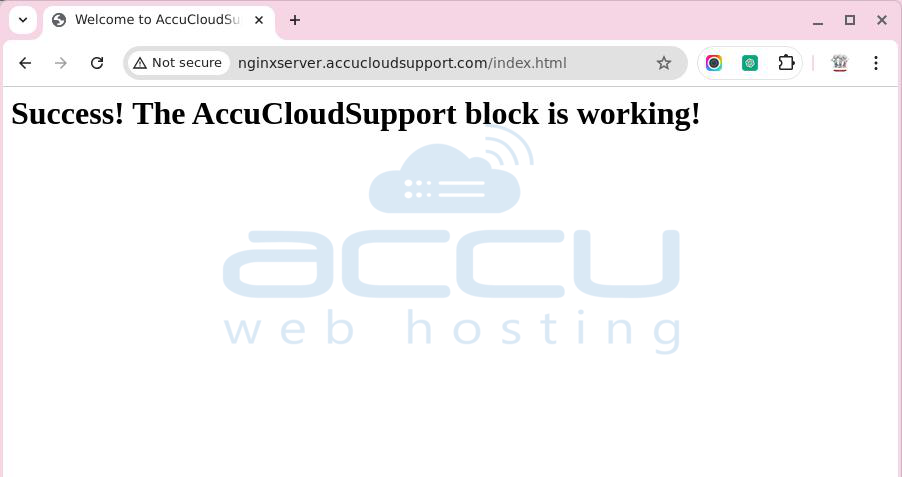
If the page loads successfully, your Nginx server is working correctly!
Conclusion
In this guide, you learned how to check if Nginx is running and how to fix firewall and port issues that might cause the "This site cannot be reached" error.
