SEO is essential for ensuring your website does well. It helps attract many people interested in what you offer on your site. If you use WordPress, Yoast SEO is a great tool to help with this.
Did you know that almost 6 million websites use Yoast SEO? That's because it's good at what it does, and it's used by nearly 72% of websites that use SEO tools in WordPress.
But setting up Yoast SEO might be tricky, especially if you're new to blogging or don't know much about SEO.
If you don't set it up right, search engines might not notice your blog, or they might focus on parts that aren't important.
Let's walk through the steps to install and set up the Yoast SEO plugin for WordPress.
How Do you Install the Yoast SEO Plugin in WordPress?
Here's how to put Yoast SEO Plugin in WordPress, step by step:
Step 1: Log in to your WordPress account.
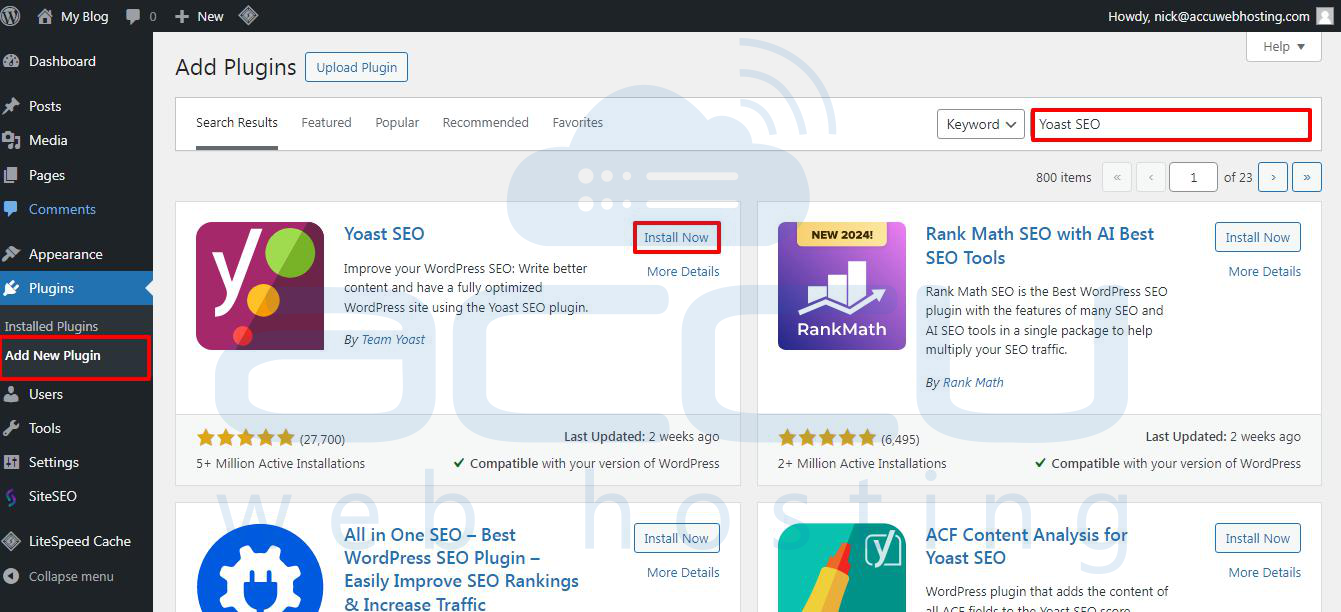
Step 2: Click "Plugins" from the menu on the left.

Step 3: Choose "Add New" from the dropdown menu or above the list of plugins.
Step 4: Look for the Yoast SEO Plugin in the search bar.
Step 5: Click the Install Now" button.
Step 6: Once the Yoast SEO plugin is installed, click the Activate button.

Now that you've completed all these steps, you're all set. Congrats—Yoast SEO is now on your WordPress site!
To make sure it's installed properly:
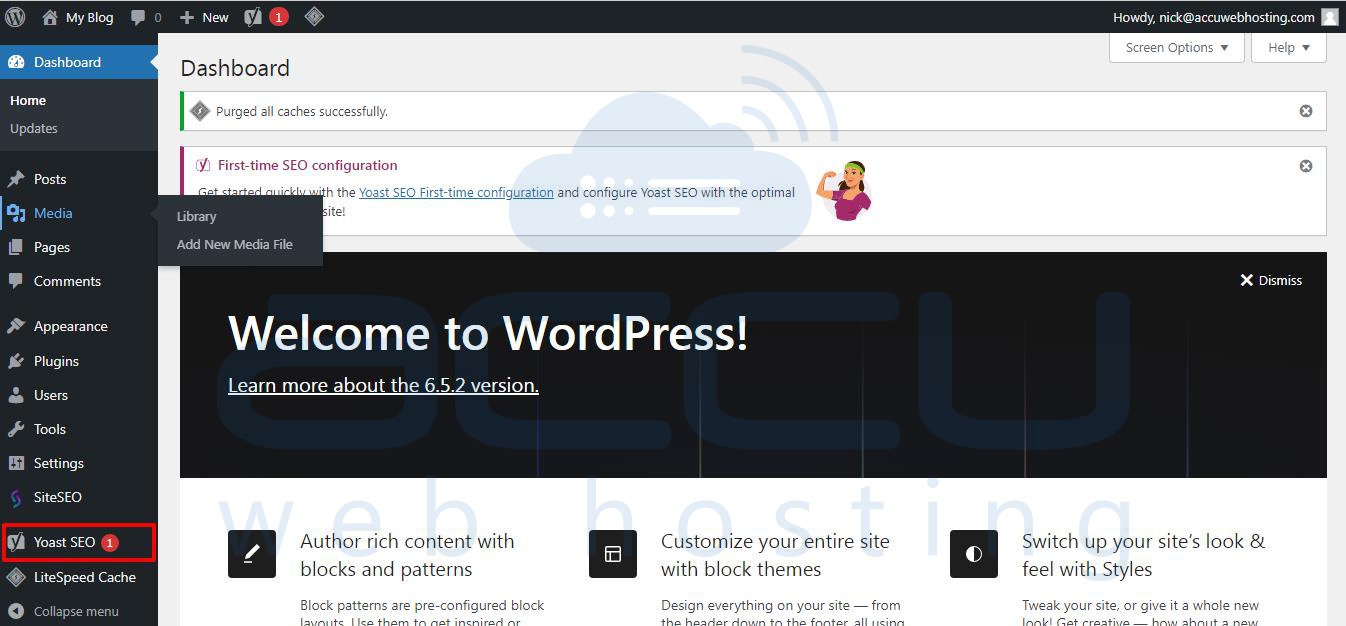
Step 7: Go to the WordPress dashboard.
Step 8: Look for Yoast SEO in the left sidebar under "SEO."
How do you set up the Yoast SEO plugin in WordPress?
The settings we've chosen are the ones we use when we do SEO for our clients. It's okay if your process is different from that of other experts.
But if you're new, we suggest you follow each step carefully.
In WordPress, there are two ways to set up Yoast SEO:
Method 1
If you're already using another SEO Plugin before installing Yoast:
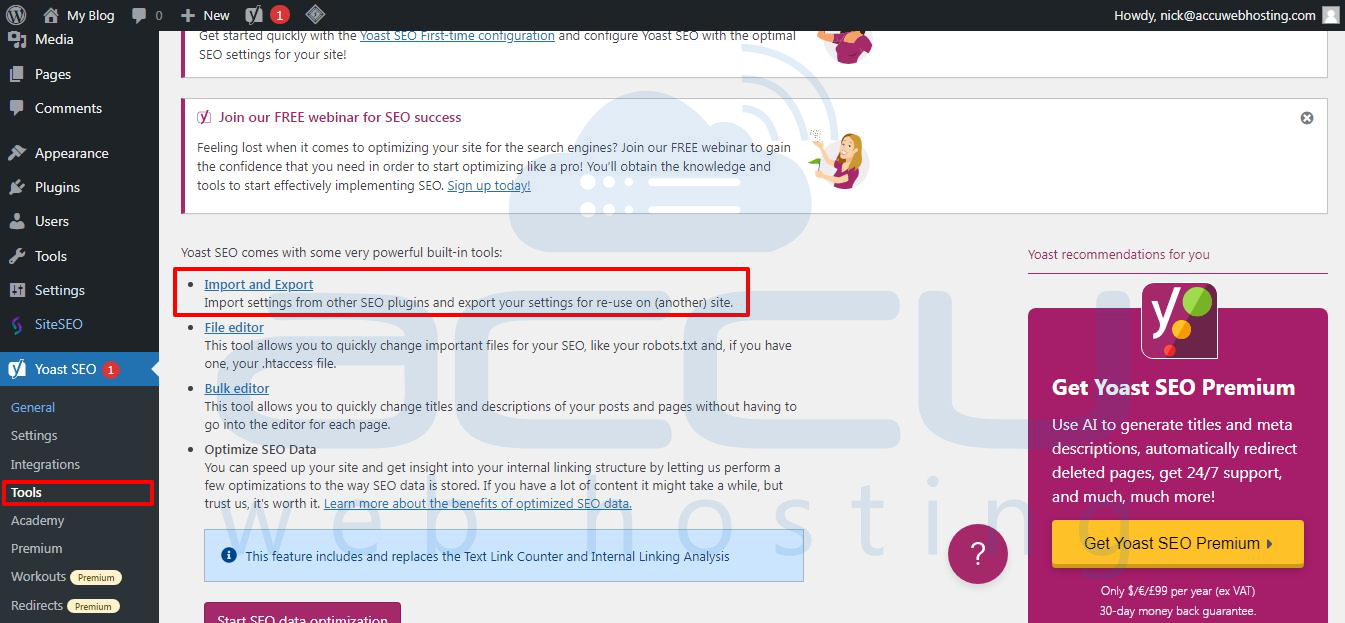
Step 1: Go to Yoast SEO.
Step 2: Click on Tools from the right menu.
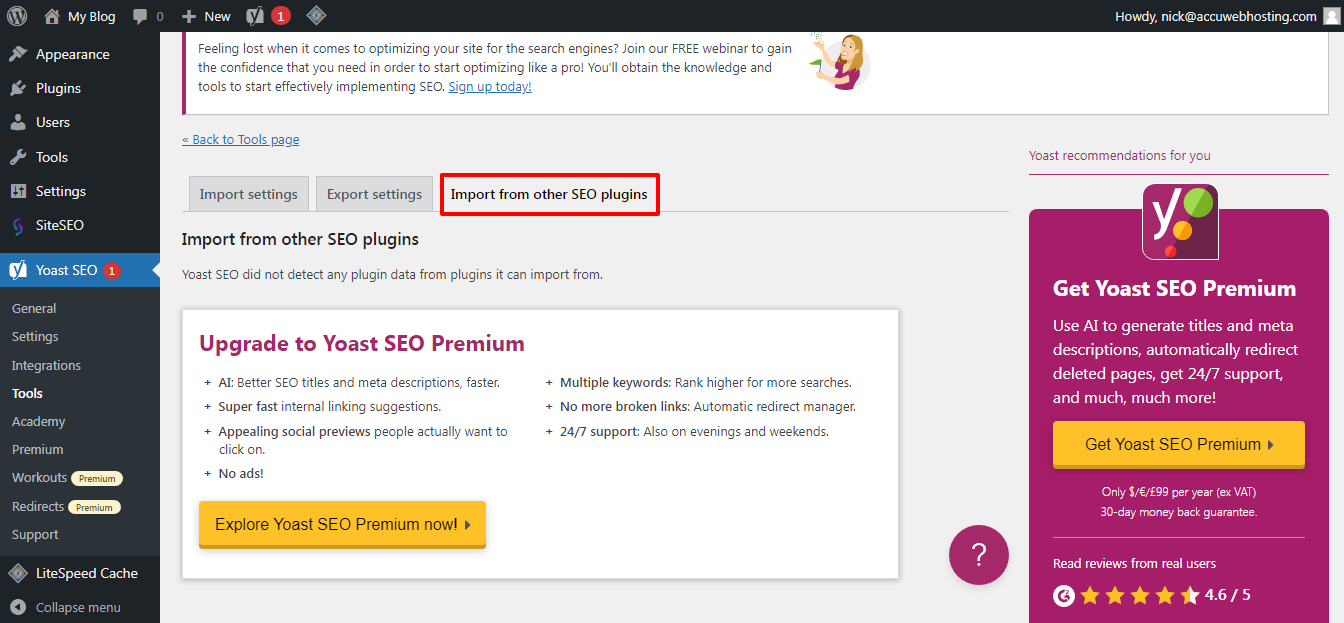
Step 3: Select Import and Export.
Step 4: You'll see a list of checkboxes for "Import From other SEO plugins" options.
Step 5: Choose the plugin from which you want to import settings.
Step 6: Check the box for the SEO tool you were using.
Step 7: Click on Import.
Step 8: Yoast will automatically import all your Yoast SEO settings, including your default XML sitemap settings or default title template.
Note: This import feature is only for paid Yoast users. If you don't see it, you might need to upgrade.
Even if you've imported all your settings from another plugin, we recommend going through all the settings below to make the most of Yoast.
If you haven't imported settings, skip this step and start setting up from scratch.
Method 2
Now, let’s set up all new settings. To set up the General Settings:
You can find the Yoast SEO setup wizard by clicking "Yoast SEO" on the left side of your WordPress dashboard.
Then, find Yoast SEO and click "Finish your first-time setup."
First, Yoast will improve your data and fix some technical problems. You don't need to do anything here; click "Continue."
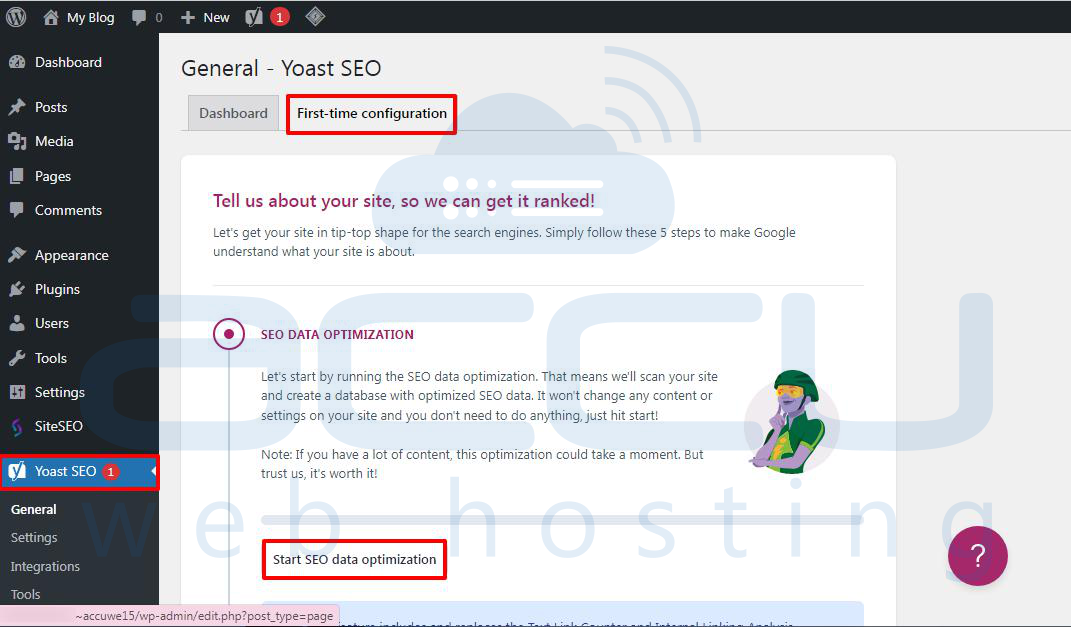
Remember, running the SEO data optimization is essential for the best results.
In the following steps, you'll provide information about your site, including its name, logo, and social media profiles.
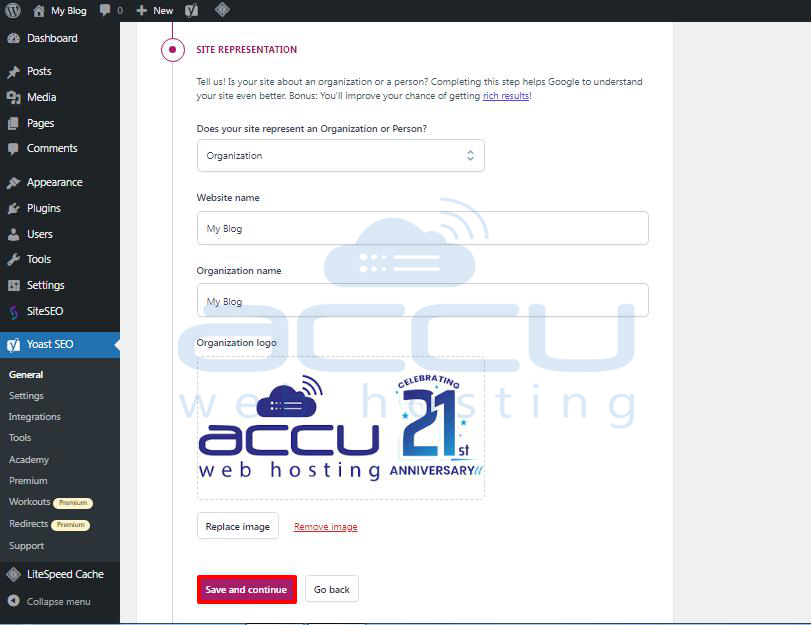
After adding this info, click "Save and continue."
Now, you'll add social media profiles linked to your website.
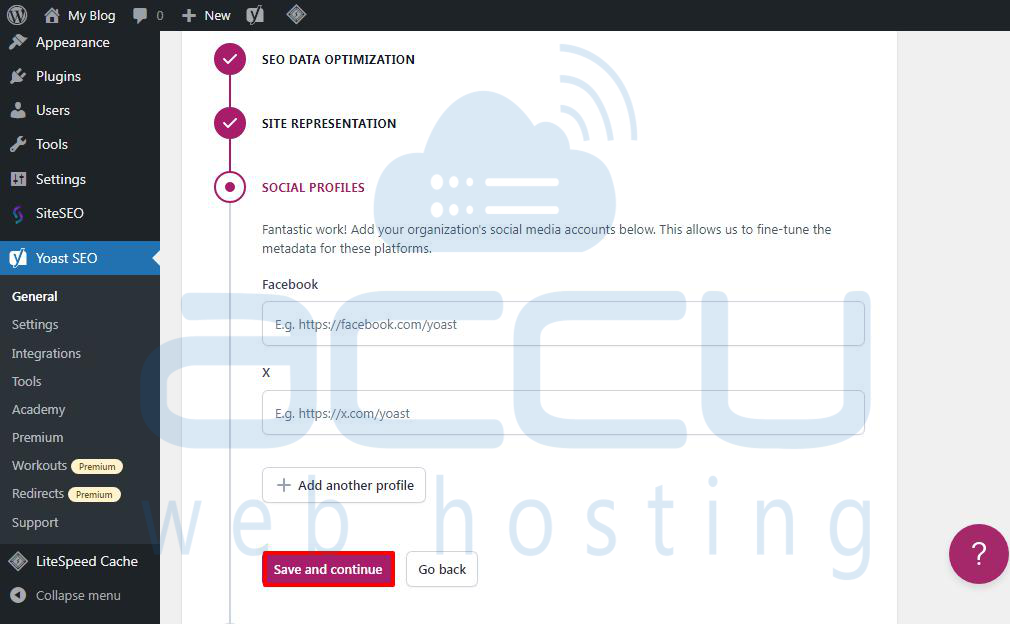
After adding your social profiles, click "Save and continue."
Next, you'll be asked for your email to get the weekly Yoast SEO newsletter.
You'll also be asked if you want to share your usage data with Yoast SEO. You can choose "No" if you prefer not to.
Click "Save and continue."

That's it! You've finished setting up the wizard successfully.
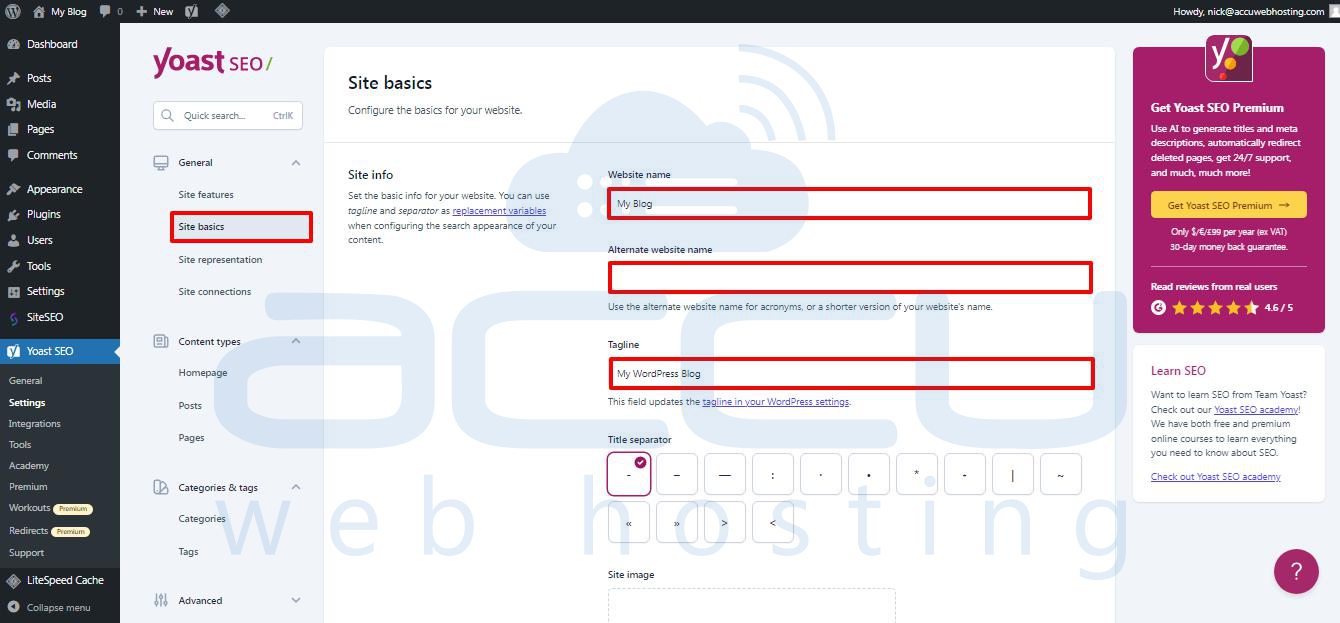
Yoast SEO Settings – Site Basics
First, you'll set up basic SEO appearance settings. Go to the Yoast SEO » Settings page and click the ‘Site Basics’ tab.
Here, you can change your site title, add an optional alternate title, give a tagline, and pick a title separator.
The title separator shows up in the browser's title bar. You can pick any, but the dash symbol is commonly used.
You can add a site image below. The recommended size is 1200 x 674 pixels.
This image shows up when your website is shared online, not for individual articles, as they can have their social sharing images.
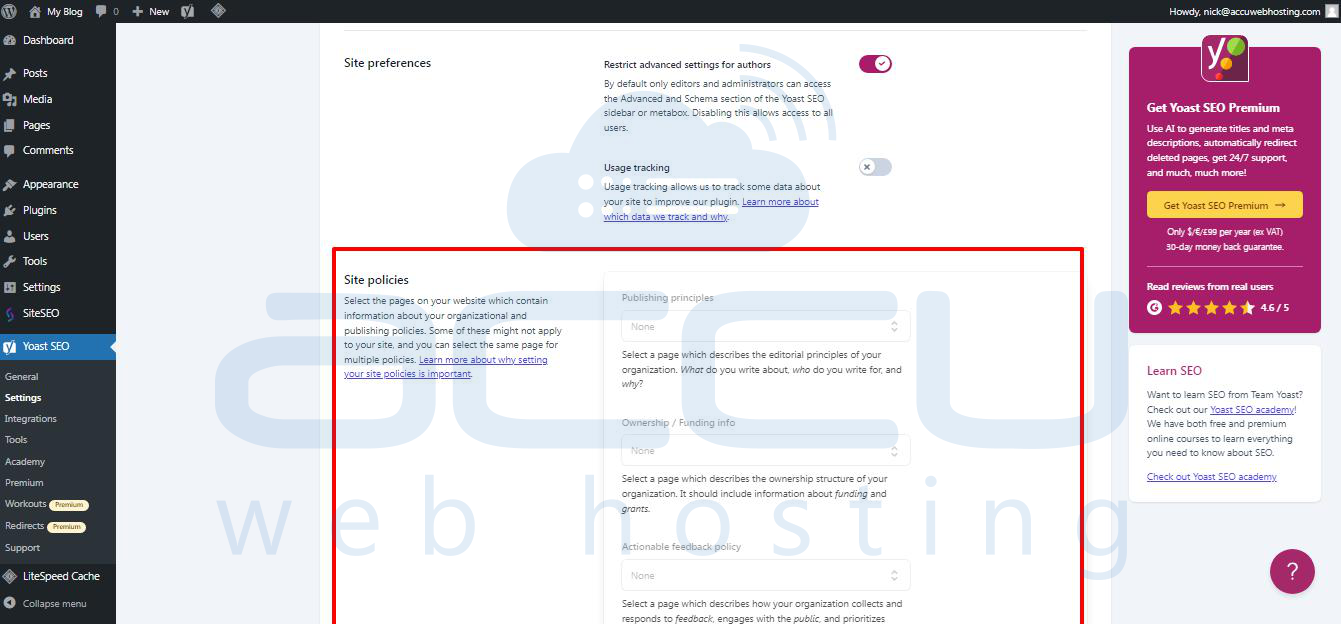
Under ‘Site preferences’, ensure ‘Restrict advanced settings for authors’ is turned on.
This stops authors from setting redirects or blocking search engines when working on an article. Editors and site administrators can still access those options.
Remember to save your changes when done.
Site Connections
Next, add your website to search engines. All major search engines let users submit their websites and track their search indexing and performance.
For more details, check our complete Google Search Console guide.
Yoast SEO makes it simple to verify your website with top search engines.
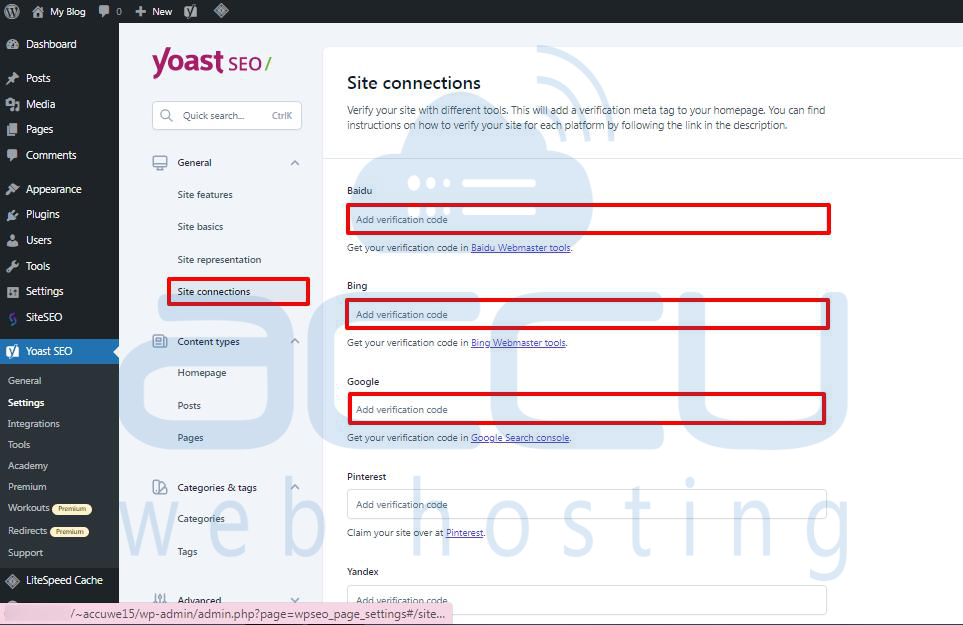
First, sign up for the Webmaster Tools program for each search engine. Then, add a meta tag to prove your website ownership.
Now, go to the Yoast SEO » Settings page and open the General » Site Connections tab.
Paste the meta code from different search engines into the respective fields and save your changes.
Content Types
Afterwards, go to the Yoast SEO settings ‘Content Types’ tab.By default, youu can set how different content types will look in search resultt.
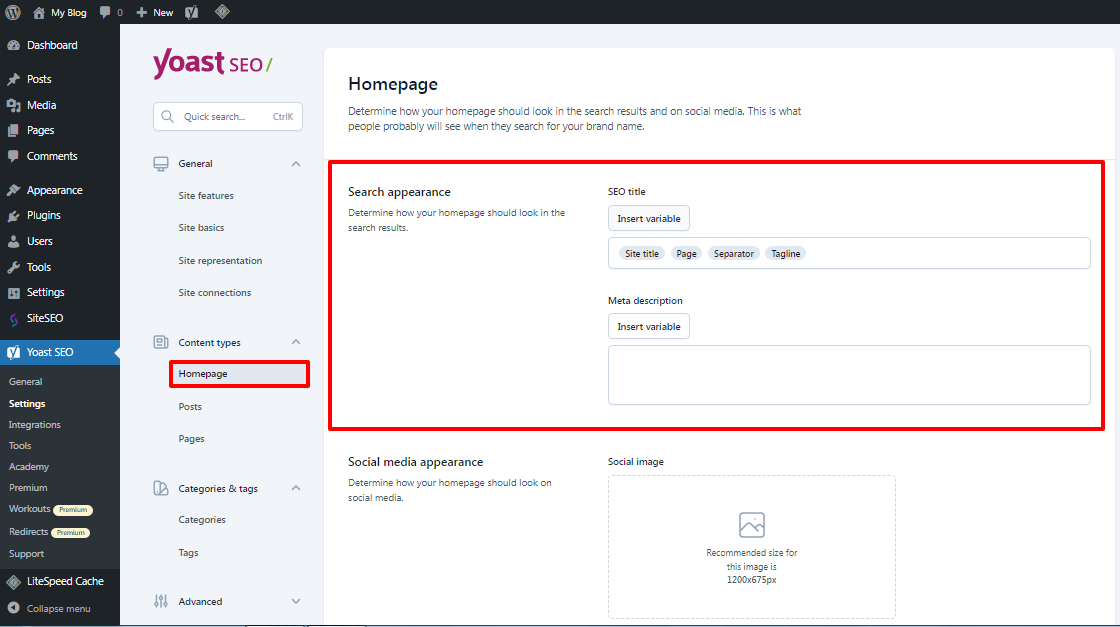
Homepage
Start by adding an SEO title and description for your homepage.
If you're using a custom homepage in WordPress, Yoast SEO will use the SEO title and description from there.
Below, you can add a social media image and a separate title and description for social sharing.
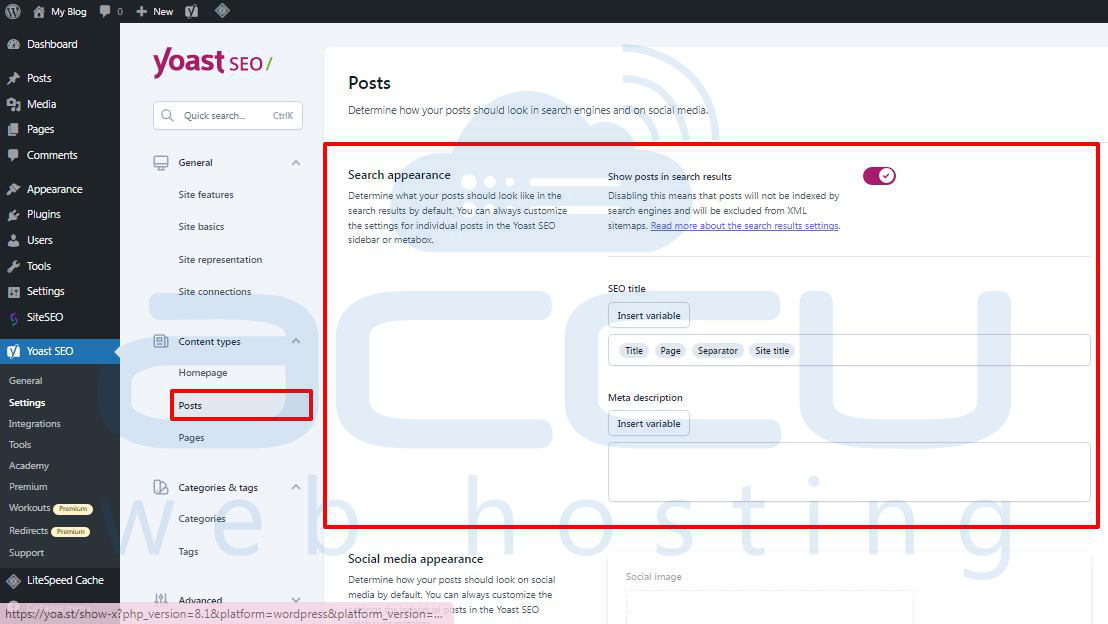
Posts
Now, go to the ‘Posts’ tab.
Ensure the option to ‘Show posts in search results’ is turned on.
You can use variables to set a default format for SEO titles in your posts. This is helpful for older posts or if you forget to add an SEO title manually.
In the meta description field, add %excerpt as the default.
Pages
Then, go to the ‘Pages’ tab.
Ensure the option to ‘Show pages in search results’ is turned on.
You can use the ‘Insert variable’ button to set a default SEO title scheme for your pages.
Use % excerpt to select Excerpt as the default for the meta description.

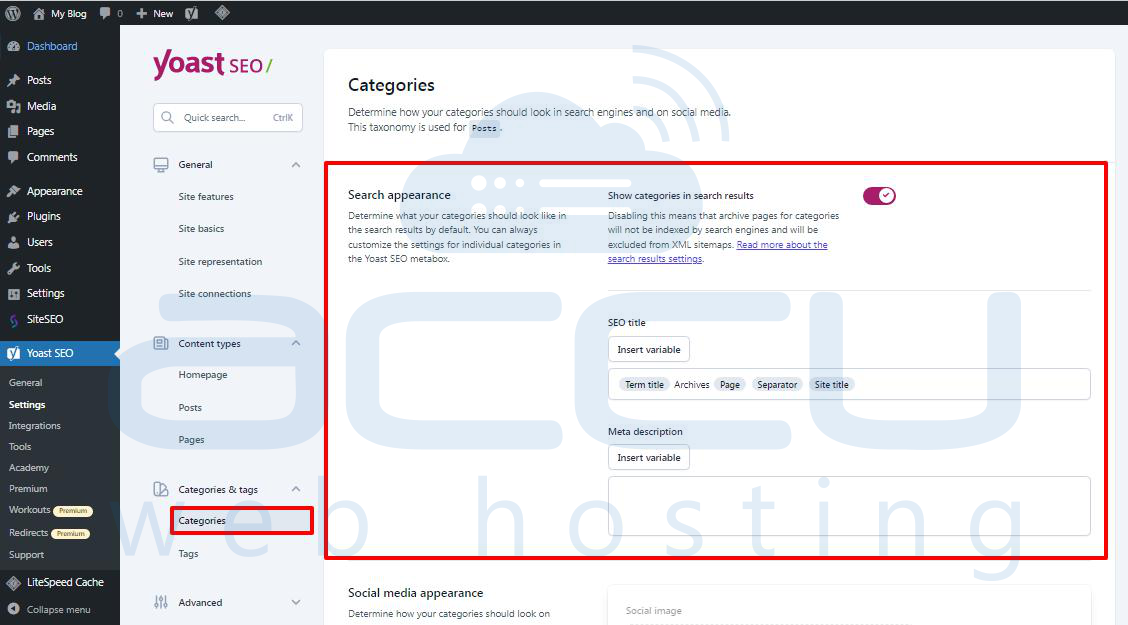
Categories & Tags
Now, set up the default appearance for categories and tags.
Go to the ‘Categories’ tab and ensure ‘Show categories in search results’ is on.
Below, set a default meta title for your categories using the variables.
For the meta description, use %category description.
Next, go to the ‘Tags’ tab and repeat the steps.
For the meta description, use the %tag description.
Advanced Settings
This part of the Yoast SEO settings has some advanced features for technical SEO.
They help you make your website even better for search engines by removing unnecessary items and making it easier for search engines to read your content.
Crawl Optimization
As a website owner, you want Google to look through more of your pages. However, WordPress creates pages and feeds that aren't important for your website and uses up much of the crawl budget.
Crawl optimization helps fix that. For more details, check our guide on fixing WordPress's SEO crawl budget issue.
The first option is to ‘Remove unwanted metadata.’ Metadata is extra data WordPress adds to each page, and search engines examine some of it.
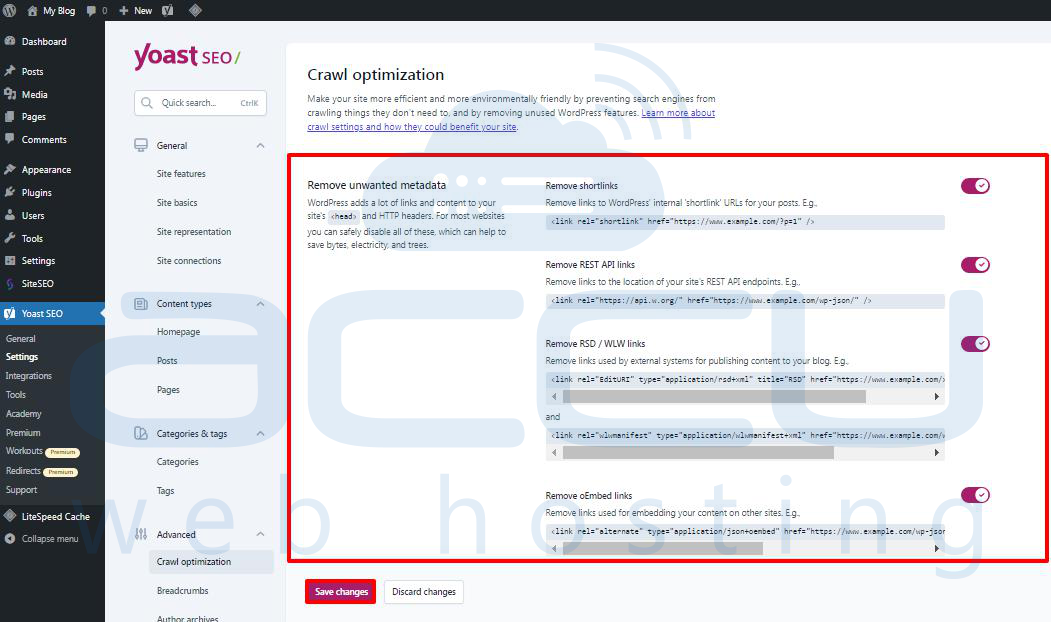
The plugin explains each option. You can turn the toggle on to remove each one.
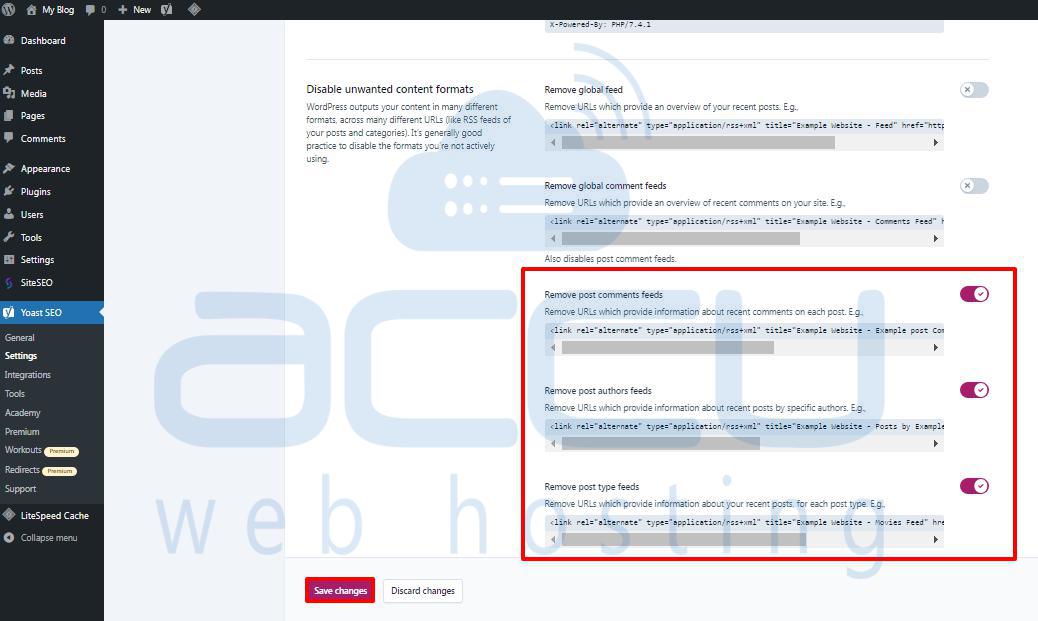
Then, go to the ‘Disable unwanted content formats’ section. From here, you can turn off the feeds that WordPress generates.
You can also turn off things like the emoji script, which is only needed for very old browsers.
You can also say no to endpoints to the WP-JSON API.

Breadcrumbs
Breadcrumbs are good for linking within your website because they show a clear path to the page you're on. They also appear in search results, giving your site an extra boost.
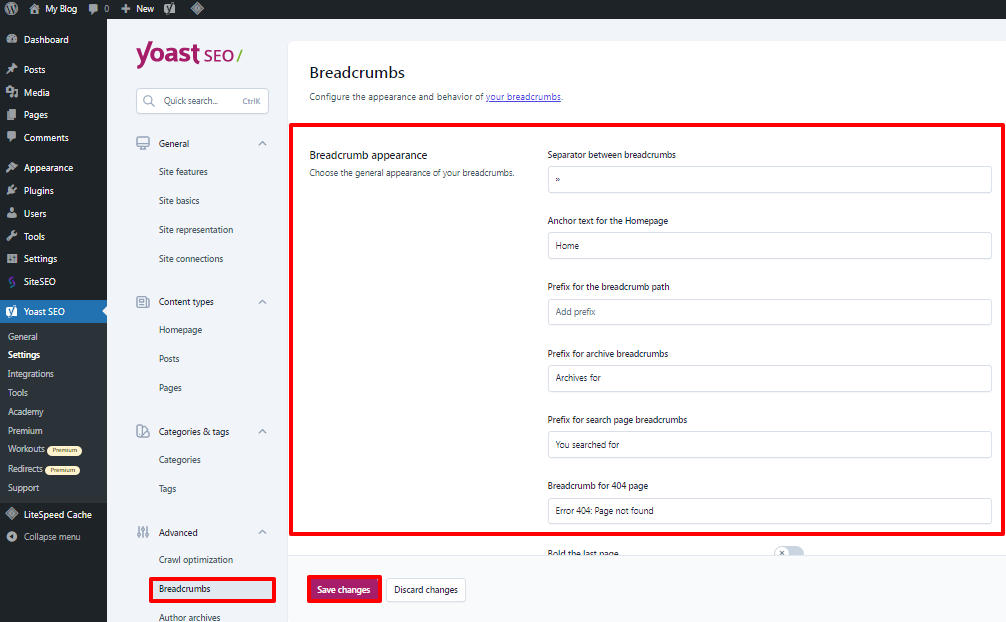
Yoast SEO's default settings are already suitable for most websites.
But if you want to change something, you can.
Then, go to the ‘How to insert breadcrumbs in your theme’ section.
Here, you can turn on the option to ‘Enable breadcrumbs for your theme’.
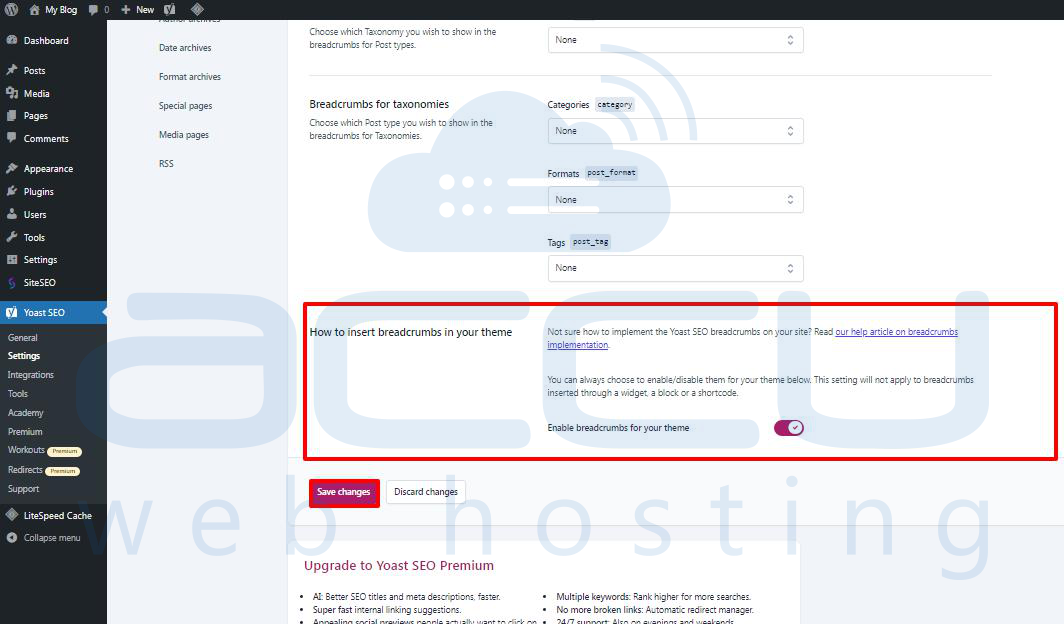
Tip: For even better breadcrumb navigation, you might want to check out All in One SEO for WordPress. You'll have more control over how your breadcrumbs look, and you can make custom breadcrumb templates to fit your needs.
Author Archives
The next option in the Advanced settings is ‘Author archives’.
You should turn off the author archives if you run a blog with just one author. This is because your blog archives and author archives will contain the same content.
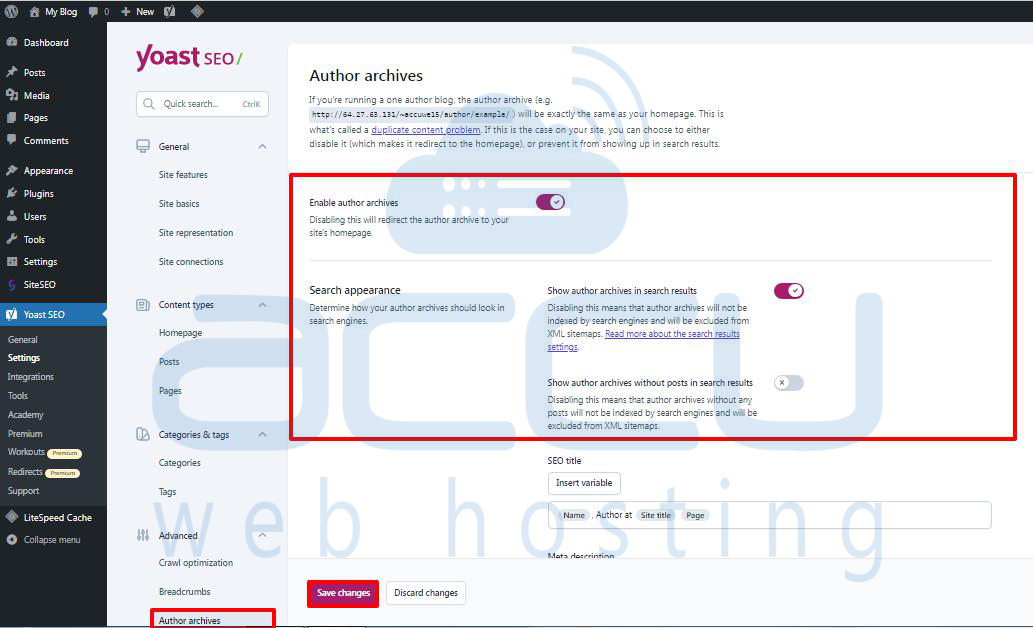
Search engines might not like this and could penalize your website for having the same or low-quality content if you don’t turn off these archives.
Date Archives
WordPress also makes archives based on dates. This can cause more issues with duplicate content.
Under Date Archives, you can turn off the switch next to the ‘Enable date archives’ option. This stops those archives, improves the crawl budget, and avoids duplicate content.
Format Archives
Post formats are features in WordPress themes that let developers add different formats. A post type can use these for looks and style.
However, many modern WordPress themes don’t use this feature.
These post formats have their URLs in WordPress that search engines can crawl.
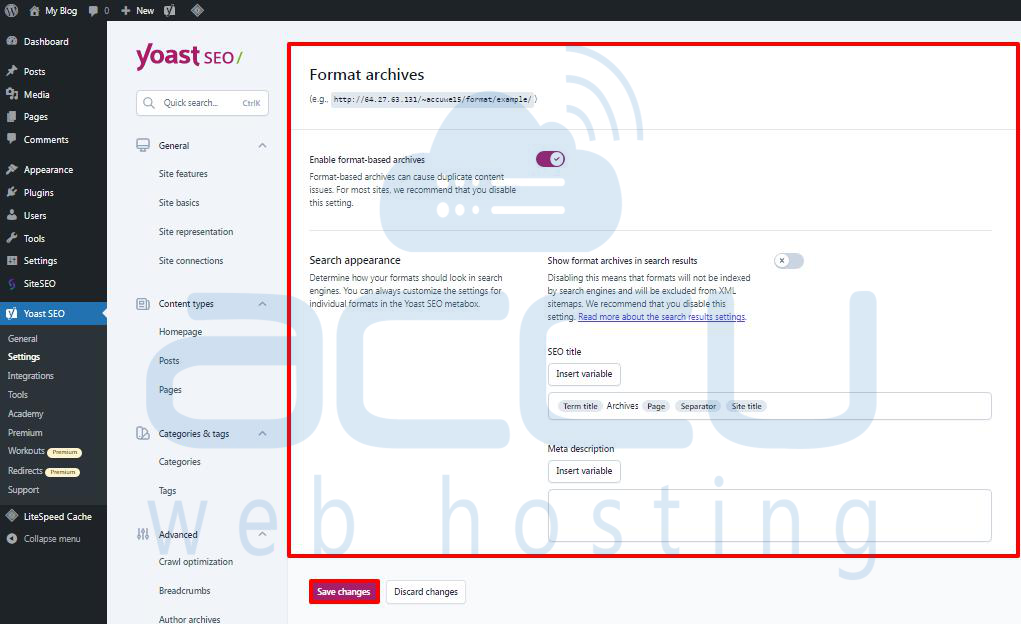
You can safely turn off these URLs in the Advanced » Format Archives tab.
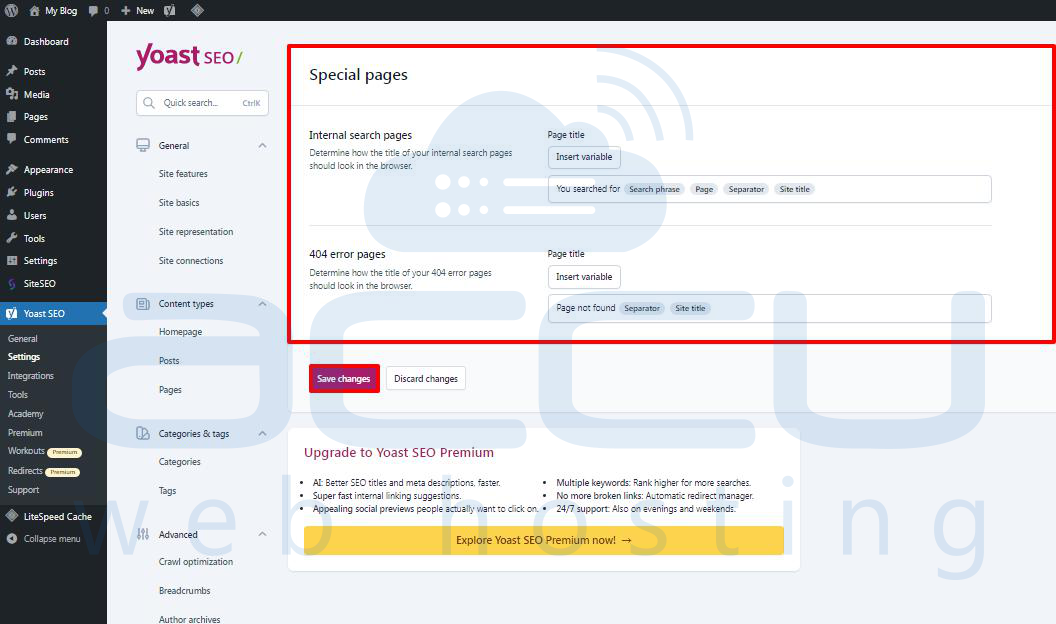
Special Pages
Here, you can give an SEO title for pages like the WordPress search result page or the 404 error page.
Media Pages
WordPress makes an attachment page when you add an image or media file to a post or page.
This page only shows that image or media file with little info. It wastes your crawl budget, adds low-content pages, and hurts SEO.
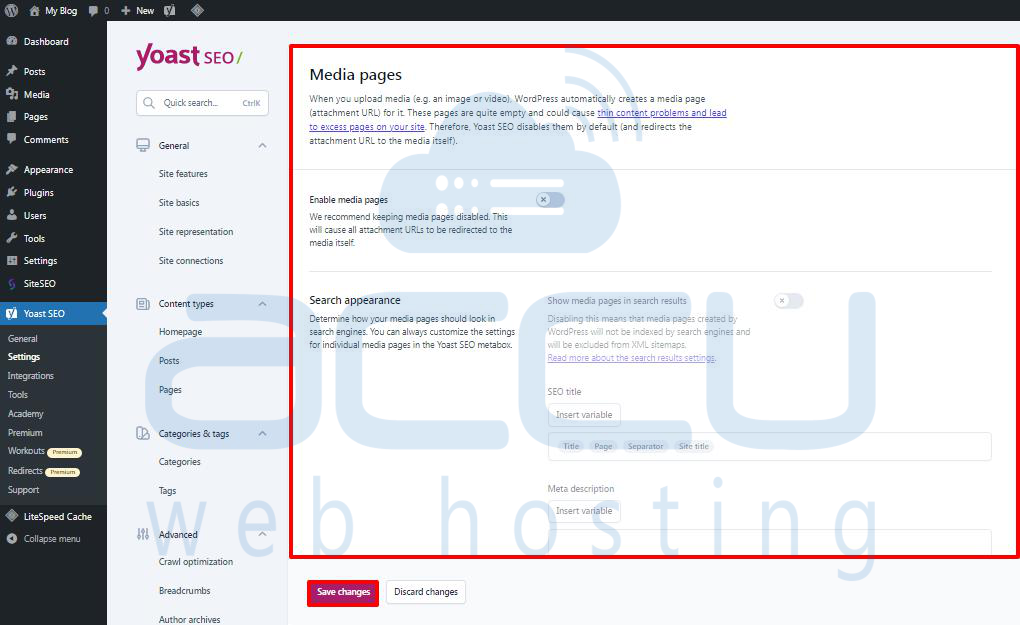
It would be best to stop these pages in the Advanced » Media Pages " tab.
Yoast SEO sends users to the media file instead of the attachment page when you do.
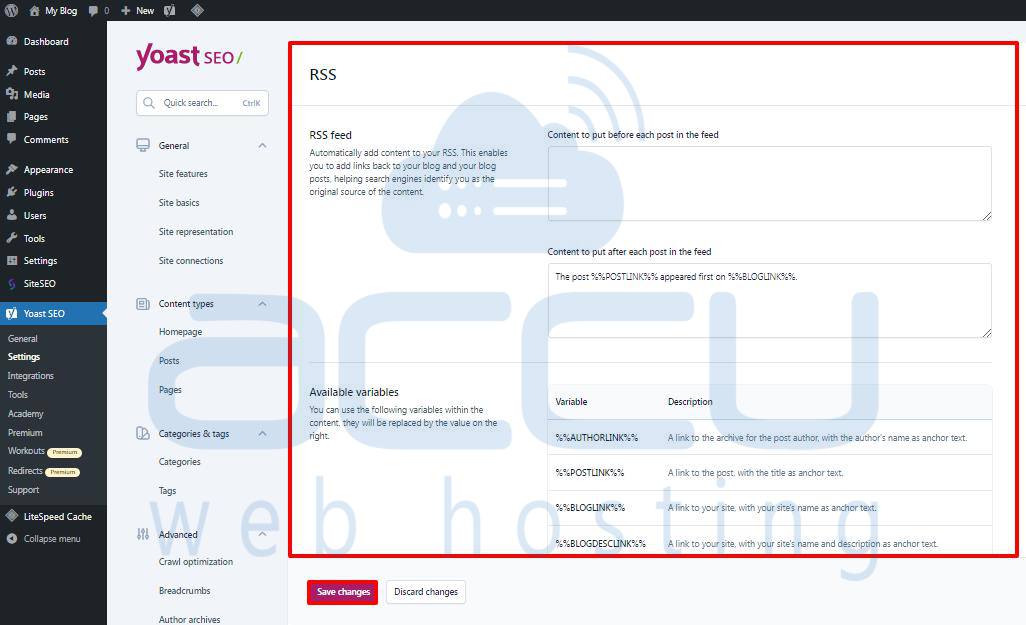
RSS
Yoast SEO lets you add content to RSS feed items. By default, it adds a link to your website at the end of each item.
You can leave it or add anything you want here, and it’ll show up in your RSS feed.
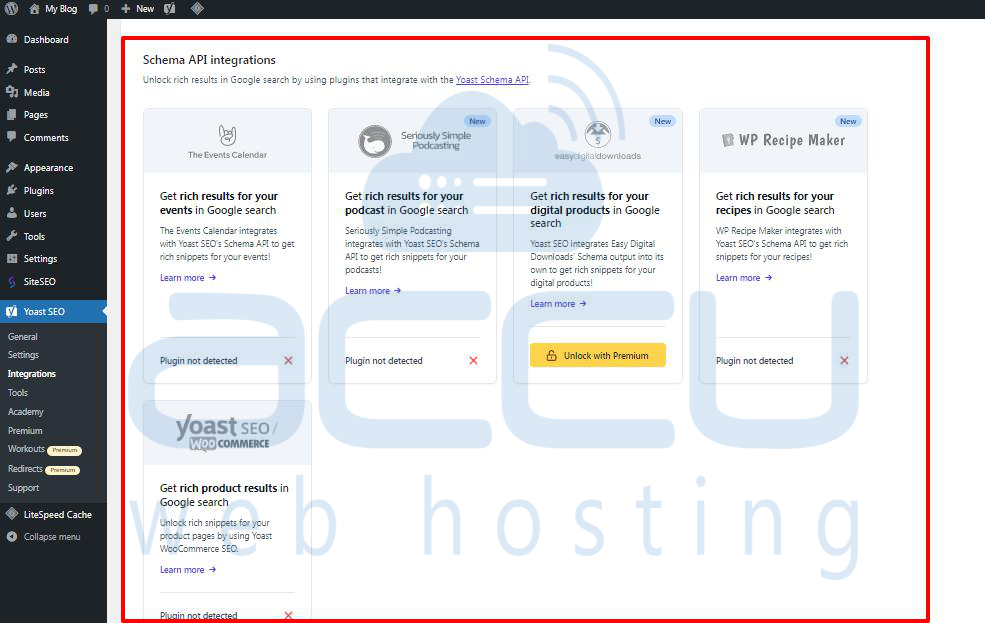
Integrations
Yoast SEO has teamed up with top-notch SEO platforms to offer more features, including two free integrations: Semrush and Wincher.
When you go to the Yoast SEO » Integrations page, these integrations are already turned on.
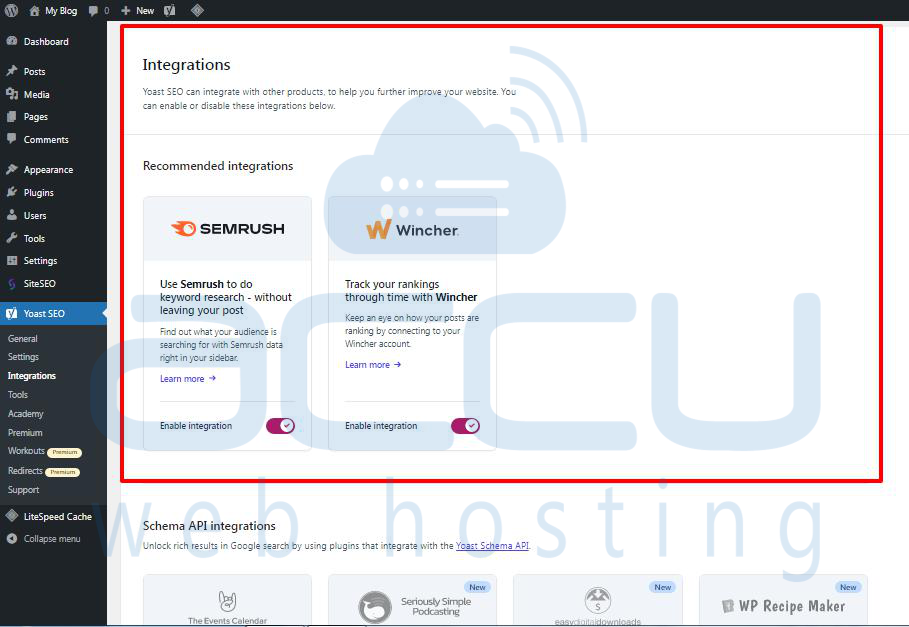
Note: To use both services, you'll need to create free accounts. However, a free account will only give you some features.
Below that, there are integrations with other premium WordPress plugins.
For example, if you're using Easy Digital Downloads, you can unlock that integration by upgrading to Yoast SEO Premium.
Conclusion:
Yoast SEO is one of the best SEO plugins for WordPress sites. It helps you improve your SEO quickly and efficiently, boosting your search engine ranking. But if you're new to this, it might initially seem a bit tricky. Hopefully, this guide will help you set up the Yoast SEO plugin smoothly.
