Introduction:
In simple terms, a firewall is like a security guard for computer networks. It watches over the information going in and out and decides whether to allow or stop it based on certain rules.
If you're using a computer system for important tasks, it's really important to know how to set up this security guard. Systems with a firewall are safer from bad stuff because they control the information coming in and going out, protecting them from potential harm on the Internet.
What is UFW?
UFW, or the Uncomplicated Firewall, is like a user-friendly helper for a Linux system called Ubuntu 20.04. It makes it easy for you to control and manage a built-in security system called iptables, which protects your computer from unwanted internet traffic. Instead of dealing with complex commands, UFW gives you a simple way to create basic security settings.
UFW works through simple commands that you type into a special text box. It can handle all the important security rules, different types of internet connections, and it can even keep a record of what's happening. If you want to know more details, you can find a long list of features in the official UFW guide.
Things You Need Before Setting Up UFW:
Before you set up UFW, make sure you have the following:
1. A server using Ubuntu 18.04, 20.04, or 22.04.
2. An account with special permissions (sudo privileges).
3. The ability to open a command line or terminal window (you can do this by pressing Ctrl+Alt+T).
Setting Up UFW:
To set up the UFW firewall, you'll need to follow these steps, which include installing and configuring the default firewall settings.
1. Install UFW Firewall:
UFW usually comes already installed with Ubuntu, but you can ensure you have the latest version by using the following command:
# apt install ufw
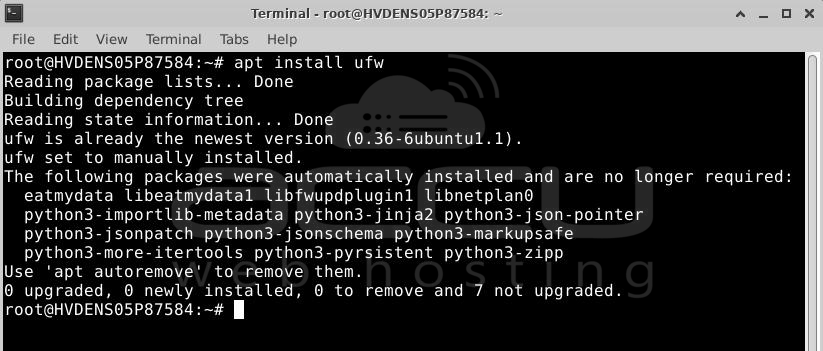
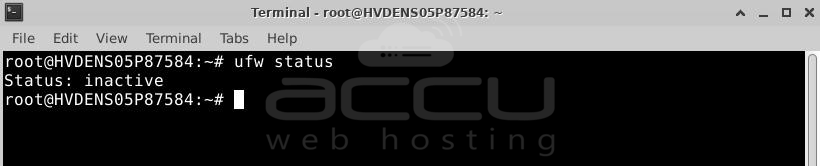
Once installed, you can check its status by using:
# ufw status
By default, UFW is inactive. We'll activate it after making some important changes.
2. UFW Default Firewall Settings:
If you're new to using UFW, it's a good idea to check the default firewall settings. You can do this by looking at the default configuration file of UFW:
# nano /etc/default/ufw

By default, UFW is set up to block all incoming traffic and allow all outgoing traffic. This means that no one can reach your system from the outside, but your system can still send requests to the outside.
You can change these default UFW settings using the following commands:
To allow all incoming traffic, use:
# ufw default allow incoming
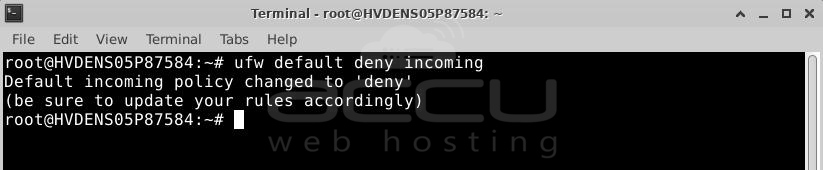
To block all outgoing traffic, use:
# ufw default deny outgoing
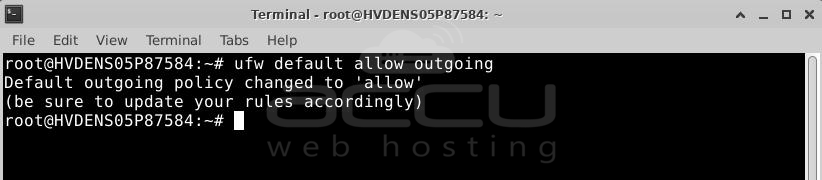
After each change, you'll see a confirmation message.
3. Allowing SSH Connections:
By default, UFW blocks all incoming traffic, including SSH and HTTP. If you turn on the firewall without making an exception for SSH, your current remote session will be cut off, and you won't be able to connect to your server.
To prevent this, you need to allow incoming SSH connections using this command:
# ufw allow ssh
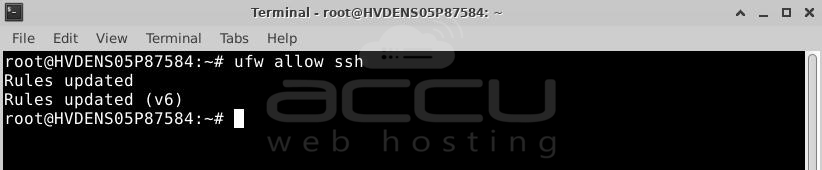
This opens port 22, which is the default port for SSH. After running this command, you'll see two new firewall rules added for IPv4 and IPv6 protocols.
If you've set up SSH to use a different port, use a more specific command to allow SSH connections. For example, if SSH is on port 1992, use:
# ufw allow 1992/tcp
This rule allows TCP connections to port 1992.

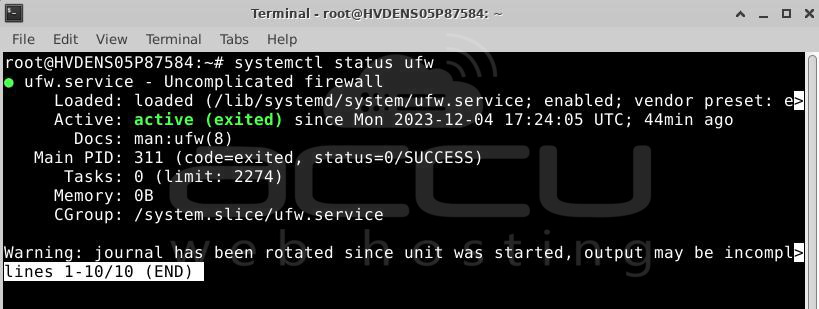
4. Activate UFW Firewall:
After setting up UFW, you must turn it on using this command:
# ufw enable
This command will start UFW right away and make sure it's enabled every time your system starts up. When prompted, type 'y' and press ENTER to confirm.

To confirm that it's running, you can check its status using the systemctl service manager:
# systemctl status ufw
Working with UFW Rules:
UFW, the firewall we're using, works based on rules. These rules determine how your server communicates with other machines.
To have more control over your firewall settings, you can specify which connections are allowed and which ones are denied.
1. Adding UFW Firewall Rules:
There are different rules you can apply to your system using UFW:
allow: Permits traffic
deny: Silently ignores traffic
reject: Refuses traffic and sends an error message to the sender
limit: Controls connections from a specific IP address that has tried to connect six or more times in the last 30 seconds
You can apply these rules broadly or more specifically. The broad approach applies the rule to both incoming and outgoing traffic using this command pattern:
# ufw [rule] [target]
If you want to be more specific and apply the rule to either incoming or outgoing traffic, you can use these command patterns:
# ufw [rule] in [target]
# ufw [rule] out [target]
We'll go through practical examples later to show how these rules work in real-life situations.
UFW firewall rules can target various things like service names, IP addresses, ports, and even network interfaces. Let's explore each of these targeting patterns to understand what is possible.
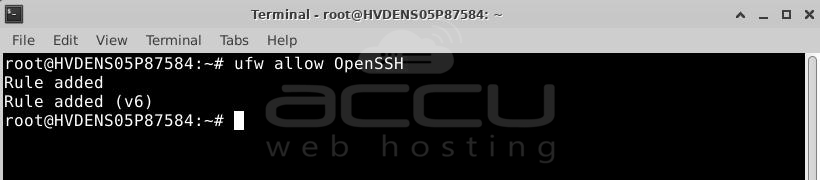
1.1 Target Application Profiles:
When you install UFW, many apps that use the internet for communication tell UFW about themselves. This way, users can quickly decide whether to allow or block external access for those apps.
You can see which apps are registered with UFW using this command:
# ufw app list
The output might look like a list of apps.

To let both incoming and outgoing traffic for any of these apps, use this command pattern:
# ufw allow [App name]
For example, to allow OpenSSH connections, you can use:
# ufw allow OpenSSH
This rule lets all traffic in and out for the OpenSSH app. If you only want to allow incoming SSH traffic, you can use:
# ufw allow in OpenSSH
However, the recommended practice for enabling SSH on a remote server is to use the "limit" rule. It allows only six connections from the same IP address within a 30-second window, protecting you from potential brute-force attacks. For OpenSSH in a production environment, it's better to use the "limit" rule instead of "allow":
# ufw limit OpenSSH
1.2 Target IP Addresses:
In UFW, you can say "yes" or "no" to a particular IP address using this command pattern:
# ufw [rule] from [ip_address]
For example, if you notice some bad behavior from the IP address 192.168.2.152, you can stop all traffic from it by typing:
# ufw deny from 192.168.2.152

However, even though you blocked all traffic from this problematic IP address, it might still reach your server sometimes. This happens because UFW follows its rules from top to bottom. For instance, your first rule might allow all incoming traffic to port 22, and the rule to deny from 192.168.2.152 could be just one step below.
To prevent such issues, use the "prepend" option to add the most specific firewall rules right at the very top of your rules list. The final command would look like this:
# ufw prepend deny from 192.168.2.153

1.3 Target Ports:
You can tell UFW to focus on certain ports or groups of ports. For example, you might allow connections to port 8080 using any method like this:
# ufw allow 5000

Usually, it's better to be more exact and only allow connections to a specific port using a certain network method. For instance, you might allow only TCP connections to port 8080 with this command:
# ufw allow 5000/tcp

However, sometimes your app might use a range of ports for different tasks. In that case, you can use this command to give permission to a range of ports:
# ufw allow 5000:6000/tcp

Remember when we talked about targeting IP addresses? If you don't want to block all traffic from an IP address entirely, you can be more precise and only block traffic to a specific port. For example:
# ufw deny from 192.168.2.152 to any port 53 proto udp
This way, you block all traffic from 192.168.2.152 to port 53 using the UDP method, which is usually used for a DNS service.
Your results would look something like this:

1.4 Target Network Interfaces:
Some systems have more than one way to connect to the network, and each might need different rules for the firewall. Luckily, UFW lets you focus on a specific network connection and apply firewall rules just to that one. Let's give it a try.
First, check the network connections your system has with this command:
# ip addr
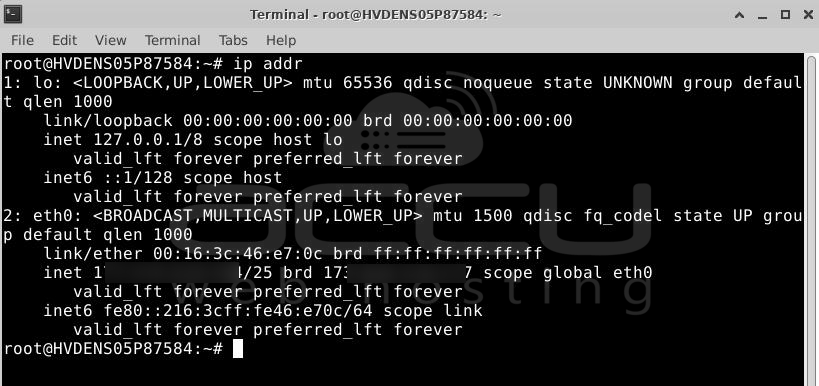
You'll see a list of network interfaces. For example, on an Ubuntu 20.04 system, there might be two. Let's focus on the second one, named eth0. To do this, use the "on eth0" option in your UFW command like this:
# ufw allow in on eth0 from 192.168.2.255
Now, only traffic from 192.168.2.255 is allowed to go through the eth0 network connection.
2. Check UFW Firewall Rules:
After you've set up your firewall rules, it's a good idea to make sure everything is in place. You can see what rules are active by using this command:
# ufw status
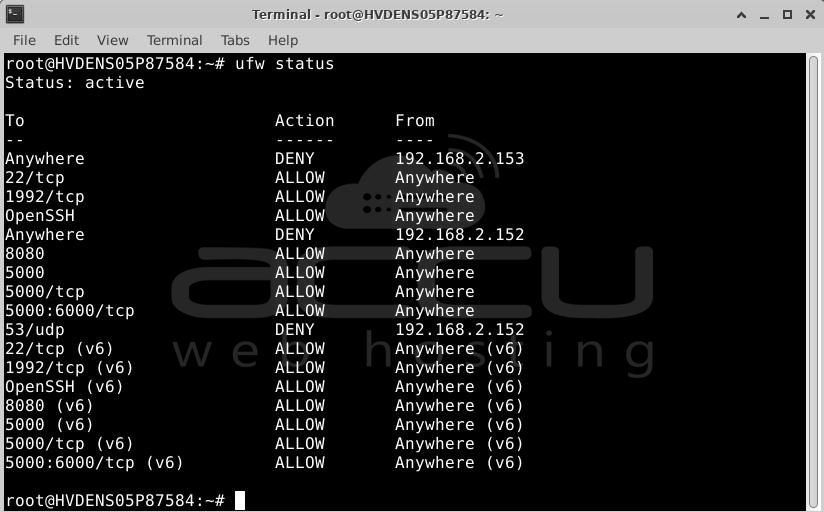
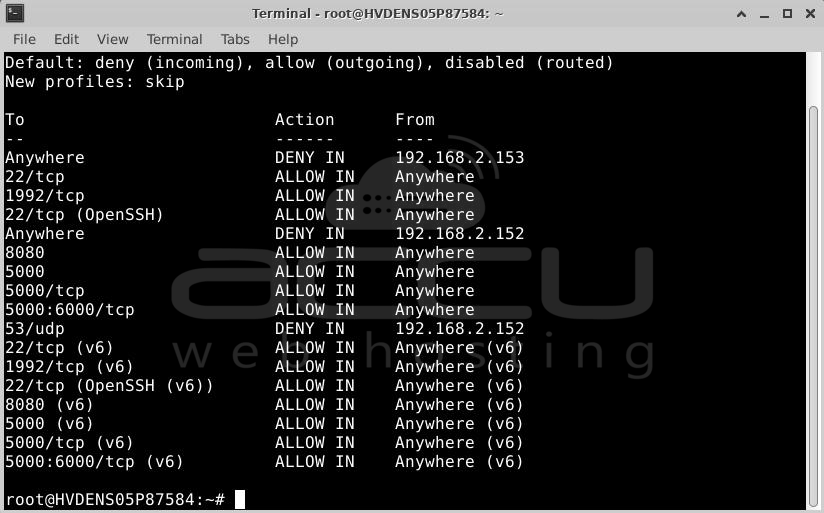
For more details about the rules, you can use the verbose option:
# ufw status verbose
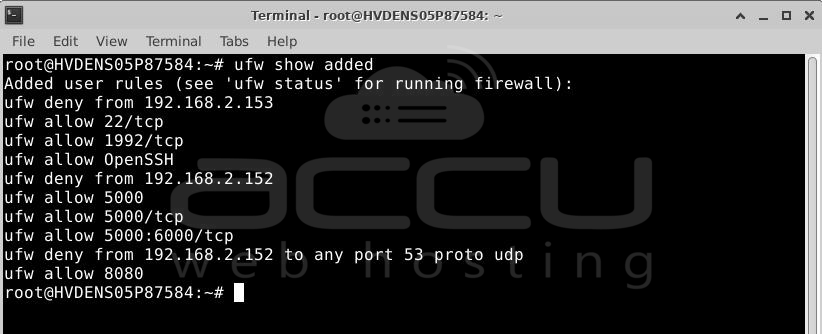
And if you just want to see a list of rules in the order you typed them, use:
# ufw show added

Unlike "ufw status," the "ufw show" command displays firewall rules even if UFW is turned off.
3. Delete UFW Firewall Rules:
After you've added your firewall rules, what if you need to remove some of them? There are two ways to do it: you can either delete a rule by its number or delete it by its name. Let's look at each method.
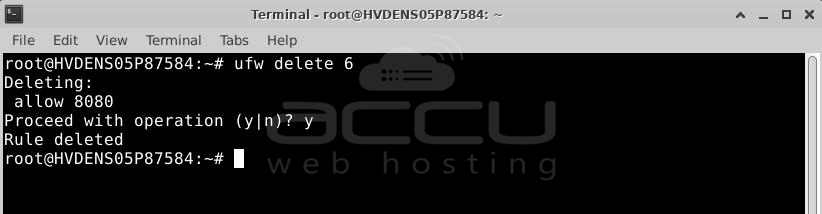
Delete by Number:
You can delete UFW rules by giving them numbers and then removing a specific rule using its number. First, check the numbered list of UFW rules with this command:
# ufw status numbered

Now, your firewall rules have numbers attached to them. For example, let's remove rule number 6:
# ufw delete 6
Press 'y' to confirm, and rule number 6 will be deleted.
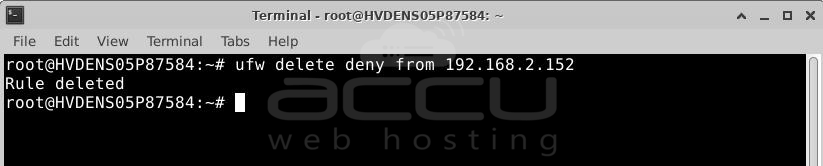
Delete by Rule Name:
The second way to delete a UFW rule is to specify it by its name. First, list the rules as you typed them:
# ufw show added
Let's say you want to remove the rule that denies all traffic from the IP address 192.168.2.152. To do this, use the delete command with the rule name:
# ufw delete deny from 192.168.2.152
This deletes the rule by its name.
4. Manage UFW Logs:
UFW lets you keep an eye on your network activity with different logging levels. By default, UFW logs all blocked packets that don't match the set rules and also logs packets that do match your defined rules. This is a basic logging level, but you can change it if you want.
To check your logging activity, use this command:
# ufw status verbose
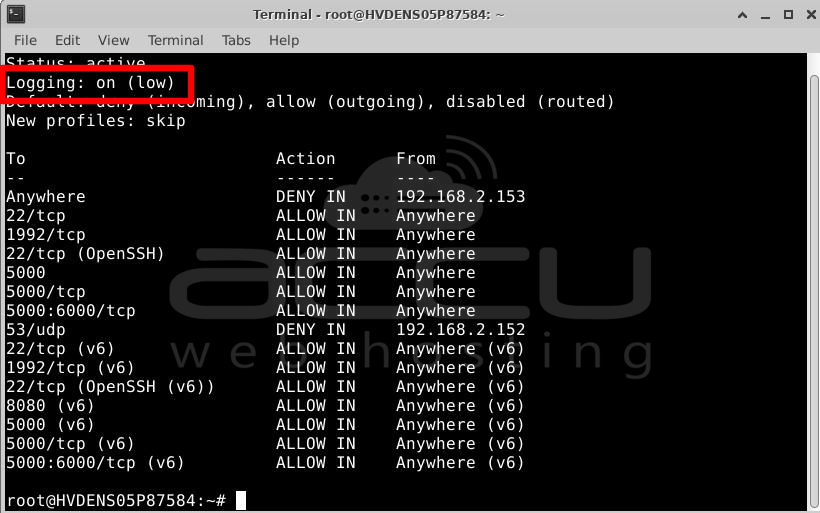
The second line of the output shows that logging is on with a low level.
Set UFW Logging Level:
There are five UFW logging levels, each collecting different amounts of data. Be careful with higher levels, as they can generate a lot of logs and fill up your disk on a busy system.
off: Turns off UFW logging.
low: Logs blocked packets and packets matching pre-set rules.
medium: Like low, plus logs all allowed packets not matching the defined policy, all invalid packets, and all new connections.
high: Like medium, but without rate limiting, and logs all packets with rate limiting.
full: Like high, but without rate limiting.
You can change the default low logging level with this command pattern:
ufw logging [level]
For example, to change the logging level to medium, use:
# ufw logging medium
This way, you've turned on medium logging, which covers more types of activities.

5. Understand UFW Logs:
The records of UFW activities are saved in the /var/log/ directory. You can see all the log files created by UFW using the command:
# ls /var/log/ufw*

Now, if you want to look into the log files for information about UFW's actions, you can use a command like:
# less /var/log/ufw.log

In the log files, you'll find detailed information about what UFW is doing. Each line of the log provides a lot of details. For example:
Dec 4 18:07:45 HVDENS05P87584 kernel: [ 2623.722888] [UFW BLOCK] IN=eth0 OUT= MAC=00:16:3c:46:e7:0c:10:0e:7e:bf:97:40:08:00 SRC=45.33.110.79 DST=192.168.2.152 LEN=44 TOS=0x00 PREC=0x00 TTL=243 ID=54321 PROTO=TCP SPT=34862 DPT=31337 WINDOW=65535 RES=0x00 SYN URGP=0
Let's break down this line to understand it better:
[UFW BLOCK]: Indicates that the packet was blocked.
IN=eth0: Incoming traffic device.
OUT=: Outgoing traffic device is empty because the traffic was incoming.
MAC=...: The device’s MAC address.
SRC=...: Source IP address of the sender.
DST=...: Destination IP address meant to receive the packet.
LEN=...: Packet length.
TOS=... and PREC=...: Deprecated variables that are not relevant and set to 0.
TTL=...: Time to live for a packet. The number of routers the packet can pass through before it is terminated.
ID=...: Unique ID for the IP datagram, shared by fragments of the same packet.
PROTO=TCP: Protocol used.
SPT=...: Source port of the connection, indicating the service that initiated the connection attempt.
DPT=...: Destination port of the connection, indicating the service meant to receive the connection attempt.
WINDOW=...: The size of the packet the sender is willing to receive.
RES=...: A reserved bit for future use, currently irrelevant and set to 0.
SYN URGP=...: SYN indicates that this connection requires a three-way handshake, and URGP stands for urgent pointer relevancy, which is irrelevant and set to 0.
6. Reset UFW Configuration:
Sometimes, you might need to start over with your settings. If you want to go back to the default settings for UFW, use this command:
# ufw reset
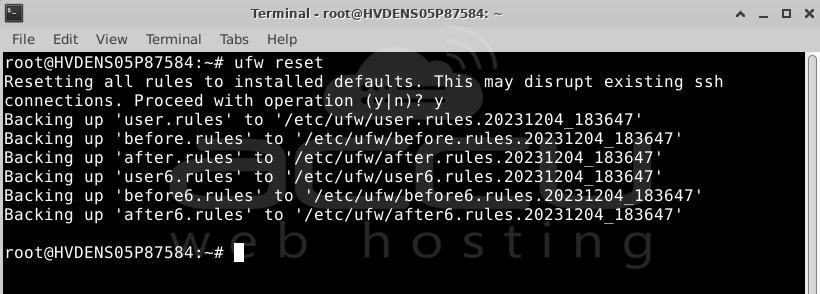
When asked, type 'y' and press ENTER to reset all active firewall rules and turn off UFW. UFW will automatically create backup files for the rules you just reset in case you change your mind or want to review them later.
Conclusion:
Having the right firewall setup is important for security and making things work smoothly. It should be set up to allow only the necessary incoming connections while blocking any unnecessary ones.
Now, your firewall is set to allow at least SSH connections. Make sure to allow any other incoming connections your server needs while blocking unnecessary ones to keep your server both functional and secure.
