Are you looking to install and configure a DNS server in your Linux environment? Look no further! This article will guide you through the process with detailed, step-by-step instructions to ensure a smooth and successful DNS setup. All the essential information is right here, whether you're a beginner or an experienced user.
The Domain Name System (DNS) serves a crucial function by translating human-readable domain names into IP addresses, facilitating our access to websites and online services. Within a Linux environment, the configuration of a DNS server empowers you to oversee and govern DNS resolution within your network. This bestows you enhanced flexibility, control, and the ability to customize settings. Let's dive into the process of installing and configuring DNS in Linux.
Identify Your Linux Distro
Before you begin, it's crucial to identify your precise Linux distribution. Different Linux distributions may have slight variations in package managers, commands, and file locations. To determine the Linux distribution installed on your system, you can use the "hostnamectl" command. Open a terminal window and run the command.
# hostnamectl
Output will display various system details, encompassing the operating system and kernel information.
Install and Bind DNS
Once you've determined your Linux distribution, installing DNS server software is next. Bind (Berkeley Internet Name Domain) is a widely used and highly reliable DNS server software. To install Bind, open the terminal and use the appropriate package manager command specific to your distribution. For instance, you can execute the command below using AlmaLinux.
To install Bind on your server, start by updating the local package index using the following command:
# sudo dnf update

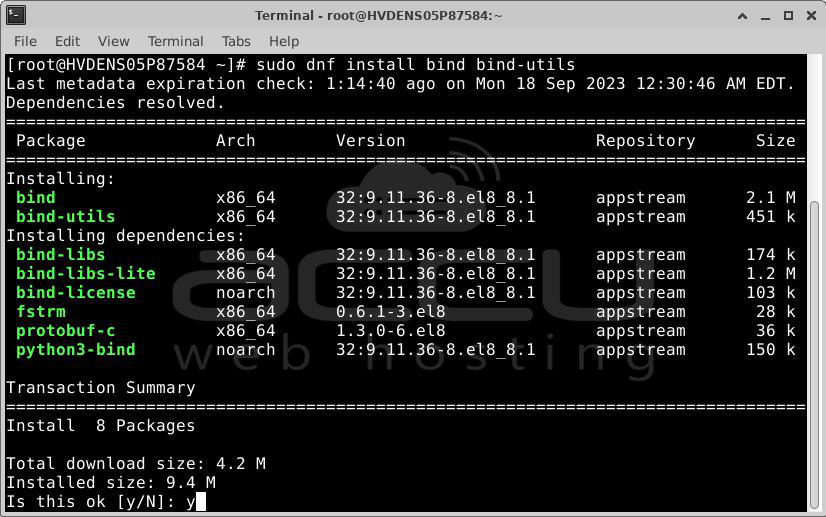
Next, use the following command to install Bind and its dependencies on AlmaLinux:
# sudo dnf install bind bind-utils
Start and Enable Bind
Once your installation is complete, start the Bind service using the following command:
# systemctl start named
Next, enable it with the following command:
# systemctl enable named

You can confirm that the service is active and operational by executing the following command:
# systemctl status named

Now, let's explore the steps to configure Bind on AlmaLinux.
Configure Bind on AlmaLinux
To begin, copy the Bind configuration file using the following command:
# sudo cp /etc/named.conf /etc/named.bak
Now, open the file using your preferred text editor. In this example, we'll use the vi text editor:
# sudo vi /etc/named.conf

Then, locate the "allow-query" parameter and modify it to match your network subnet or any to match every IP address.
allow-query { localhost; any; };
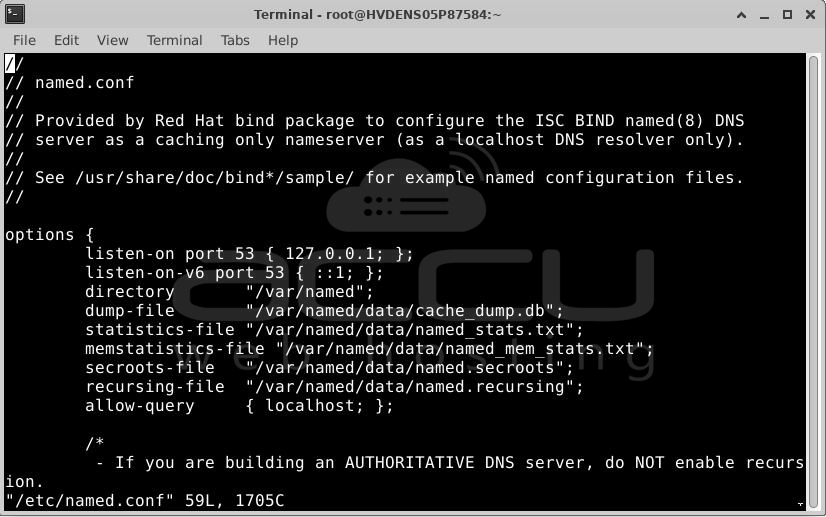
Once you've made the necessary changes, save and close the file.
This configuration restricts access to the DNS server only to hosts within the specified network and prevents access from other hosts.
The forward lookup DNS zone stores the association between hostnames and their corresponding IP addresses. When queried, it provides the IP address of a host system based on its hostname.
In contrast, the reverse DNS zone retrieves a server's Fully Qualified Domain Name (FQDN) based on its IP address.
To set up the reverse and forward lookup zones, copy and paste the following content into the Bind configuration file on AlmaLinux, replacing "accuwebtraining.com" with your specific domain name:
# sudo vi /etc/named.conf

After making these changes, please save the file and then close it.
For the remaining steps in configuring Bind, let's create a forward DNS zone file for the Domain.
Now, let's create a Forward DNS zone file on AlmaLinux.
You can generate a Forward DNS zone file for the Domain using the following command:
# sudo vi /var/named/accuwebtraining.com.db
Note: Replace the domain name and hostname with your Domain & hostname. Here, the Domain name is accuwebtraining.com, & Hostname is HVDENS05P87584.kbwritingforseo.com. Add the following content to the file.
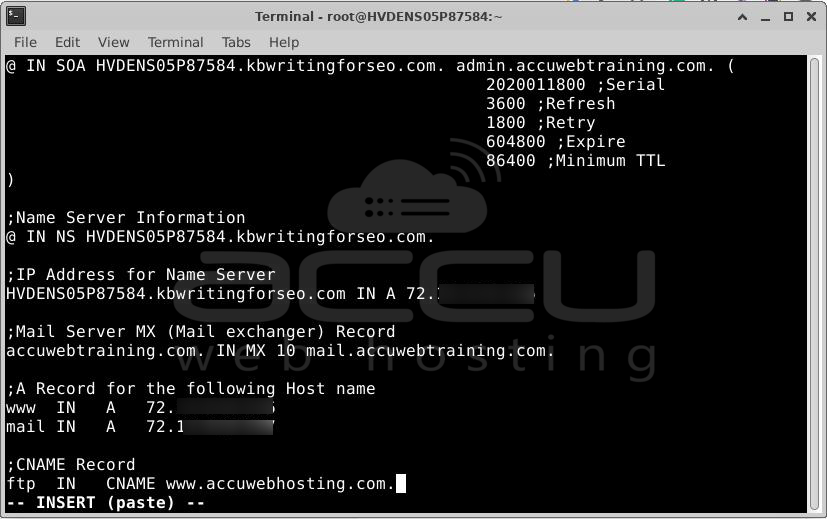
Once you're done, save and close the file.
Now, let's create a reverse DNS zone file on AlmaLinux.
To complete the Bind configuration on AlmaLinux, you should proceed by generating a reverse DNS zone file for the Domain.
# sudo vi /var/named/accuwebtraining.com.rev
Add the following content to the file.
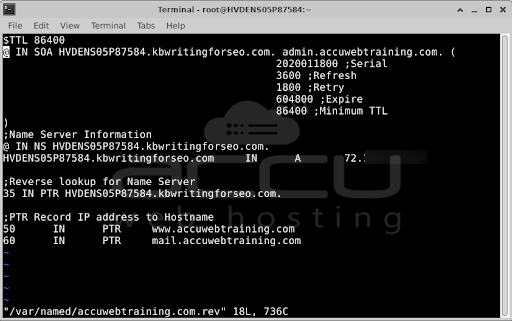
Once you're done, save and close the file.
Now, Set the required file permissions for the two configuration files using the following commands:
# sudo chown named:named /var/named/accuwebtraining.com.db
# sudo chown named:named /var/named/accuwebtraining.com.rev
Next, ensure that the DNS zone lookup files are free of syntax errors by executing the following commands:
# sudo named-checkconf
# sudo named-checkzone accuwebtraining.com /var/named/accuwebtraining.com.db

# sudo named-checkzone 72.XXX.XXX.XXX /var/named/accuwebtraining.com.rev

Restart Bind
Execute the following command to implement these changes:
# systemctl restart named
Set up the firewall configuration
To allow client systems to access the system, follow these steps to add the DNS service to the firewall and reload it. Execute the following commands:
# sudo firewall-cmd --add-service=dns --zone=public --permanent
# sudo firewall-cmd --reload

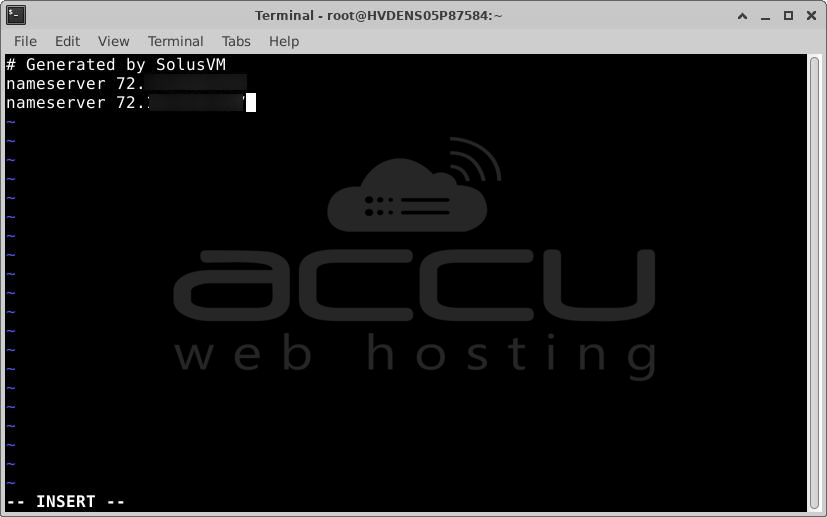
Include the nameserver's IP address in the /etc/resolv.conf file.
# vi /etc/resolv.conf
Next, modify the following parameter:
nameserver 72.XXX.XXX.XXX
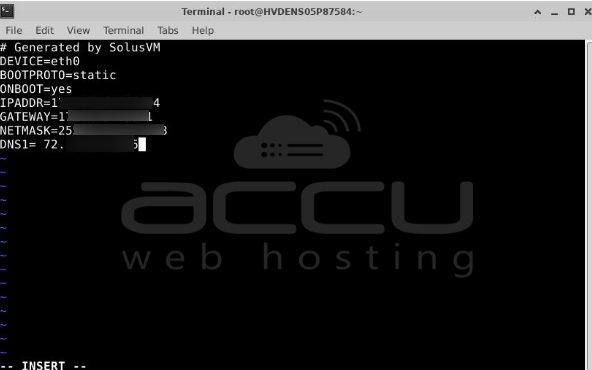
Lastly, you should add the IP address of the Bind DNS server to the /etc/sysconfig/network-scripts/ifcfg-eth0 file, as demonstrated below.
# vi /etc/sysconfig/network-scripts/ifcfg-eth0
Afterward, bind the DNS server's IP address by placing it below the gateway configuration:
DNS1= 72.XXX.XXX.XXX
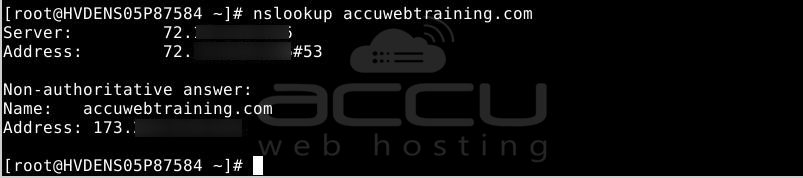
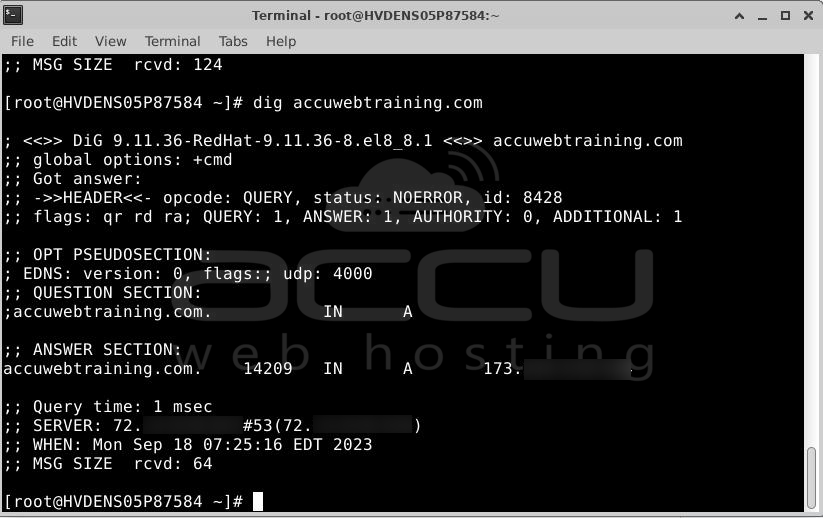
Verify the DNS name resolution
After installing the BIND package, configuring named files, creating lookup zones, and restarting the service for the changes to take effect, it's time to utilize the nslookup and dig commands. These tools will aid in verifying the proper functioning of DNS and whether the expected results are being achieved.
nslookup is a utility for querying internet domain name servers, while dig is a tool designed to interrogate DNS servers. dig conducts DNS lookups and presents the responses received from the nameserver.
# nslookup accuwebtraining.com
# dig accuwebtraining.com
Conclusion
This article has provided a comprehensive understanding of DNS and its operations. You now grasp both forward and reverse lookup zones and how they function.
Additionally, you have acquired the knowledge required to install the BIND package, responsible for establishing DNS on your system, configuring named files, and managing lookup zones. Lastly, you have been introduced to two essential commands, nslookup and dig, which are invaluable for querying and scrutinizing DNS resolutions.
