Introduction
PFX files are used to securely store certificates, including both the public key and the associated private key. These files are valuable for various purposes, such as securing web servers, enabling SSL/TLS encryption, and more. In this article, we'll walk you through the process of generating a PFX file from both Windows and Linux servers.

Generating a PFX File on Windows Server:
Converting a CER certificate to a PFX format without the private key may seem like a complex task, but with the right steps, it's a straightforward process. This method is specific to Windows platforms and assumes that you've generated a Certificate Signing Request (CSR) on the same machine where the private key was created. Windows Server provides a user-friendly interface and Command Prompt for exporting certificates to PFX files.
Steps to generate a PFX File using Windows Server Certificate Manager:
1. Import the certificate
Step 1. Login into your Windows Server.
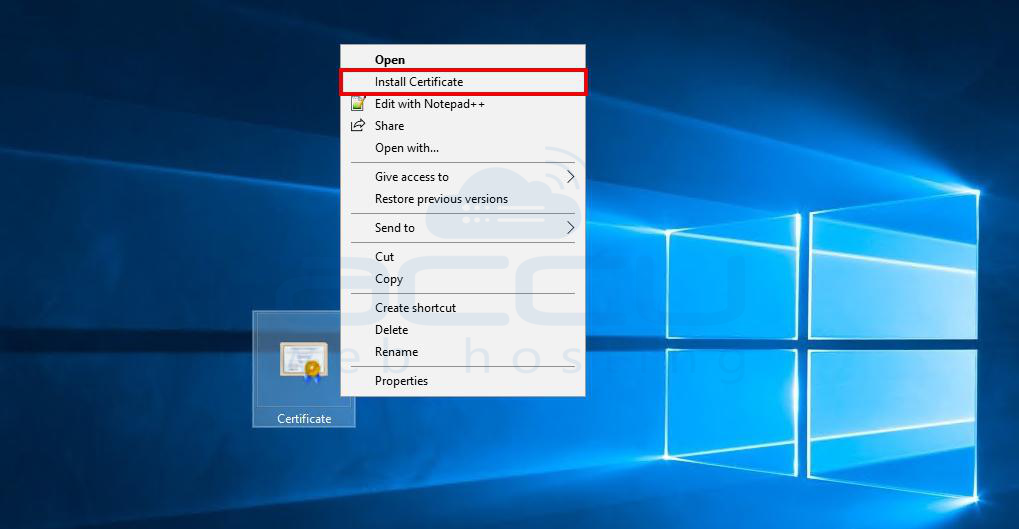
Step 2. Right-click on the certificate file (CER format). Select "Install Certificate."
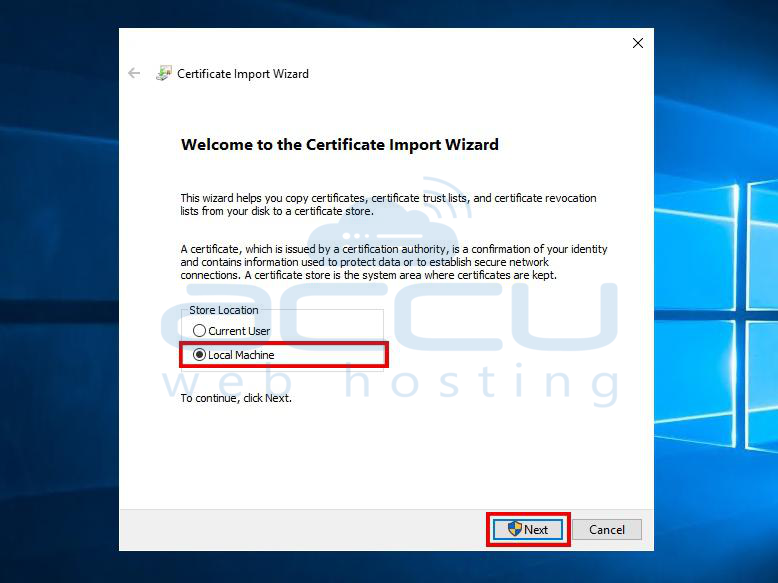
Step 3. In the wizard, select the "Local Machine" radio button and click "Next."
Step 4. Choose the default automatic store location for importing the certificate and click on "Next" to proceed.

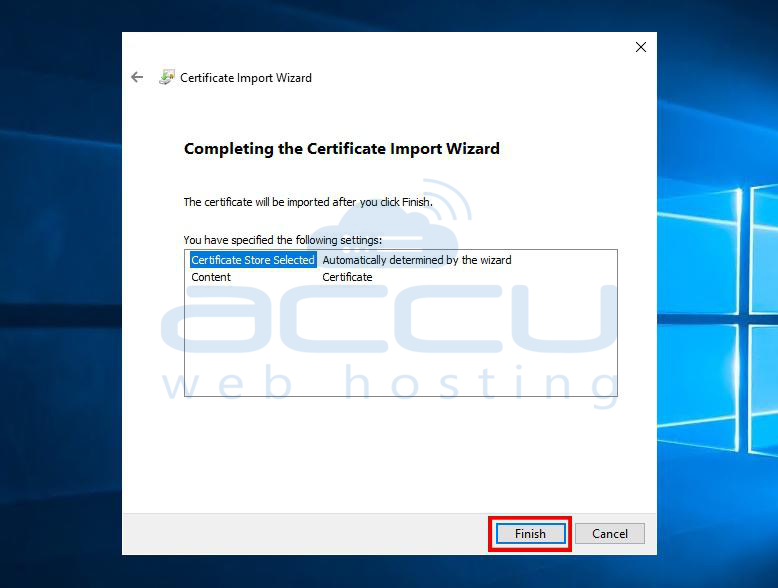
Step 5. Click the "Finish" button to complete the import process.
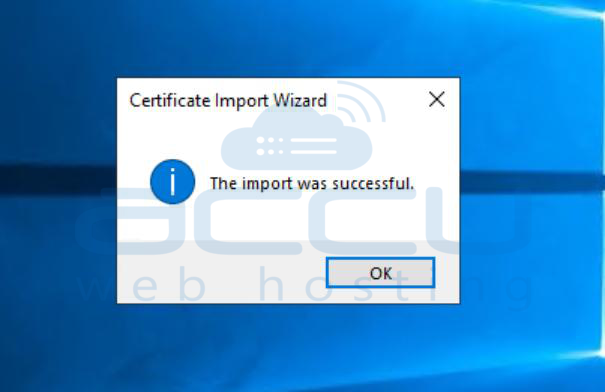
Step 6. Wait for a while until you see a successful message indicating "Certificate Import Successful."
2. Steps to export the certificate in .pfx from the Windows Server Certificate Manager.
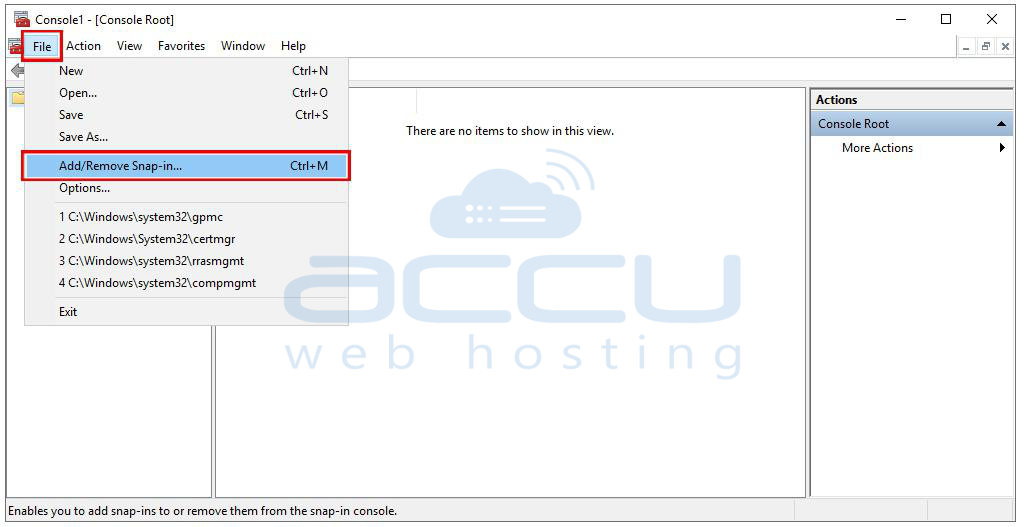
Step 1. Press Win + R to open the Run utility. Type "mmc" (Microsoft Management Console) into the text box and press the OK button. This action will launch the Microsoft Management Console.

Step 2. Within the Microsoft Management Console, navigate to the "File" menu located in the upper left corner. Click on "File," and from the drop-down menu, choose "Add/Remove Snap-in..."
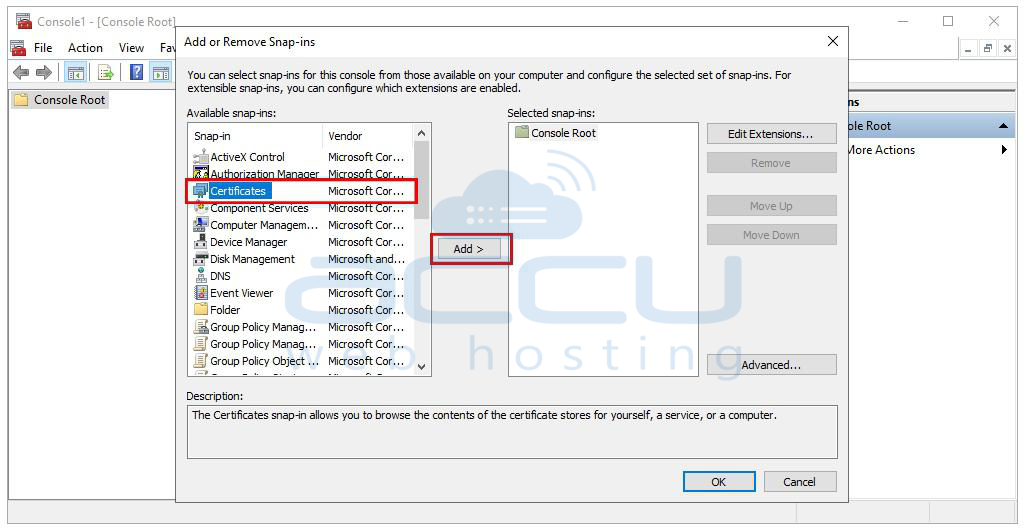
Step 3. In the "Add or Remove Snap-ins" window, you'll see a list of available snap-ins. Scroll down and find "Certificates" in the list. Select it by clicking on it, then press the "Add" button.
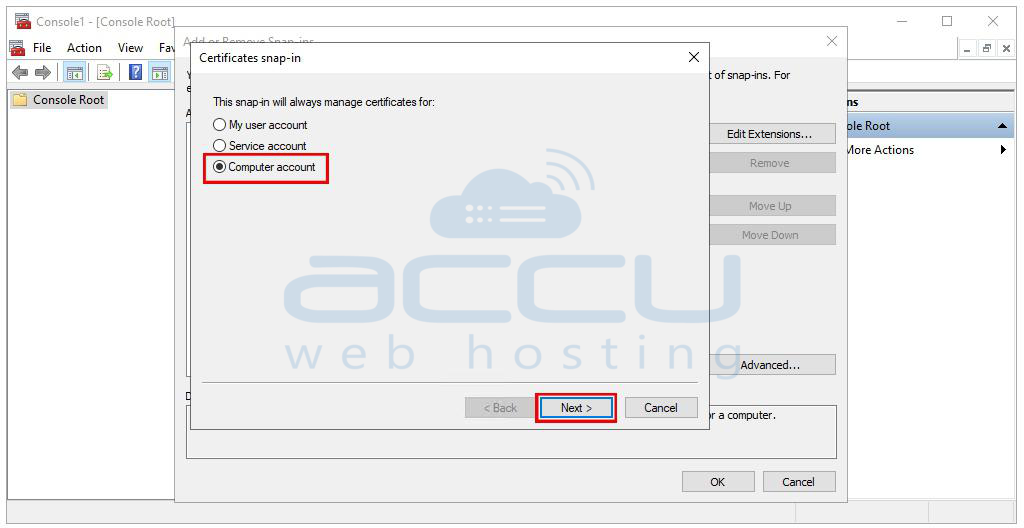
Step 4. A new window will appear, asking you to select the snap-in that you want to create the certificate for. For demonstration purposes, let's choose "Computer account" and click the "Next" button.
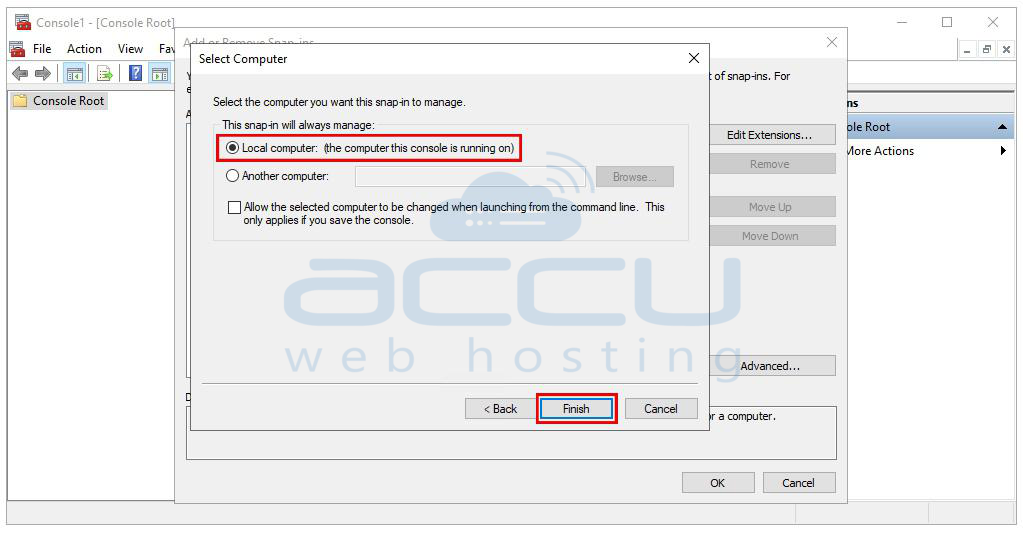
Step 5. Select "Local computer" since you're creating a Certificate Signing Request (CSR) on the same computer. Then, click "Finish."
Step 6. In the "Add or Remove Snap-ins" window, you should now see "Certificates (Local Computer)" listed. Select it and click "OK."
Step 7. You will now have access to the certificate store.
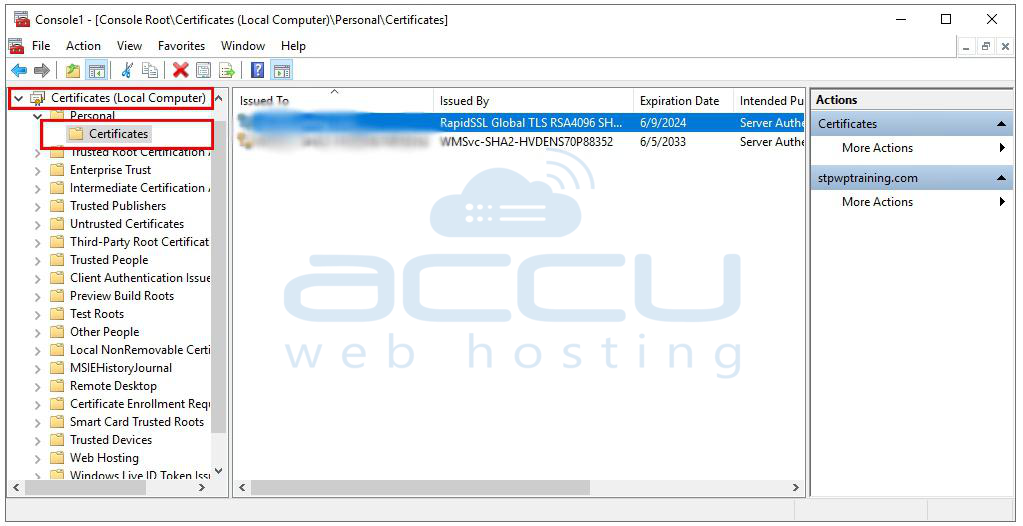
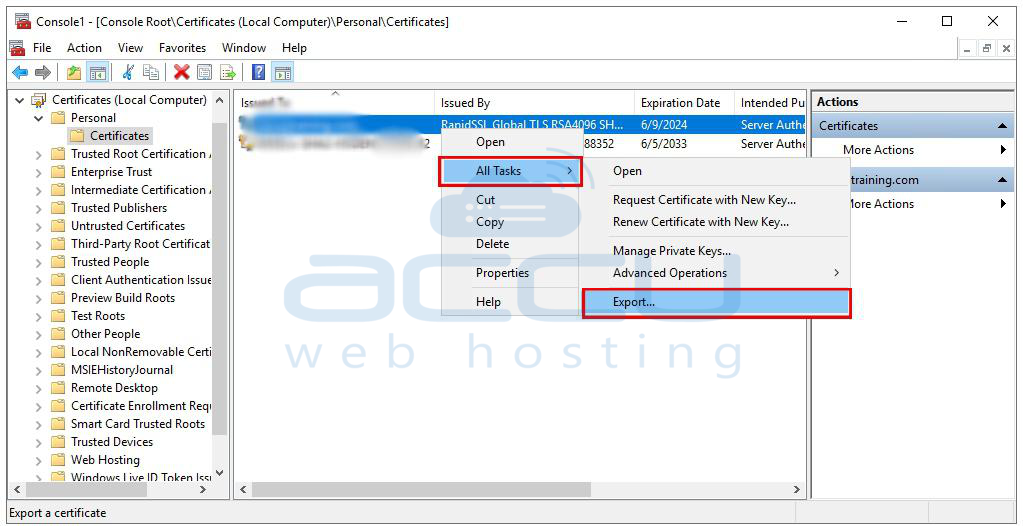
Step 8. Locate and right-click on the certificate you want to export. From the context menu that appears when you right-click, hover over "All Tasks" and select "Export."
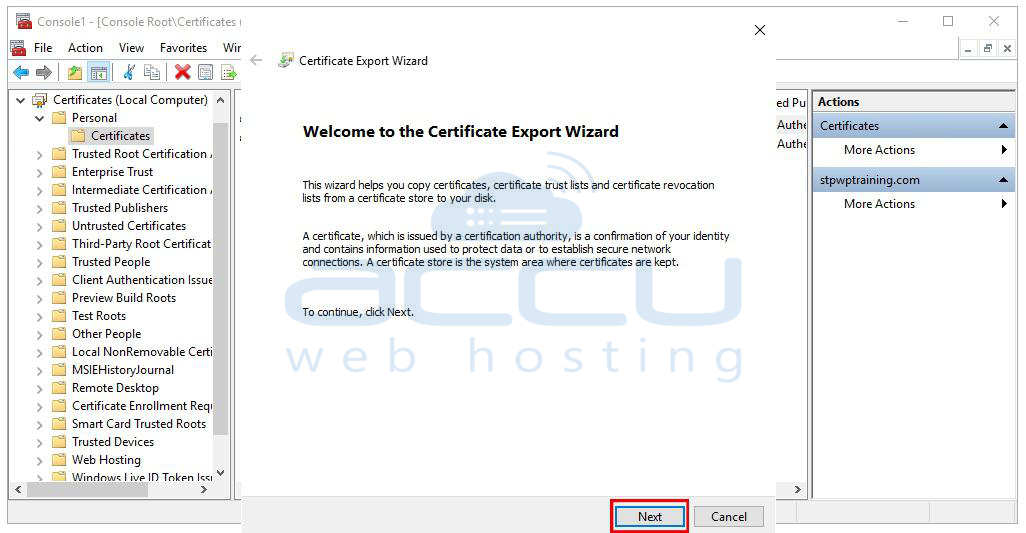
Step 9. In the "Certificate Export Wizard," click "Next" to proceed.
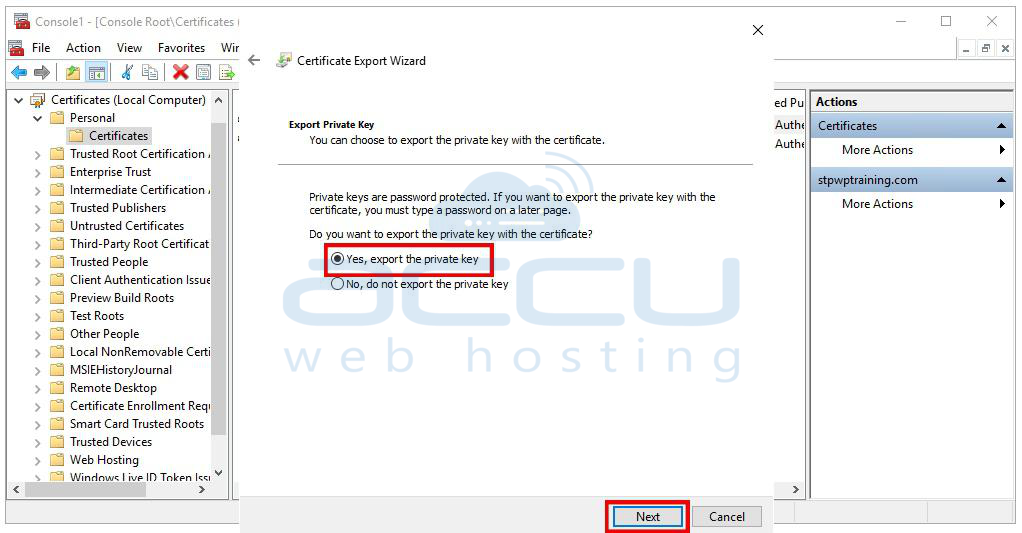
Step 10. On the next screen, select the radio button that says "Yes, export the private key" and click "Next."
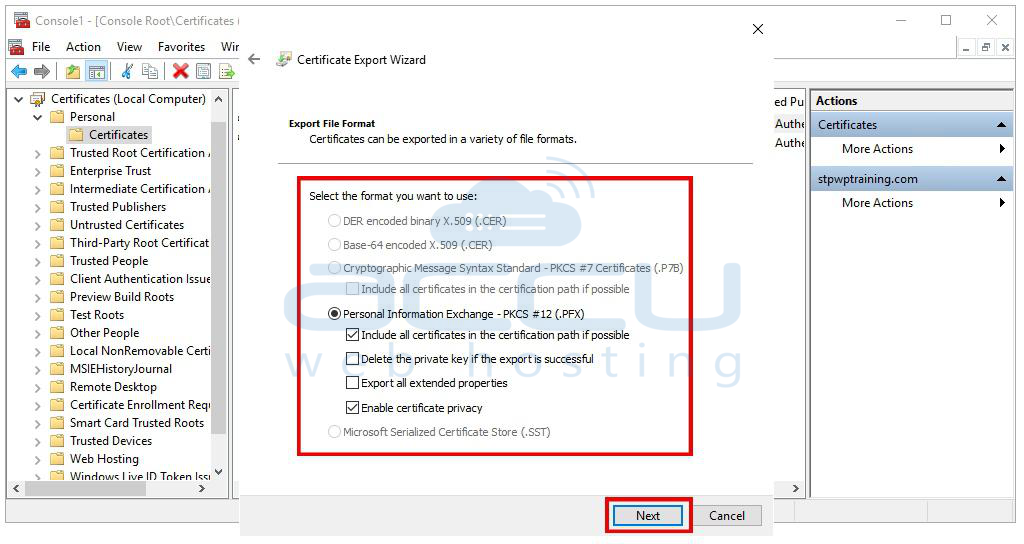
Step 11. In the "Export File Format" screen, select the option labeled "PFX." There may be multiple options available, so choose the one that suits your needs. Click "Next" to proceed to the next screen.
Step 12. On this screen, you can specify security options for exporting the PFX certificate. You can optionally select a "Group or user name" to set permissions for managing the certificate.
Step 13. For security purposes, it's mandatory to set a password for encrypting the certificate. Enter the desired password and confirm it. Also, you will have to select encryption as per your need and click on Next.

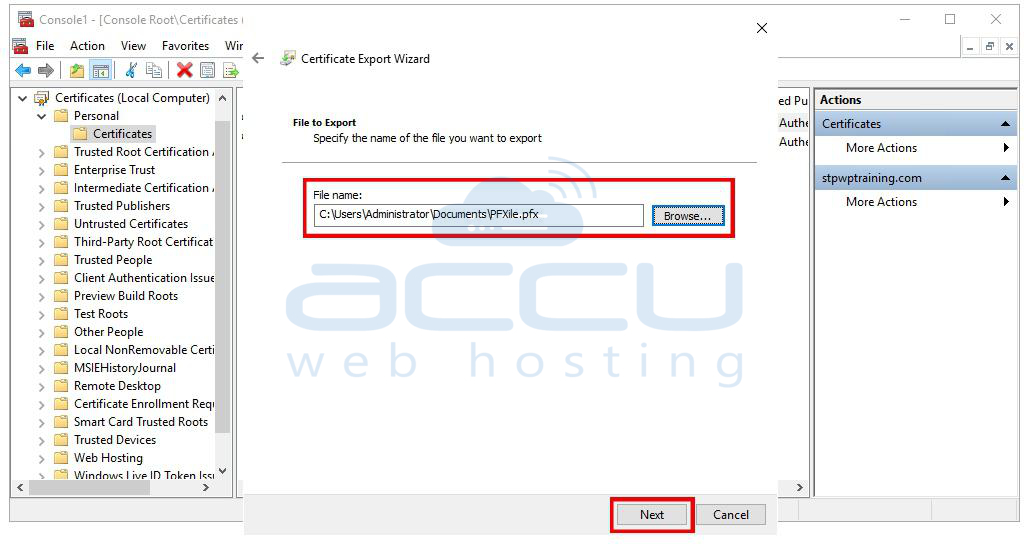
Step 14. You will be prompted to provide a location to save the PFX certificate. Click the "Browse" button to choose the directory where you want to save the file. After specifying the save location, click "Next."
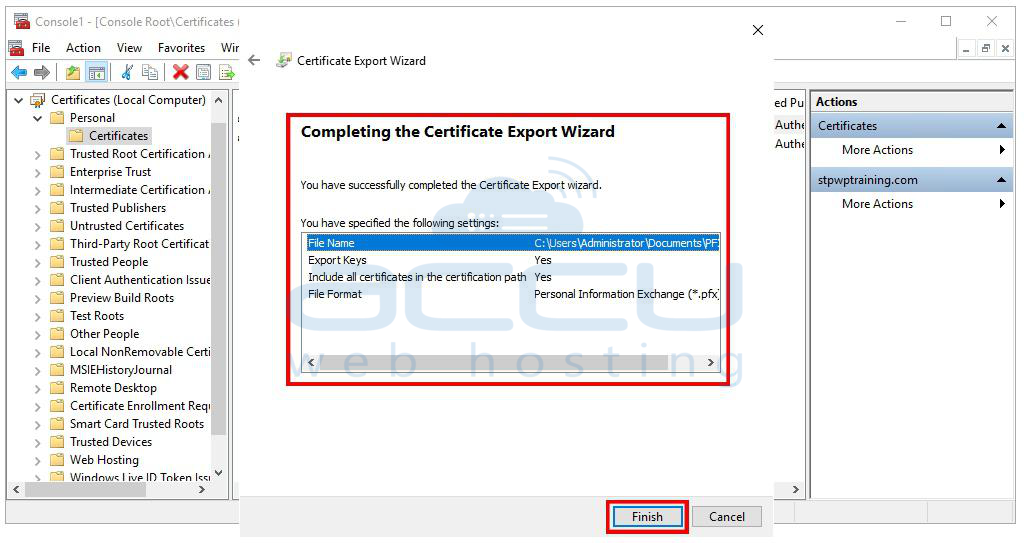
Step 15. Review the settings on the summary screen to ensure they are correct. Once you're satisfied, click "Finish" to initiate the export process.
By following these detailed steps, you will successfully convert a CER certificate to a PFX format. Make sure to keep your password secure, as it is essential for accessing and using the exported PFX certificate.
3. Steps to Convert A PEM File to PFX file using the command prompt
To convert a PEM certificate to a PFX format using the command prompt, follow these detailed steps:
Step 1. Begin by ensuring you have the latest OpenSSL software installed on your computer. You can download it from the official OpenSSL website and follow the installation instructions provided.
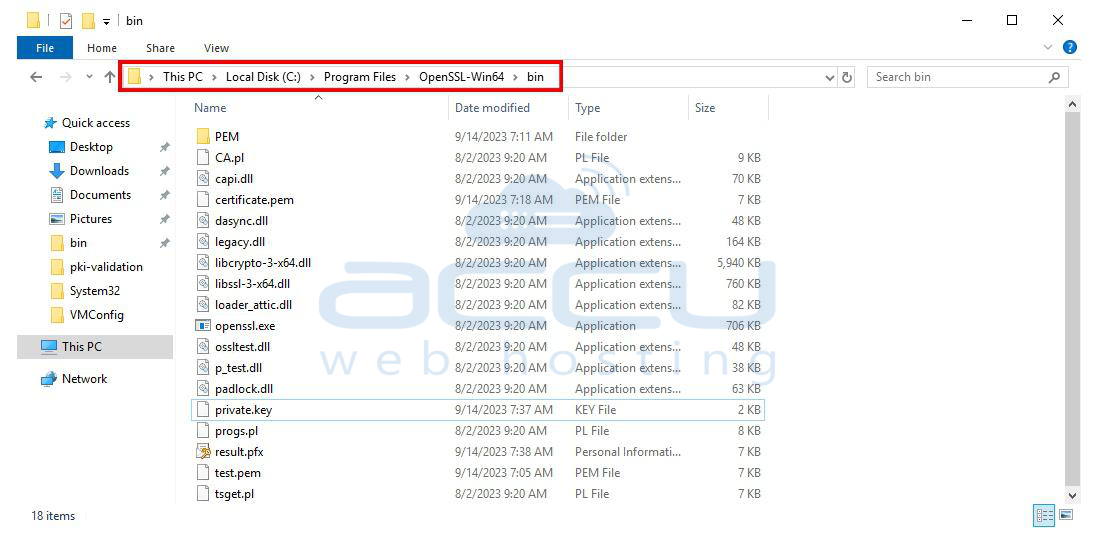
Step 2. Locate the PEM file that you want to convert to PFX. Copy this file to the OpenSSL binary folder on your computer. Typically, this folder can be found at "C:\Program Files\OpenSSL-Win64\bin," but it may vary depending on your installation.
Step 3. To execute OpenSSL commands, you need to open an administrative command prompt.
Step 4. Use the "cd" command to navigate to the OpenSSL binary folder where you copied your PEM file. For example, if you copied your PEM file to "C:\Program Files\OpenSSL-Win64\bin," you can navigate to this folder by typing the following command and pressing Enter:
cd C:\Program Files\OpenSSL-Win64\bin
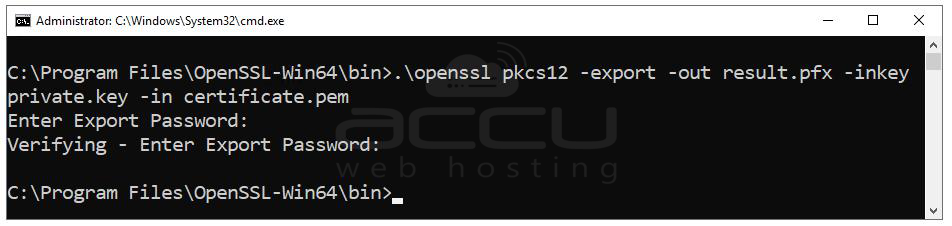
Step 5. Now that you are in the OpenSSL binary folder, you can execute the command to convert the PEM file to PFX. Use the following command:
.\openssl pkcs12 -export -out result.pfx -inkey mypemfile.pem -in mypemfile.pem
.\openssl: This is the command to run OpenSSL from the current directory.
pkcs12 -export: This part of the command specifies that you want to export the PEM file as a PKCS#12 (PFX) file.
-out: This sets the output file name as "result.pfx." You can change "result.pfx" to your desired output file name.
-inkey: This specifies the input PEM file that contains the private key.
-in: This specifies the input PEM file that contains the certificate.
Ex. .\openssl pkcs12 -export -out result.pfx -inkey private.key -in certificate.pem
Step 6. After executing the command, you will be prompted to enter a password for the PFX file. This password is used to protect the PFX file, so make sure to choose a secure and memorable one. After entering the password, press Enter.
Once you've provided the password, OpenSSL will perform the conversion and create the PFX file with the specified name. You can find the resulting PFX file in the same directory where you executed the command.
4. Steps to create PFX file using the Internet Information Services (IIS) Manager
To create a .pfx file on Windows Server using Internet Information Services (IIS) Manager, follow these step-by-step instructions:
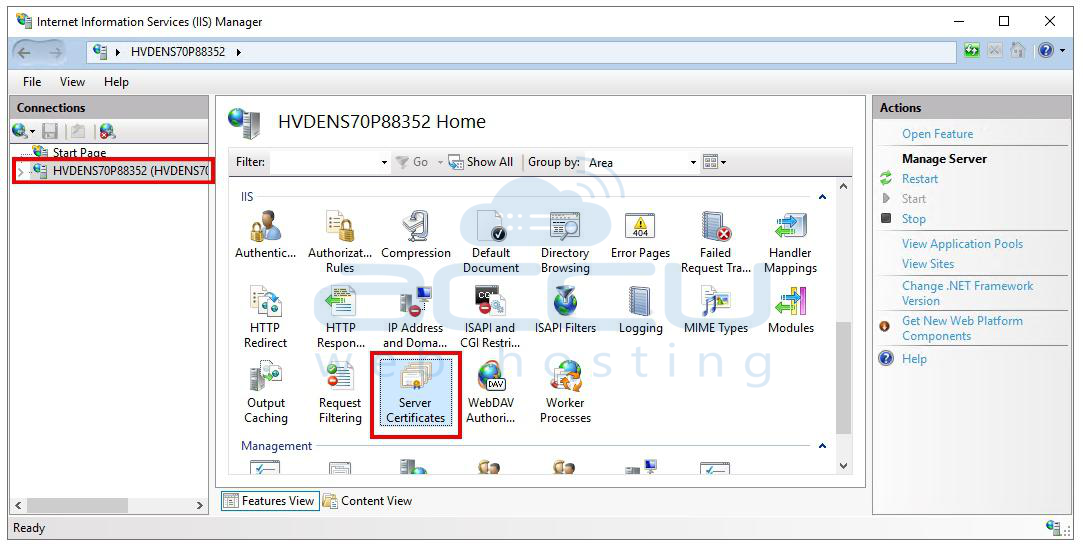
Step 1. Open the Windows Start menu. Type "Internet Information Services (IIS) Manager" and launch it from the search results.
Step 2. In the left pane of Internet Information Services (IIS) Manager, navigate through the Connections menu tree. Locate and click on the server name to select it. This is the server on which you want to manage certificates.
Step 3. On the server name Home page (found in the center pane), look for the IIS section. Double-click on "Server Certificate."
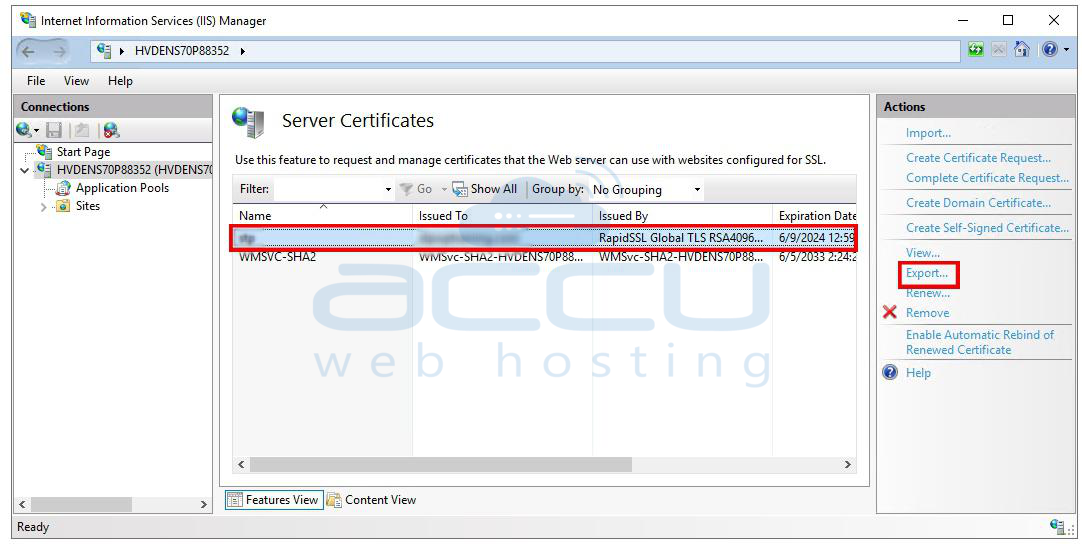
Step 4. In the Server Certificates page (center pane), you will see a list of available certificates. Select the certificate that you want to export.
Step 5. In the right pane, under the Actions menu, click the "Export..." button to begin the export process.
Step 6. On the File Name page, you will be prompted to specify a file name for the .pfx file. Click the "..." (browse) button to navigate to the location on your server where you want to save the .pfx file.
Step 7. After specifying the file location, you will need to enter a password for the .pfx file. Type the password in the appropriate field and confirm it.
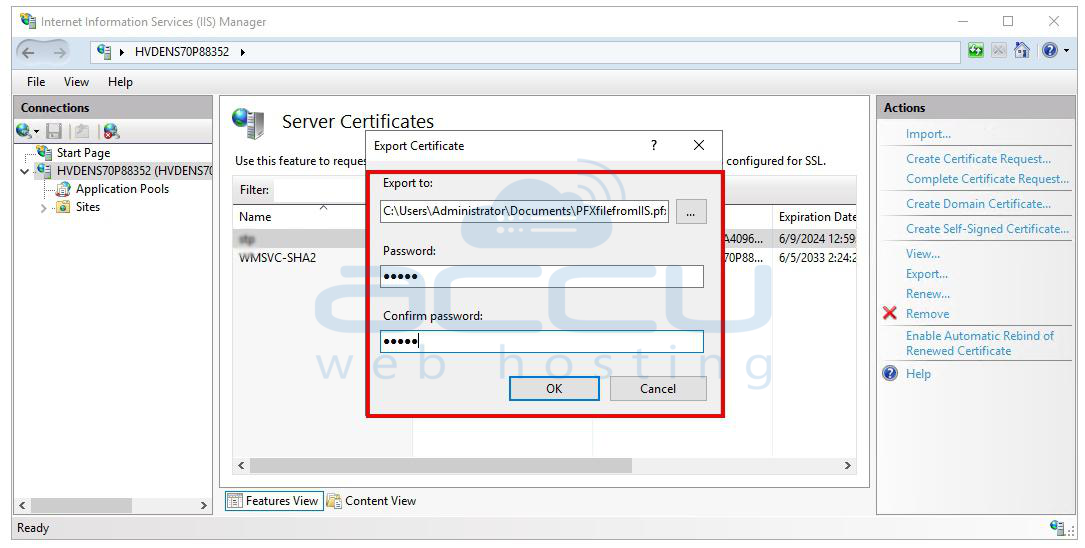
Step 8. Click "OK" to confirm your selections and initiate the export process.
The .pfx file will now be created and saved at the location you specified in step 6. This file contains the certificate and is protected by the password you provided.
By following these steps, you will successfully create a .pfx file on your Windows Server using IIS. Make sure to keep the .pfx file and its password secure, as it contains sensitive certificate information.
Steps to generate a PFX (Personal Information Exchange) file from a Linux server
To generate a PFX (Personal Information Exchange) file from a Linux server, you can use OpenSSL, which is a widely-used open-source tool for SSL/TLS-related operations. Here's a step-by-step guide to creating a PFX file from a Linux server:
Step 1. If OpenSSL is not already installed on your Linux server, you can typically install it using your package manager. The exact command may vary depending on your Linux distribution. For example, on Debian-based systems (e.g., Ubuntu), you can use:
# sudo apt-get update
# sudo apt-get install openssl
On Red Hat-based systems (e.g., CentOS), you can use:
# sudo yum install openssl
To create a PFX file, you'll need the following files:
Private Key File (PEM): This is the private key associated with the SSL certificate.
Certificate File (PEM): This is the SSL certificate itself.
Certificate Chain File (PEM): If applicable, this is the certificate chain or intermediate certificate.
Make sure you have these files available on your Linux server. You may need to copy them to a specific directory for ease of access.
Step 3. Once you have the required files, you can use OpenSSL to create the PFX file. Open a terminal on your Linux server and run the following command:
openssl pkcs12 -export -out certificate.pfx -inkey private-key.pem -in certificate.pem -certfile certificate-chain.pem
-export: This option tells OpenSSL to perform an export operation.
-out certificate.pfx: Specifies the output file name as "certificate.pfx." You can change this to your desired output file name.
-inkey private-key.pem: Specifies the path to your private key file.
-in certificate.pem: Specifies the path to your SSL certificate file.
-certfile certificate-chain.pem: If you have a certificate chain or intermediate certificate, specify its path. Otherwise, omit this part.
Step 4. After running the command, you'll be prompted to set a password for the PFX file. This password is used to protect the PFX file, so make sure to choose a secure one and remember it.
Step 5. Once you've provided the password, OpenSSL will create the PFX file with the specified name in the current directory. You can now use this PFX file as needed.
Remember to keep the PFX file and its password secure, as it contains sensitive certificate information. Additionally, make sure the file paths in the OpenSSL command match the locations of your actual certificate and key files.
Conclusion:
Whether you're managing a Windows or Linux server, the ability to generate PFX files is essential for maintaining secure communication. Windows offers a graphical interface through the Certificate Manager, IIS, and a command-line approach with PowerShell, while Linux leverages the versatile OpenSSL tool. By following the steps outlined in this guide, you can ensure the security and integrity of your certificates while facilitating secure data transmission on your servers.
