Are you seeing a message in WordPress that says, "The Link You Followed Has Expired"? This is a common issue. Don't worry. It could occur whenever you upload files, themes, or plugins that are too large for WordPress to handle by default. Clicking on it returns you to your previous location; the notice doesn't explain why.
Due to this error, you may be unable to add or update likely WordPress components, such as files or themes. You're trying to add something too big for WordPress' standard rules. WordPress says "no" when this happens and doesn't let you upload it. You may be trapped and confused by the entire situation.
What causes the error “The Link You Followed Has Expired”?
Error "The Link You Followed Has Expired" often appears when trying to add a theme or plugin that's too large. This happens because hosting providers limit how big files can be uploaded and how long they process. These limits are in the PHP settings, which help keep servers running smoothly. If you try to add something beyond these limits, the error message appears. It's like a way for WordPress to say, "Sorry, this is too much for me to handle!"

This limitation might create difficulties when you're trying to upload specific files, themes, or plugins. To check the current upload limit, navigate to your WordPress admin panel and Media → Add New. This limit affects how big the files you're trying to add can be. If your file is larger than the set limit, WordPress can't accept it, and that error message might pop up.

Remember that "The link you followed has expired" is not solely an error message that can show up when you're trying to upload big files that go beyond the size limit. For instance, if you attempt to upload a media file, you might see an error message saying, "image.jpg exceeds the maximum upload size for this site." These messages are like warnings when trying to add something too large.
AccuWeb Hosting has set limits on the server, such as PHP memory limit, upload size limit, or execution time limit. If these limits are too low, you might get this error when uploading large files or running long scripts. To fix this error, you need to increase these limits in WordPress or change the server settings. Be careful when making changes, and ask the Accuweb Hosting Technical team for help if you're unsure.
How to fix "The link you followed has expired" WordPress error?
There are four main ways to fix this WordPress error. Before starting, do some basic checks and gather information:
Check the file size: If you see this error after trying to upload a file, note the file’s size and compare it to your site’s maximum upload limit.
Backup your WordPress site: Since fixing this error involves changing your site’s code, create a backup to avoid potential problems, data loss, or other errors.
Most solutions involve changing a few values in your website’s core files:
- upload_max_filesize: Sets the maximum file size your website can upload.
- max_post_size: Sets the maximum file size for each blog post. If this is too low, increasing the file size limit won't help.
- max_execution_time: Sets the maximum time your website can spend trying to upload a file.
If you increase the upload_max_filesize value, also increase the max_execution_time value because larger files take more time to upload.
Suggested settings:
upload_max_filesize: 64 MB
max_post_size: 64 MB
max_execution_time: 300
You might need a higher file size limit if you often upload videos or high-resolution images. However, keeping it under 100 MB is usually best for good performance.
Avoiding excessive limits:
While fixing the ‘Link Expired’ error is important, it’s also crucial not to set values too high. Keep these values as low as needed to solve the problem.
Setting very high file upload sizes and long execution times can cause issues like:
- Slow down your site during large uploads.
- Overloading the backend if many users are uploading at the same time.
- This gives hackers more chances to upload malicious files and increases security risks.
Even if large file uploads aren’t a problem for everyone, it’s important to balance allowing bigger uploads with keeping your site fast and secure.
Method 1: Increase Limits Using WPCode (Recommended)
Increasing limits in the functions.php file is easy, but changes get lost if you update or change your theme. That's why we recommend using WPCode instead. WPCode is a code manager plugin for WordPress that lets you add code snippets anywhere on your site without editing theme files. This way, your customizations stay even when you update or change your theme.
Step 1: Log into the WordPress Admin dashboard. Then, install and activate the WPCode plugin.
Step 2: After activating the plugin, go to Code Snippets -> Add Snippet in your WordPress admin area and click on ‘Add Your Custom Code.’
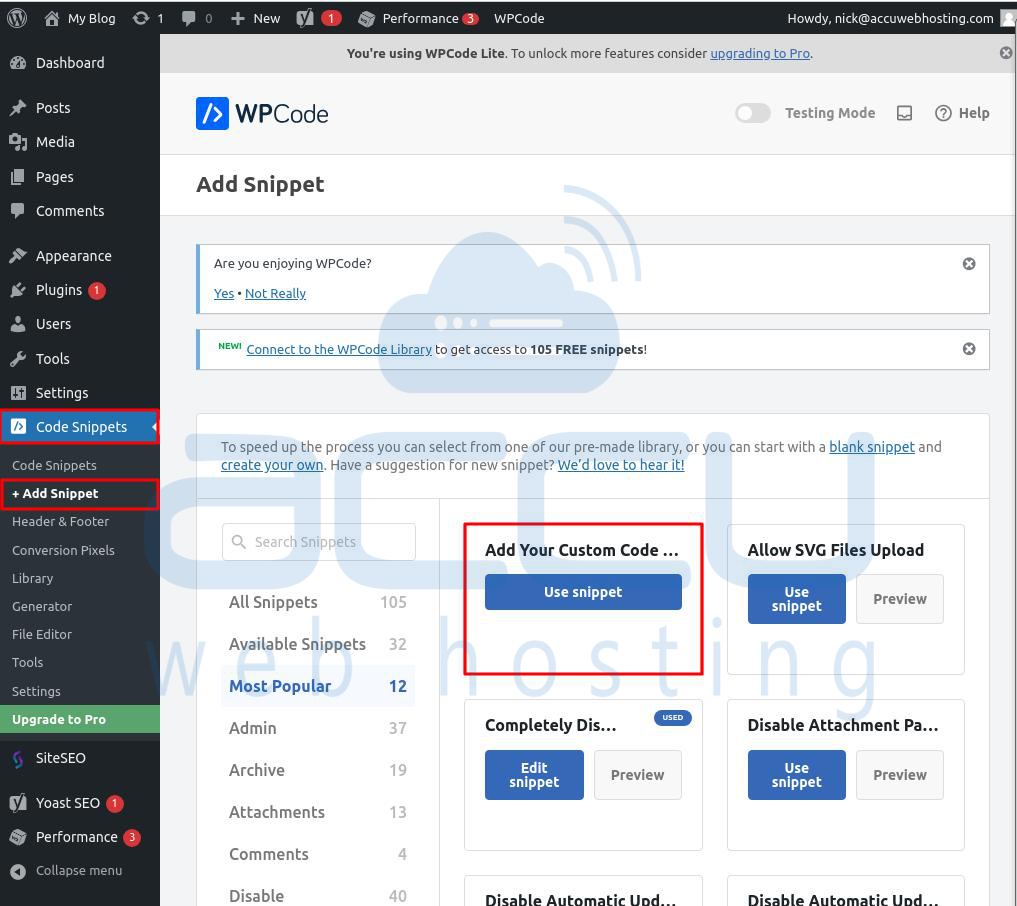
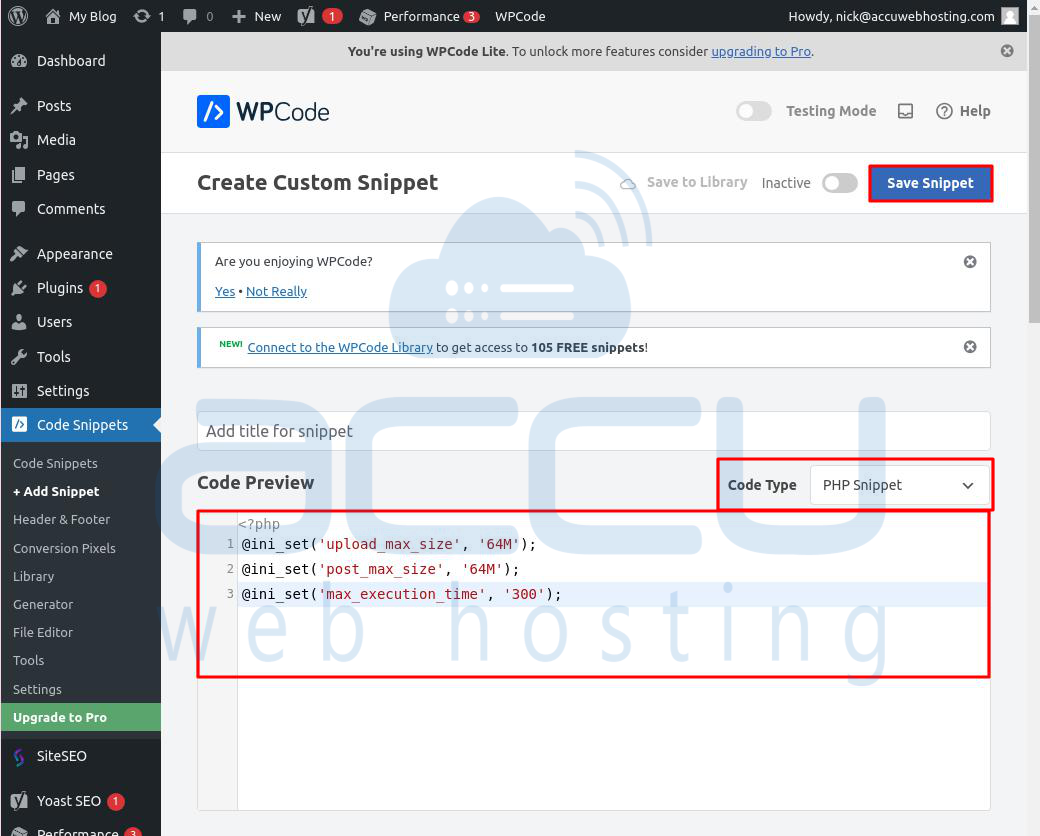
Step 3: Select ‘PHP snippet’ from the ‘Code Type’ dropdown menu and enter this code into the ‘Code Preview’ box:
@ini_set('upload_max_size', '64M');
@ini_set('post_max_size', '64M');
@ini_set('max_execution_time', '300');
This code increases the upload and post size limits to 64 megabytes and sets the execution time to 300 seconds.
Adjust the values in upload_max_size and post_max_size as needed based on the size of the file you're trying to upload. You can also increase max_execution_time if the file takes longer to upload.
Step 4: Finally, toggle on the code snippet to make it active on your website.
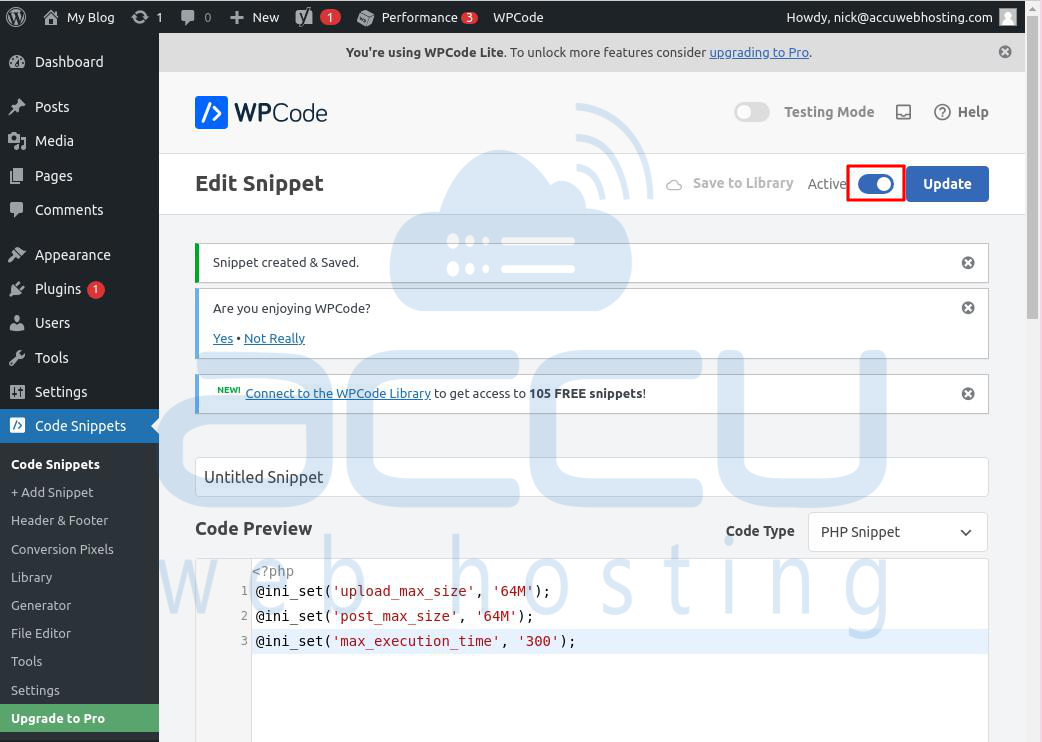
Test the changes by trying to upload a file or do an action that previously caused the error. If the settings are correct, the error should no longer appear.
Method 2: Increase PHP Memory Limit in wp-config.php
This method is another way to increase resource limits, different from using the WPCode plugin.
While WPCode lets you manage code snippets without touching theme files, editing the wp-config.php file directly changes your WordPress core settings.
Step 1: You’ll need to use an FTP client or the File Manager in cPanel to access your website files and find the wp-config.php file.
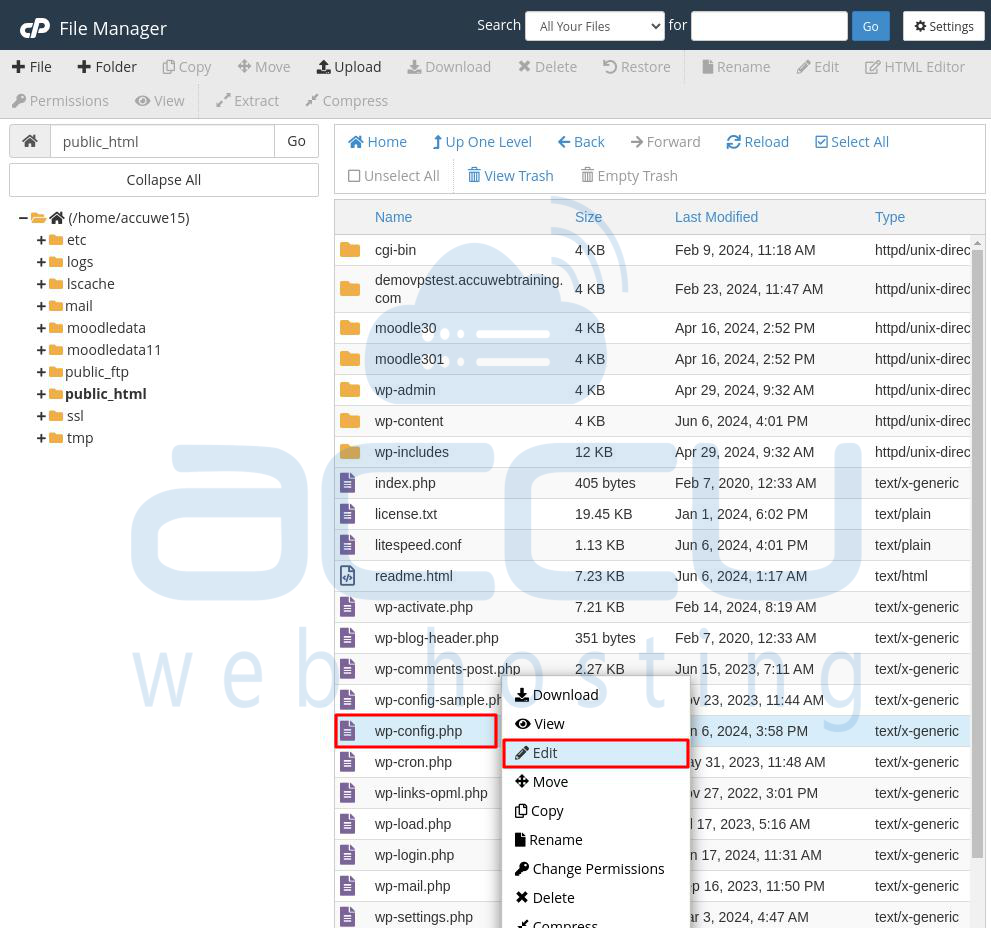
Step 2: Once you have the wp-config.php file, open it for editing and add this line just before the line that says That's all, stop editing! Happy blogging.:
define('WP_MEMORY_LIMIT', '256M');
This code sets WordPress to use 256MB of memory for your site. You can change the value to a higher amount if needed, but start with 256MB first.
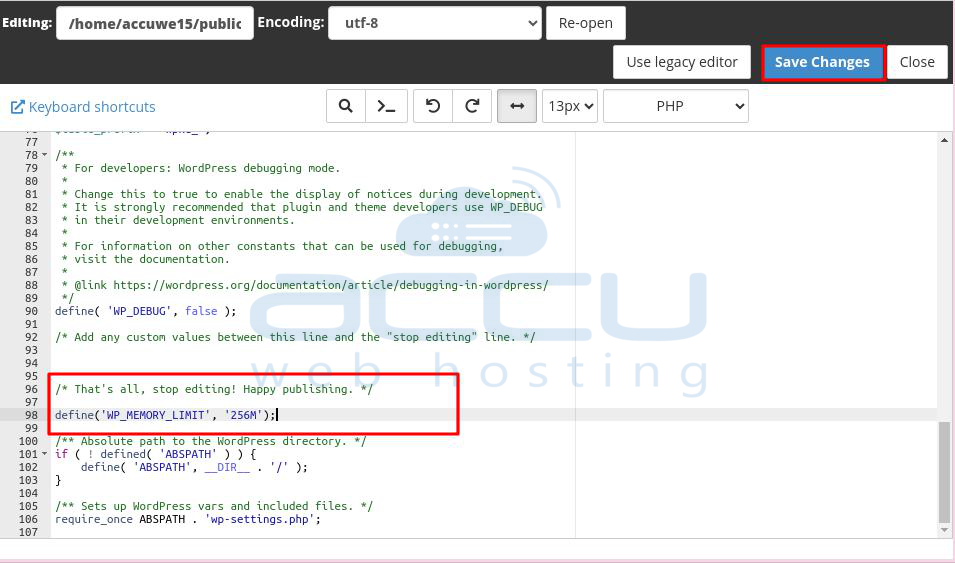
Step 3: Save the changes by clicking on the Save Changes button.
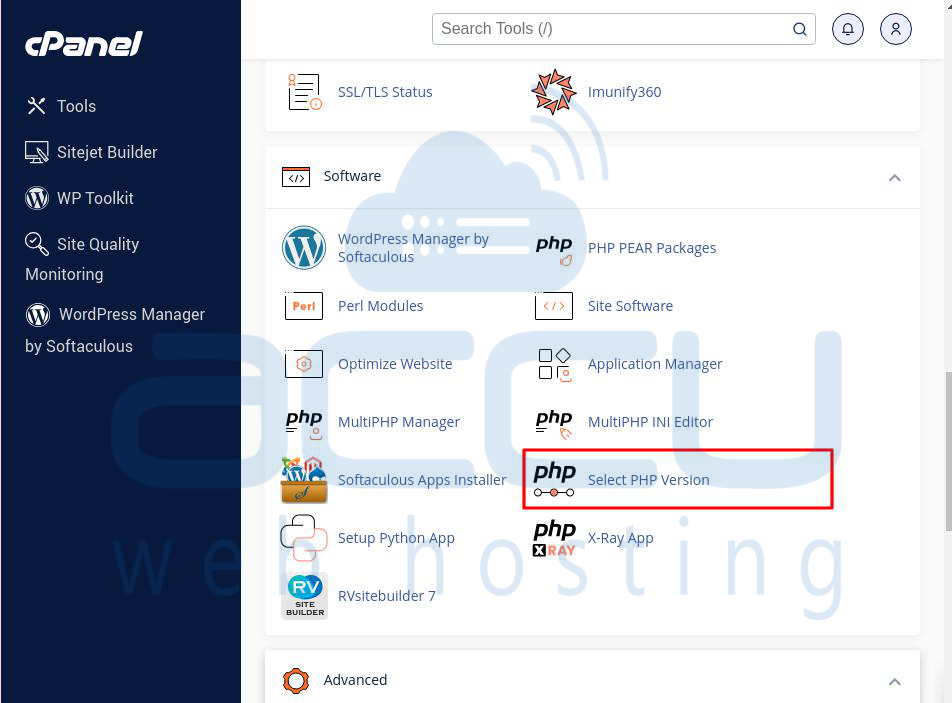
Method 3: Increasing Limits via cPanel
Using cPanel is an easy way to change server settings through a graphical interface. Here’s how to do it:
Step 1: Log into cPanel.
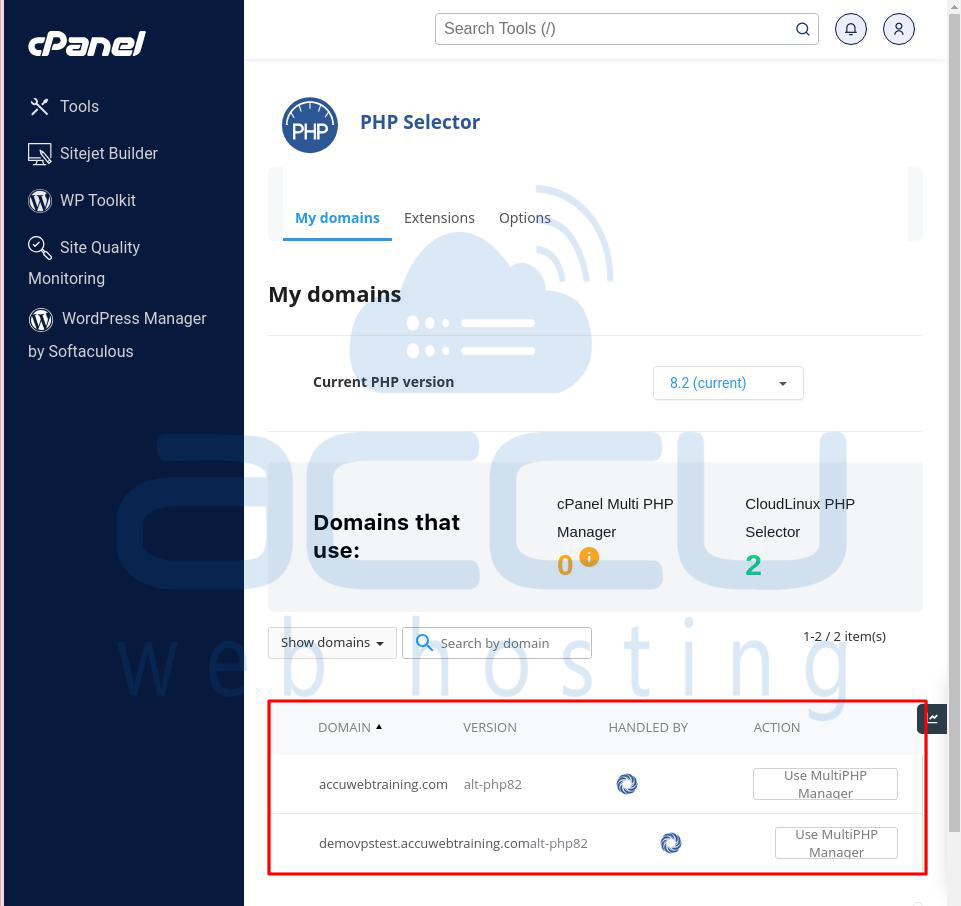
Step 2: Go to the Software section and click on Select PHP Version.
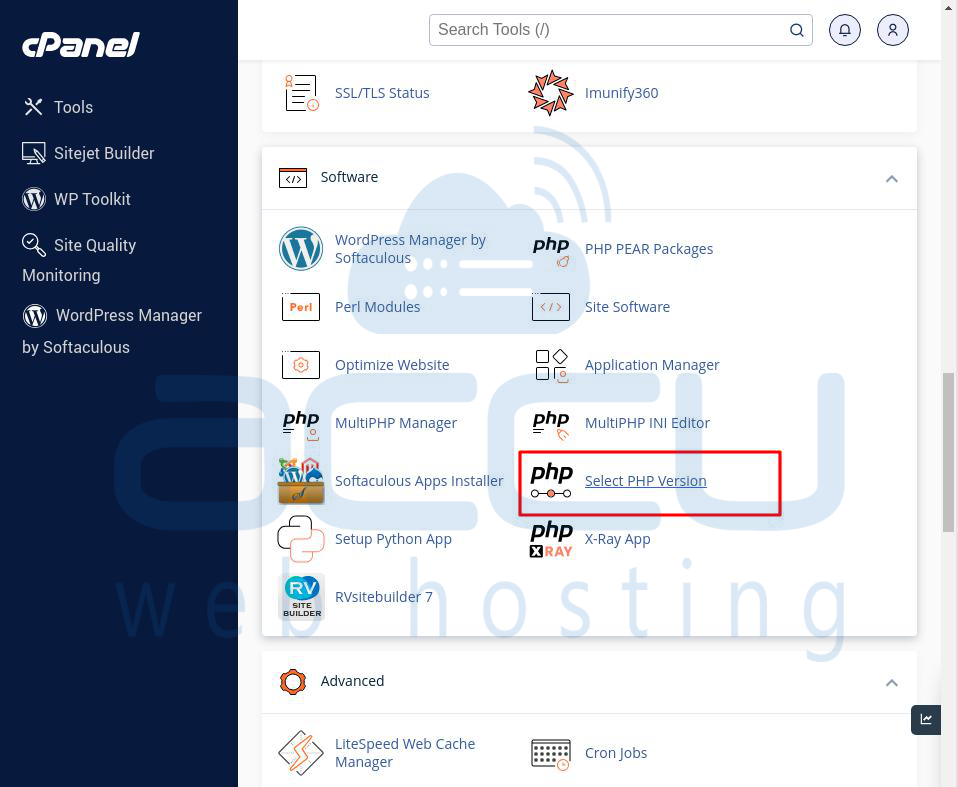
Step 3: In the PHP Selector window, click on the Options.
Step 4: Increase the upload_max_filesize, post_max_size, and max_execution_time settings by entering higher values (e.g., 64M for file size and 300 for time).

After making these changes, return to your WordPress site and try to upload a file or install a plugin/theme to see if the error is fixed. This method is good for users who prefer not to work directly with code or file systems.
Method 4: Increasing Limits in the .htaccess File
The .htaccess file in WordPress is a powerful tool for managing server settings. By editing this file, you can increase limits that might fix the “The Link You Followed Has Expired” error.
Here’s how to do it:
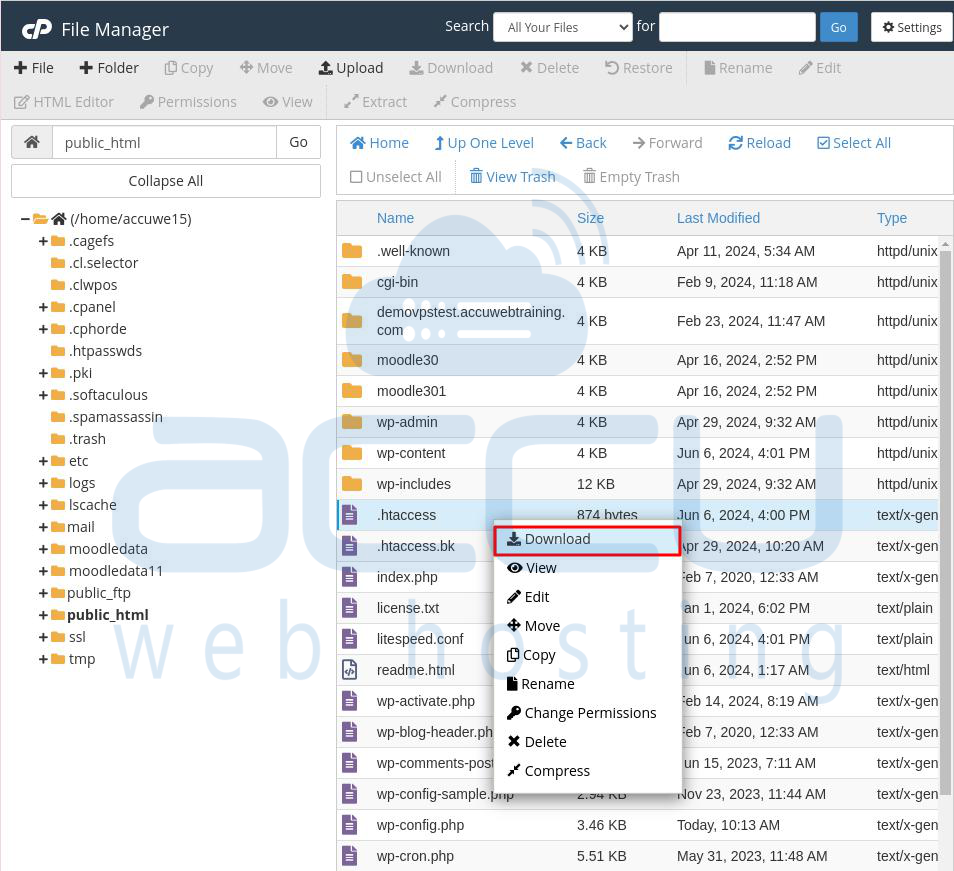
Step 1: Use an FTP client or the File Manager in cPanel to access your website’s root directory (usually named public_html).

Step 2: Find the .htaccess file.
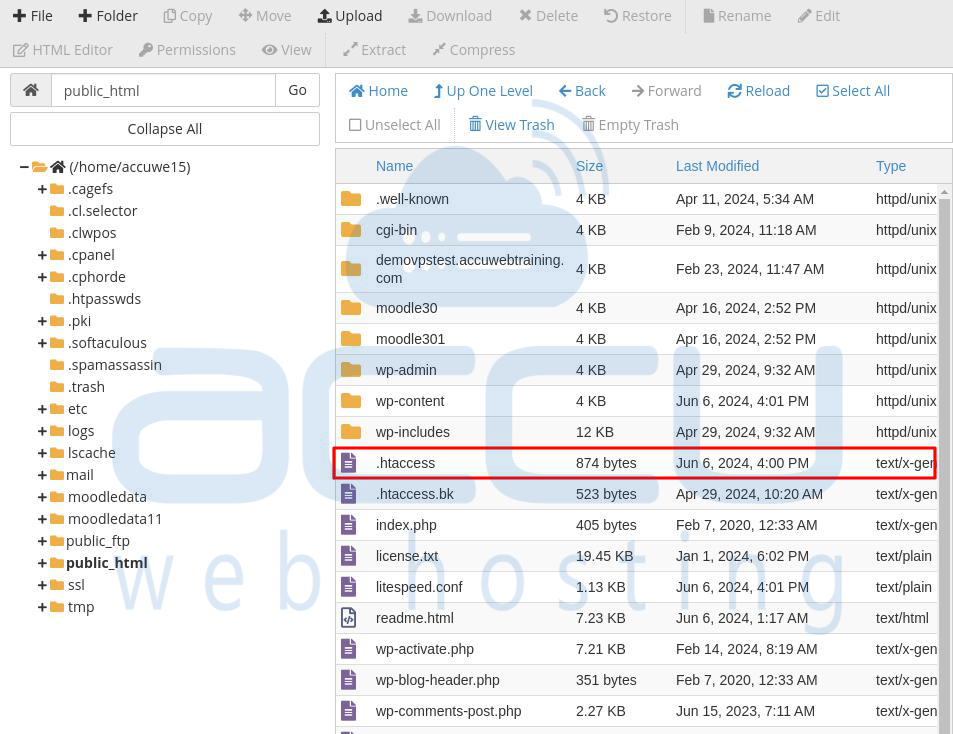
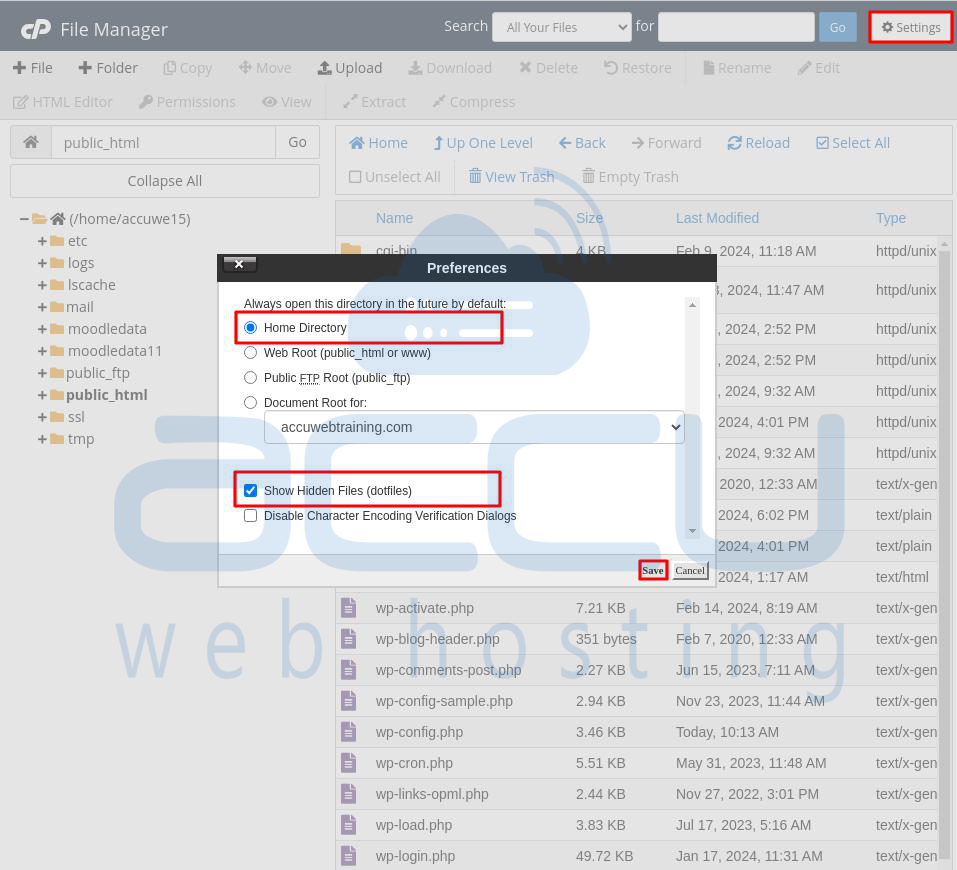
If you don’t see it, make sure hidden files (dotfiles) are visible in your FTP client or file manager settings. You can enable the hidden file in cPanel -> Settings -> Select home directory -> tick box Show Hidden files -> Click on Save button.
Step 3: Before changing anything, back up the existing .htaccess file. You can do this by downloading it to your computer or making a copy in the same directory.
Step 4: Edit the file by adding these lines at the end:
php_value upload_max_filesize 64M
php_value post_max_size 64M
php_value max_execution_time 300
Adjust the values as needed.
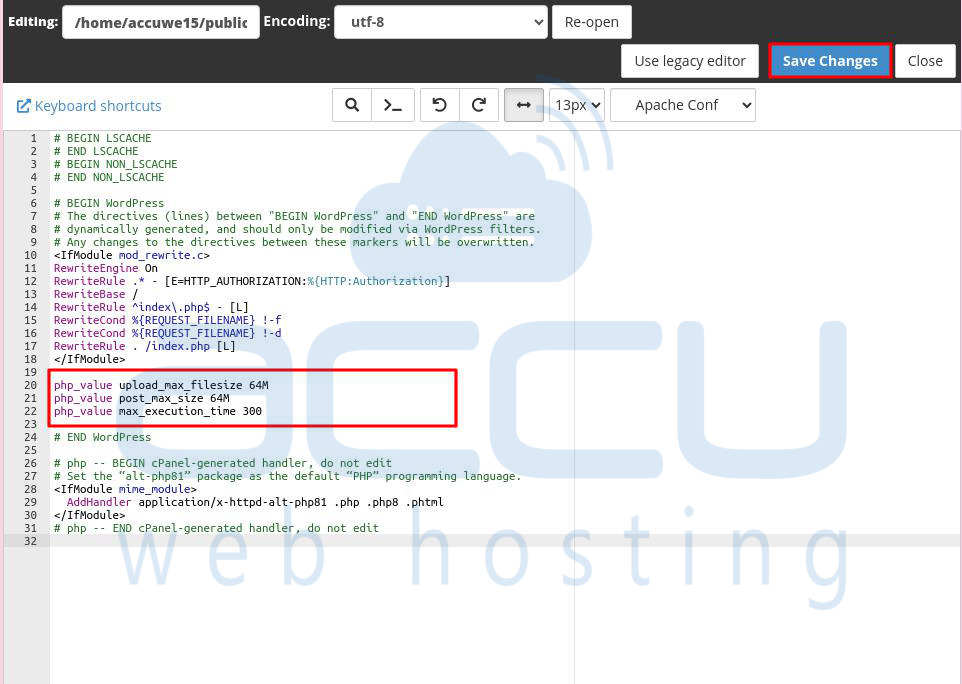
Step 5: Save and close the file.
Try to perform the action that caused the error, like uploading a large file or installing a plugin/theme, and see if the error is fixed. This method is helpful because it doesn’t require changing WordPress core files or PHP settings directly through the cPanel.
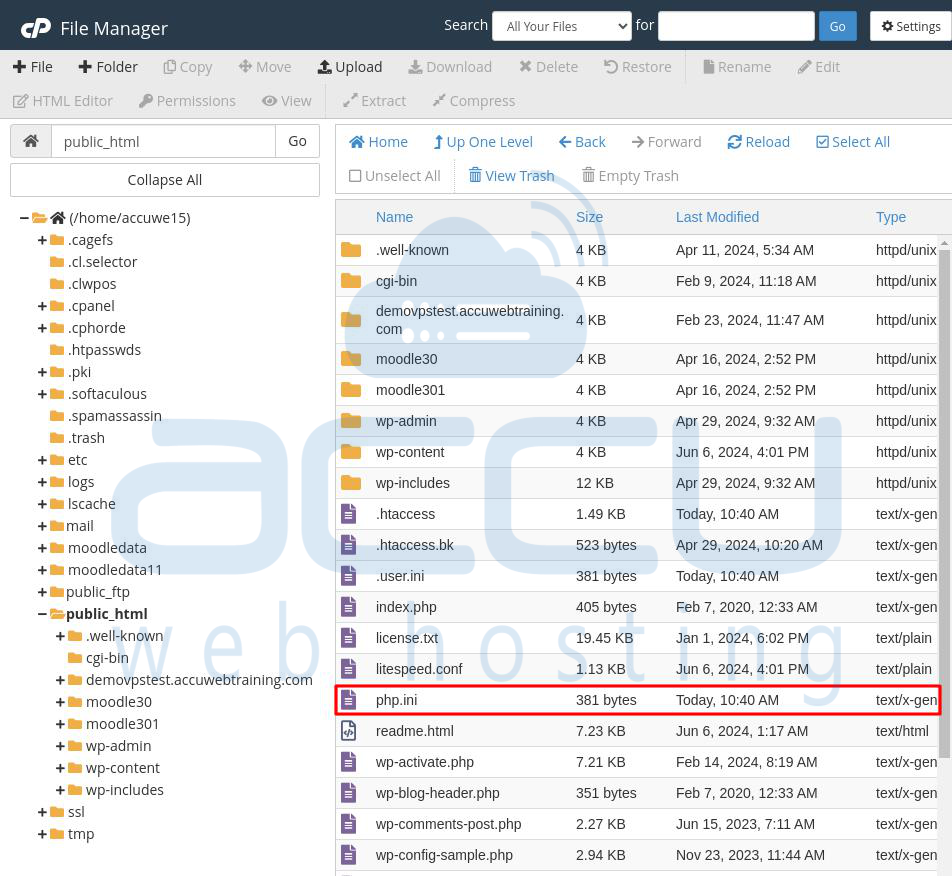
Method 5: Increasing Limits in the php.ini File
The php.ini file is the main configuration file for PHP on your server. Changing settings in this file can help fix the “The Link You Followed Has Expired” error in WordPress.
Here’s how to adjust the php.ini file:
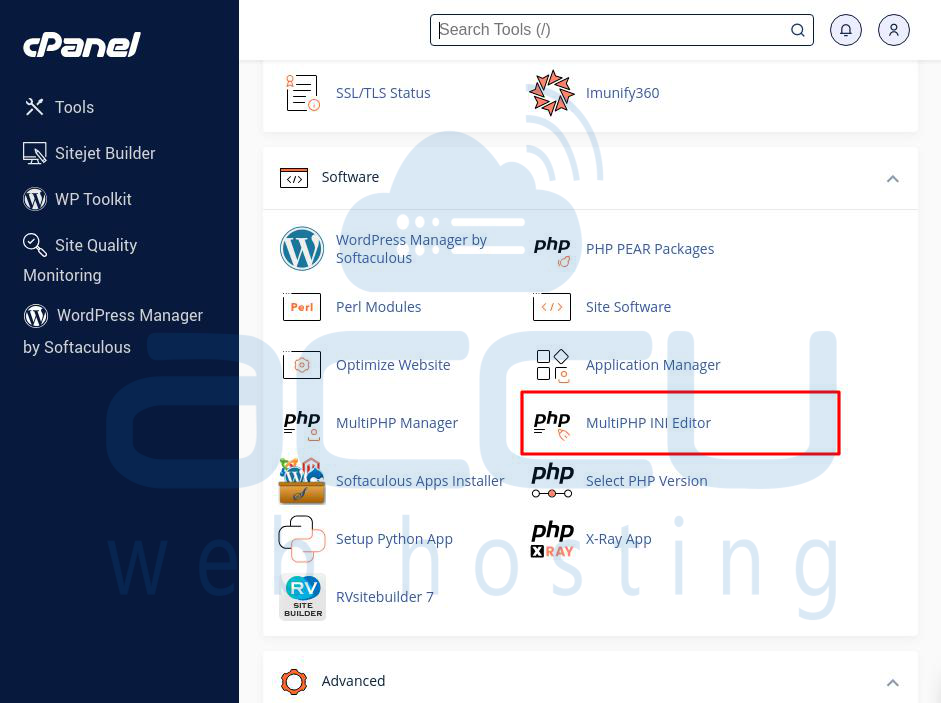
Step 1: Log into cPanel.
Step 2: Go to the Software section and click on MultiPHP INI Editor.
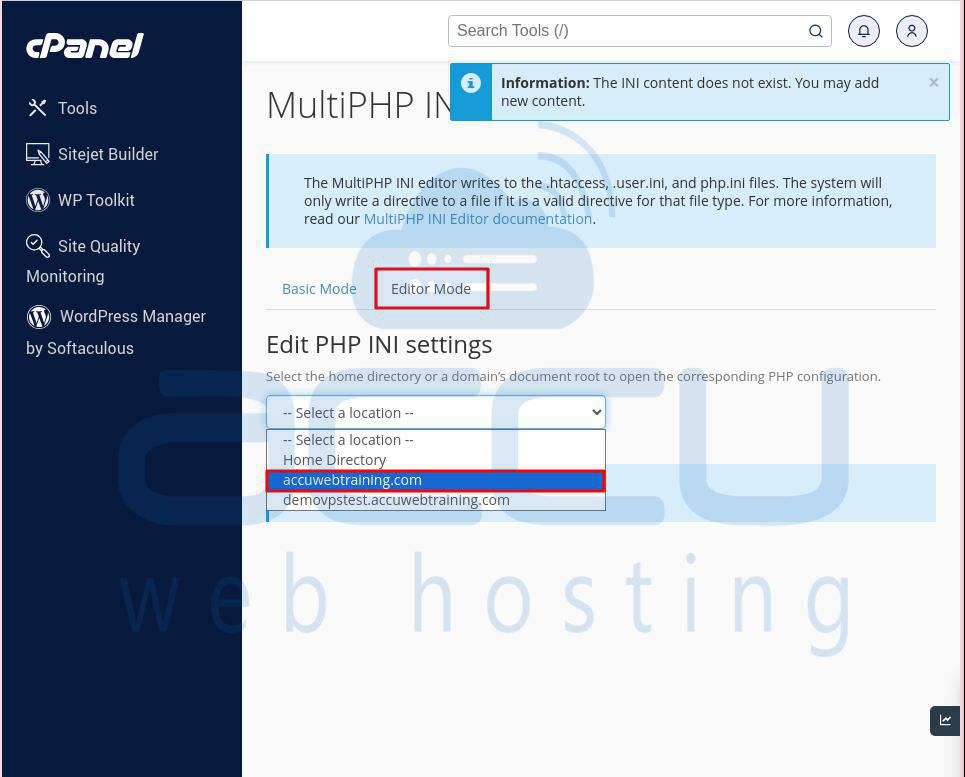
Step 3: In the MultiPHP INI Editor window, select Editor Mode. Then, select the website name or domain name in the Edit PHP INI Settings field.
Step 4: Add the following lines in the field which is located below of the Edit PHP INI Settings.
upload_max_filesize = 64M
post_max_size = 64M
max_execution_time = 300
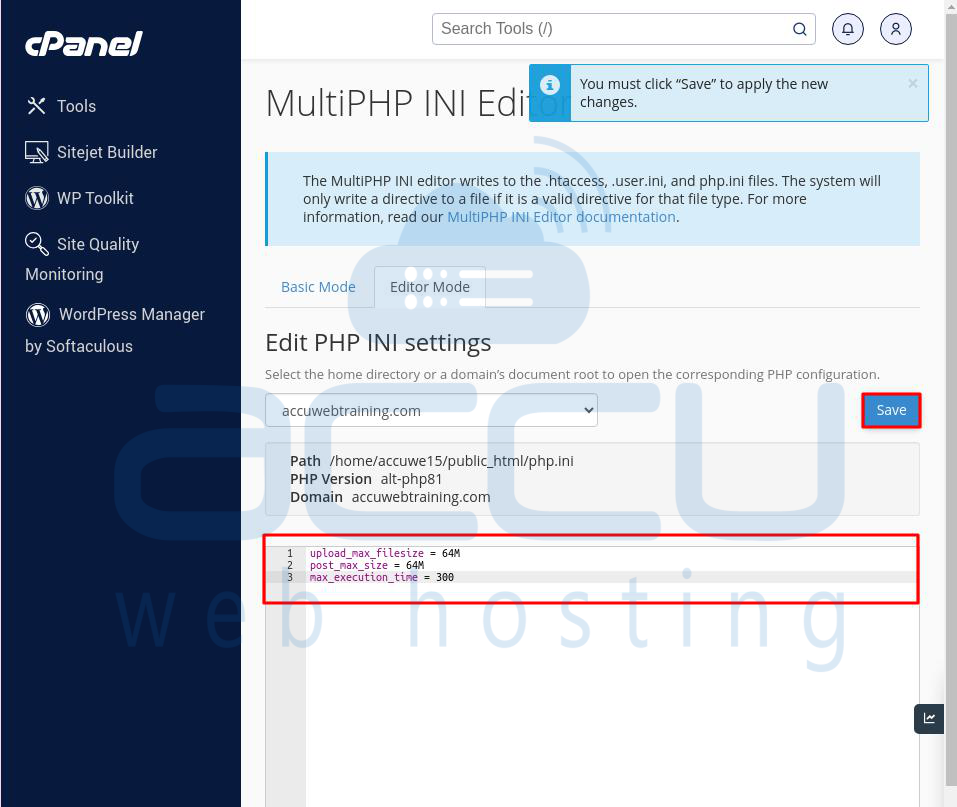
Step 5: Click the Save button to keep the changes.
Step 6: If the php.ini file does not exist, it will be created in the website's root folder. If it already exists, it will be updated with the value you entered in the PHP INI Settings field.
Test your site to see if the error is fixed by performing the action that caused it before.
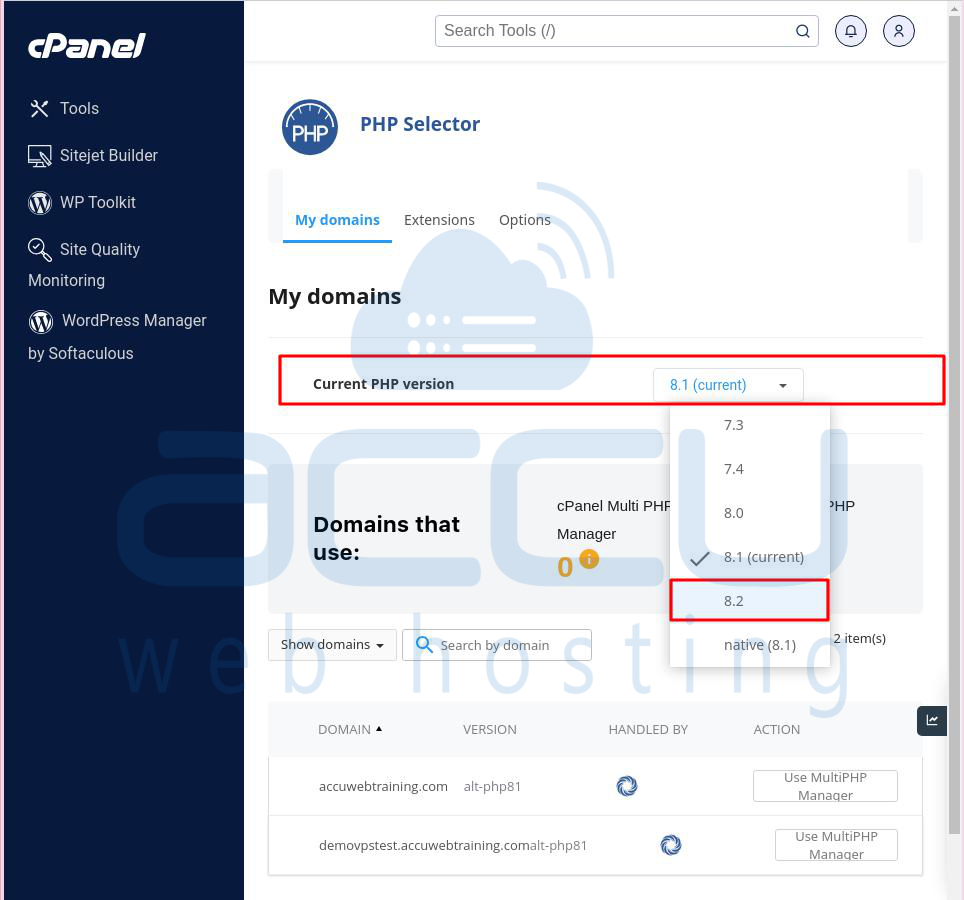
Method 6: Update Your PHP Version
Using an old PHP version can cause the “The Link You Followed Has Expired” error due to inefficiencies or outdated settings. Here's how to safely update your PHP version:
Step 1: Check which PHP version your site is using. You can do this with a plugin like Display PHP Version or in cPanel under the PHP section.
Step 2: Make sure your website, plugins, and themes are compatible with the newer PHP version.
Step 3: Back up your website, including the database, WordPress files, plugins, and themes. This allows you to restore your site if the update causes problems.
Step 4: Log into your cPanel, go to the Software section, and click on Select PHP Version.
Step 5: Choose a newer, stable PHP version like PHP 8.2. Avoid versions that are not widely supported or still in beta.
Step 6: After updating, check your website for any issues. Browse pages, test functionality, and ensure everything works as expected.
Step 7: Monitor your site for a few days for any performance issues or errors. Check error logs through cPanel or a logging plugin to identify any new warnings or errors.
Updating your PHP version can help fix errors, improve security, and speed up your website.
Method 7: Check for Plugin Conflicts
Plugin conflicts can cause issues like the “The Link You Followed Has Expired” error in WordPress. Plugins can interfere with each other or with WordPress due to overlapping code, outdated components, or compatibility issues with newer WordPress or PHP versions.
Here’s how to find and fix plugin conflicts:
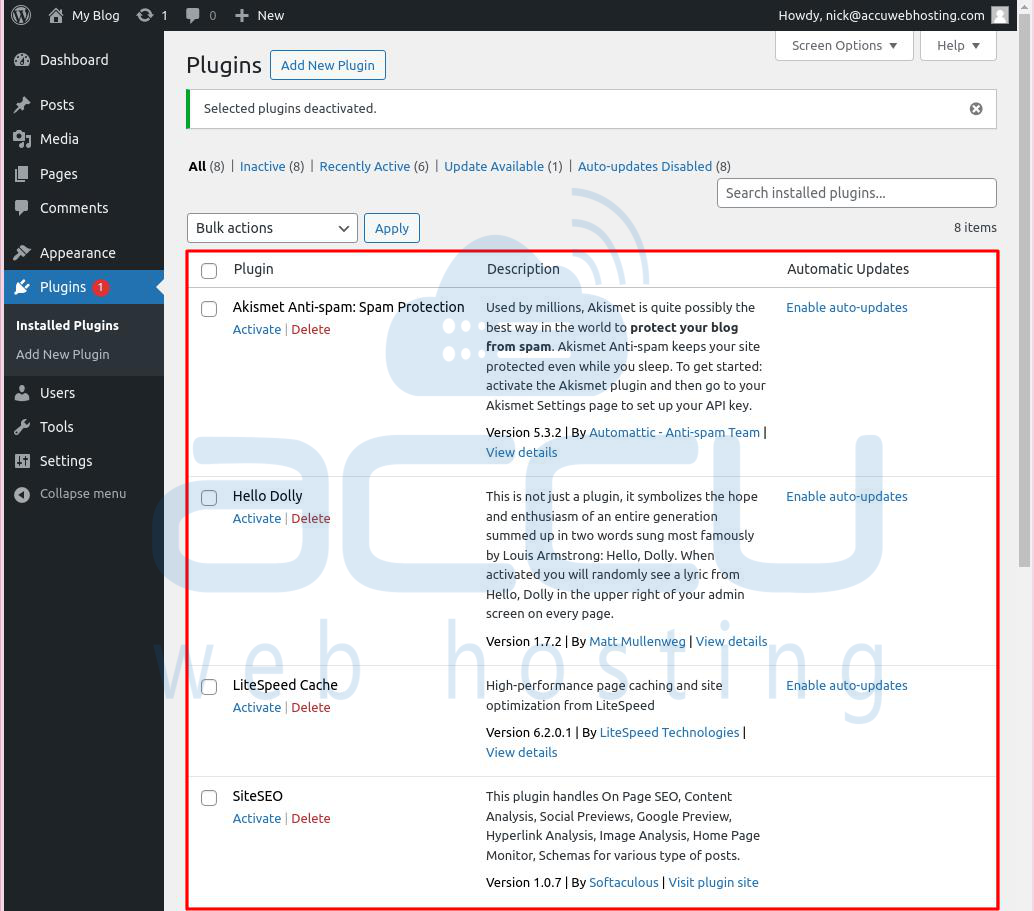
Step 1: Go to the Plugins section in your WordPress dashboard.
Step 2: Select all plugins, choose Deactivate from the Bulk Actions dropdown menu, and apply the action. This turns off all plugins without deleting them or their settings.

Step 3: Try the action that triggered the error, like uploading a file or installing a theme. If the error doesn’t happen, one or more plugins are likely causing the problem.
Step 4: Reactivate each plugin one at a time. After activating each plugin, test the action that caused the error. Continue until the error reappears. The last plugin you activated before the error returned is likely the cause.
Step 5: Once you identify the problematic plugin, look for updates or alternative solutions. Developers often release updates to fix bugs and improve compatibility.
By following these steps, you can identify and resolve plugin conflicts that might be causing errors on your WordPress site.
Conclusion:
To sum up, fixing the "The Link You Followed Has Expired" error in WordPress means changing file size limits, execution times, or updating PHP. By trying these methods one by one, you can find the correct solution for your hosting service and get your site working well again.
