In the MySQL Replication process, one server's data is automatically copied to another backup server in real time, providing fault tolerance and redundancy. If the master fails, your data will be recovered from another server.
Following are the steps to configure MySQL Master-Slave Replication on RHEL 7.
Note
To do this, we require two servers with different IP Addresses.
1. Download and install the MySQL server on both servers using the Yum command.
# wget https://dev.mysql.com/get/mysql57-community-release-el7-9.noarch.rpm
# sudo rpm -ivh mysql57-community-release-el7-9.noarch.rpm
# sudo yum install mysql-server
2. Once the MySQL server is installed, start and enable it to start on boot.
sudo systemctl enable mysqld
sudo systemctl start mysqld
3. Find out the temporary MySQL server password using this command –
# sudo grep 'temporary password' /var/log/mysqld.log
4. Run the command given below to secure the MySQL database –
# sudo mysql_secure_installation
5. Enter the temporary password we just got in Step 3 and change the default password.

6. To provide the best security, press y for all the answers. 
Step 1
Configure Master Server
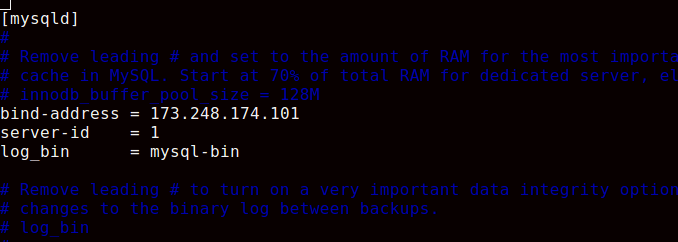
1. Open the MySQL configuration file using your preferred editor.
# sudo vim /etc/my.cnf
2. Add the below-given line in the mysqld section.
# bind-address = Your Master server IP Address
server-id = 1
log_bin =mysql-bin
3. Restart the MySQL service.
# sudo systemctl restart mysqld
4. To create a replication user, log in to the MySQL server using root and provide the password.
# sudo mysql -u root -p
5. We will create the replica user with the command below and grant the Slave access to the user.
Make sure you use your server IP Address.
mysql> CREATE USER 'replica'@'173.248.174.102' IDENTIFIED BY 'Herrick@1989';
mysql> GRANT REPLICATION SLAVE ON *.*TO 'replica'@'173.248.174.102';

6. Run the command given below to get the binary filename and position.
mysql> SHOW MASTER STATUS\G
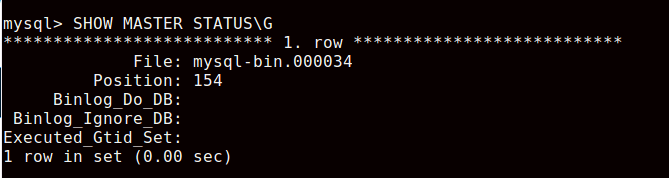
7. We will need to note down the master filename mysql-bin.000034 and its position 154.
Step 2
Configure Slave Server
1. Open the MySQL configuration file using your preferred editor.
sudo vim /etc/my.cnf
2. Add the below line in the mysqld section.
bind-address = Your Slave server IP Address
server-id = 2
log_bin =mysql-bin
3. Restart the MySQL service.
sudo systemctl restart mysqld
Let us configure the Slave server to replicate the Master server.
1.Log into the MySQL server.
sudo mysql -u root -p
mysql> STOP SLAVE;

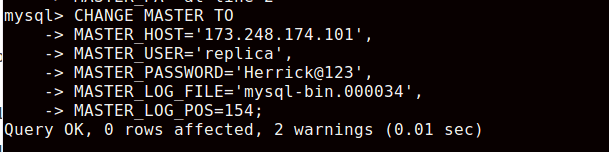
5. We will run the below-given query to configure the Slave server to replicate the Master server.
mysql> CHANGE MASTER TO
-> MASTER_HOST='173.248.174.101',
-> MASTER_USER='replica',
-> MASTER_PASSWORD='Herrick@123',
-> MASTER_LOG_FILE='mysql-bin.000034',
-> MASTER_LOG_POS=154;
6. Start the Slave server.
mysql> START SLAVE;
Step 3
Test the MySQL Master-Slave Replication
We have completed the configuration of the Master and Slave servers. Now, we will test replication on both servers.
1. Go to the Master server and run this command –
sudo mysql -u root -p
2. Create a test database.
mysql> CREATE DATABASE replica_database;
3. Go to the Slave server and log in to the MySQL database server.
sudo mysql -u root -p
4. List the database using the command given below –
mysql> SHOW DATABASES;

You will see the database created in the Master if all the configuration is correct.
This is it!
Our MySQL Master-Slave Replication works fine.
