The Model Context Protocol (MCP) allows AI systems to communicate with different tools, applications, and platforms seamlessly. When integrated with WordPress, MCP creates a direct link between your website and AI agents, enabling smarter, faster, and more automated management.
In this guide, we’ll walk through how WordPress and MCP work together, the benefits, and show you how to get started with your integration.
What is WordPress MCP Integration?
WordPress MCP Integration is the process of integrating a WordPress website with an AI assistant or LLM through the use of the Model Context Protocol (MCP), an open standard interface for safe and structured communication between AI models and external systems such as WordPress. Unlike traditional APIs, which can be complex and inconsistent, MCP provides a unified framework for AI to interact with WordPress’s REST API, allowing natural language commands to trigger actions like creating posts, managing users, or fetching comments.
MCP serves as a "bridge" translating AI requests (e.g., "Generate a draft post with title 'AI Trends 2025'") into executable API calls, sending back structured data to the AI for processing. The integration is most often done through an MCP server, which can be hosted locally, on a VPS, or through plugins such as Automattic's WordPress-MCP.
Why WordPress MCP Integration is Big News?
WordPress is an open-source platform that supports a variety of plugins and themes. It allows users to utilize tools such as Elementor, Gutenberg, WooCommerce, Advanced Custom Fields, and more.
MCP adapts to any setup you are working on without requiring you to change platforms or formats. It provides AI tools with a consistent and standardized way to understand your structure, interpret your tools, and operate within your real-world workflow, regardless of how customized it is.
How WordPress MCP Integration Works?
The WordPress Model Context Protocol (MCP) integration allows AI agents and Large Language Models (LLMs) like Claude or ChatGPT to interact with your WordPress website in a structured, contextual, and secure manner.
1. MCP Server: This is a backend service (often running in Node.js or Python) that acts as a bridge between the AI agent and your WordPress site. It exposes the site's functionalities as a set of defined tools and resources to the AI.
2. MCP Client: This is the AI agent or application, like Claude Desktop, that sends instructions to the MCP Server in a natural language format.
3. WordPress REST API: The core WordPress feature that allows external applications to interact with the site's data (posts, pages, media, users, etc.). The MCP server uses this API to execute the actions requested by the AI agent.
MCP Integration Workflow
-
AI request
The user provides a natural language prompt to the AI assistant (e.g., Claude Desktop), something like: "Update the prices for product ‘Makeup Brush,' 'Trolley Bag,' and 'Minimalist Food Keychain.'”
Set their new prices to $49, $1200, and $50, respectively. Also, increase their stock by 10 each, and update their descriptions based on the document.
-
AI Translation
The AI assistant, using its built-in MCP client, analyzes your request and translates it into a series of structured MCP requests, each corresponding to a specific WooCommerce action like updating a product, according to your document.
-
MCP Server Processing
The MCP Server acts as a link between the AI and your WooCommerce store, and receives these requests. It then translates them into a series of REST API calls, specifying the products to be updated, their new prices, stock adjustments, and the new descriptions.
-
WordPress/WooCommerce Action
Your WordPress website, powered by WooCommerce, receives the REST API calls. It authenticates them using the provided application password and executes the requested actions – updating product prices, adjusting stock levels, and applying the new descriptions.
-
Response to AI
The WordPress/WooCommerce system sends back the success or failure of each action to the MCP Server, which then relays the information back to the AI assistant.
-
User Notification
Your AI assistant informs you about the successful updates (or any errors encountered) in a conversational manner.
How to Set Up the WordPress MCP Server?
Prerequisites
- Node.js (version 18 or higher)
- A WordPress site (staging or live) with REST API access
- Application password (for secure API auth)
- Claude Desktop (or any compatible LLM tool)
System Requirements for Claude Desktop
- macOS: macOS 11 (Big Sur) or higher
- Windows: Windows 10 or higher
Method 1: Using a Plugin
1. Log in to your WordPress dashboard.
2. Navigate to the Users > Profile.
3. Search for or scroll down to the Application Passwords section.
4. Add a name that is related to MCP Integration.
5. Click Add Application Password.
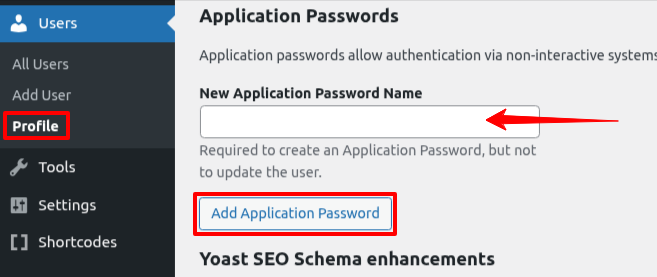
6. Copy the application password and store it somewhere.
Important: For security reasons, you will not be able to view your application password again after closing the configuration menu. If you lose it, you must create a new one.
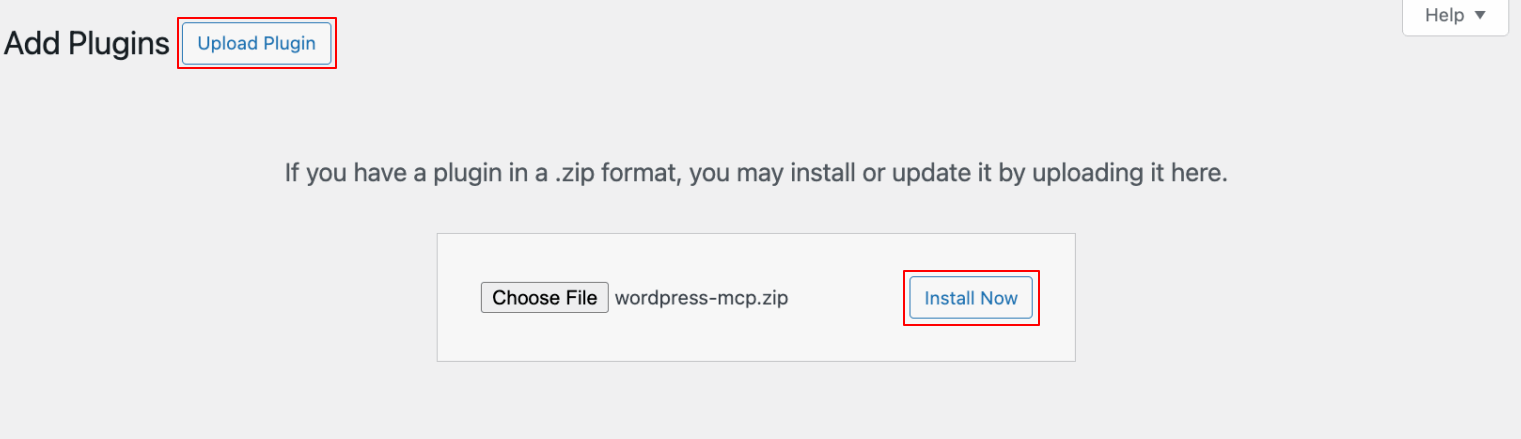
7. Next, download the wordpress-mcp.zip file from the Automattic GitHub repository releases.

8. Now go to the Plugins > Add Plugin > Upload Plugin, then upload your previously downloaded zip file.
9. Click Install Now and Activate it.
10. Next, navigate to Settings > MCP.
Now, let’s set up the MCP server in WordPress to connect to an AI tool. In this guide, we’ll show the process using Claude Desktop, though steps may vary for other tools.
11. Open Claude Desktop.
12. Go to the menu bar > Claude > Settings.
13. Click on the Developer tab and click Edit Config.
14. Open the claude_desktop_config.json file and paste the following code.
{
"mcpServers": {
"wordpress-mcp": {
"command": "npx",
"args": [ "-y", "@automattic/mcp-wordpress-remote@latest" ],
"env": {
"WP_API_URL": "https://yoursite.com/",
"WP_API_USERNAME": "your-username",
"WP_API_PASSWORD": "your-application-pwd",
"LOG_FILE": "optional-path-to-log-file"
}
}
}
}
Do not forget to replace your data in the above code.
15. Save the code and restart Claude.
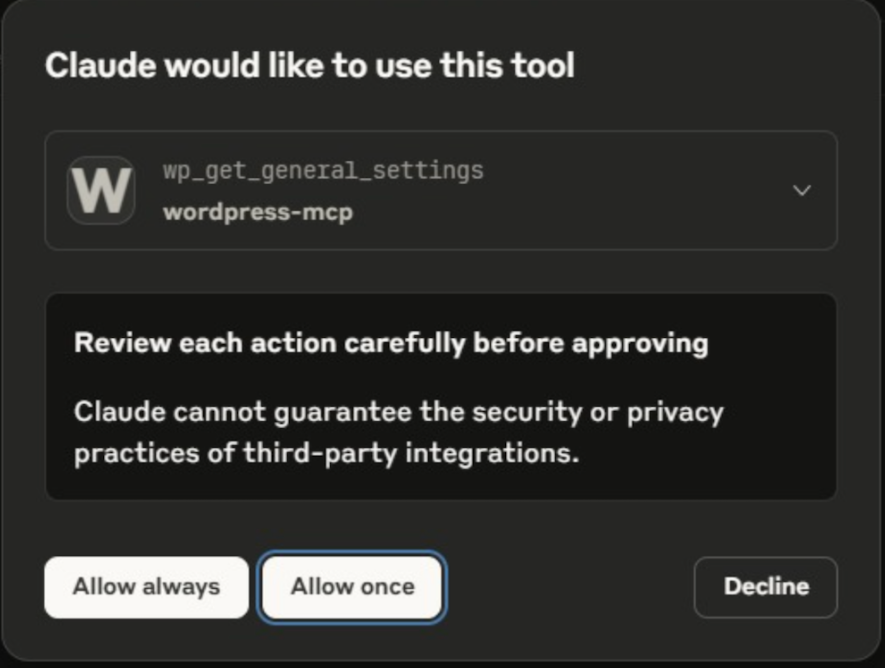
Next, request Claude to create a new user account on your WordPress site. If the integration is successful, it will prompt you for permission to make changes.
Method 2: Using Command
1. Clone the GitHub repository and install the dependencies manually.
git clone https://github.com/modelcontextprotocol/server-template.git
cd server-template
npm install
2. In the MCP server config file (config.json or .env, depending on repo), add your WordPress site details:
WORDPRESS_API_URL=https://your-site.com
WORDPRESS_USERNAME=your_username
WORDPRESS_PASSWORD=your_app_password
3. Run the MCP server.
npm start
The MCP server will now listen for requests from AI tools like Claude.
Claude will now interpret your natural language prompts and send them to WordPress through this server.
Benefits of WordPress MCP Integration
- Natural Language Interaction: Manage WordPress through simple prompts, reducing the need for direct dashboard interaction or code.
- Automation: Automate repetitive tasks like content updates, user management, and even plugin/theme toggling.
- Content Management: Create, retrieve, update, and delete posts, pages, categories, tags, and media.
- Security: Uses secure authentication methods like WordPress application passwords and respects user permissions and roles to control AI access to the site.
- Extensibility: Allows developers to define and add new tools and resources to expose custom WordPress functionalities to AI agents.
The WordPress–MCP integration enables you to manage tasks, such as adjusting site settings or handling inventory, simply by chatting with an AI agent. It streamlines administration and saves valuable time.
