The WordPress Heartbeat API is crucial to enhance the functionality of WordPress by making sure certain processes function properly in the background. It constantly transmits data between the server and the browser, at least every 15 seconds.
In this guide, we will learn about what WordPress heartbeat is, how it works, and its benefits.
What is the WordPress Heartbeat API?
The WordPress Heartbeat API is an inbuilt feature that provides real-time communication between the browser and the server. It was implemented in WordPress 3.6 to improve user experience through handling auto-saves, session control, and real-time updates.
This API works using AJAX calls, with small pulses of data sent constantly between the browser and server. These pulses cause certain events to occur, keeping the data in sync between the WordPress dashboard and the server.
It helps maintain active user sessions, prevents multiple users from editing the same post simultaneously.
What Does WordPress Heartbeat Do?
WordPress Heartbeat provides multiple features to manage your website efficiently. But you have to manage it according to your needs.
- Keep you logged in: It extends your session so you do not need to re-enter your login credentials.
- Auto-save work: Heartbeat API saves your work every 15 seconds.
- User session control: It monitors logged-in users and restricts simultaneous logins, so no overwriting or content deletion happens.
- Updates: It enables real-time updates for plugins and themes, allowing them to refresh specific information without requiring a full page reload.
- Live Notifications: Shows eCommerce order alerts, chat updates, new comments, and other activities occurring on your site.
- Team Collaboration: Some plugins use Heartbeat to allow multiple users to edit content simultaneously.
- Custom Features: Developers use WP Heartbeat to add interactive and dynamic elements to plugins and themes.
- API Support: WP Heartbeat helps connect with other services by sending and receiving data instantly.
How Does WordPress Heartbeat Work?
WordPress Heartbeat behaves like a background messenger, constantly exchanging information between your browser and the server to update your site in real time.
1. Starting the Heartbeat
When you are logged into your WordPress dashboard (back-end or front-end), the Heartbeat API is automatically executed. It initiates small background requests (AJAX calls) to the server every 15 seconds (or at a user-specified interval).
2. Sending Data to the Server
These requests carry essential details like user activity, page status, and updates. The data is sent to a file on your server called /wp-admin/admin-ajax.php, which helps WordPress process these background tasks.
AJAX calls operate in the background, allowing users to interact with the site while processing requests. A heartbeat request is typically sent using the POST method, ensuring sensitive data is transmitted securely.
3. Processing on the Server
Once the server gets the request, it performs essential actions like:
- Auto-saving drafts to prevent data loss.
- Preventing multiple users from editing the same post.
- Keep your session active so you don’t get logged out.
4. Receiving Updates in the Browser
Once the server responds, the browser processes the information and updates the site as needed. The interface reloads automatically whenever there is fresh data, showing updates without refreshing the page.
The browser will also check whether any further action is needed, like showing a notification or taking the user to another page for a smoother experience.
5. The Continuous Loop
This process repeats every few seconds, keeping everything in sync between your site and the server.
How to Manage the WordPress Heartbeat API?
Heartbeat can easily be managed using a plugin or code editing.
In this guide, we will use the Heartbeat Control plugin.
Option 1: Manage WordPress Heartbeat Using a Plugin
1. Log in to your WordPress dashboard.
2. Go to Plugins > Add New Plugin.
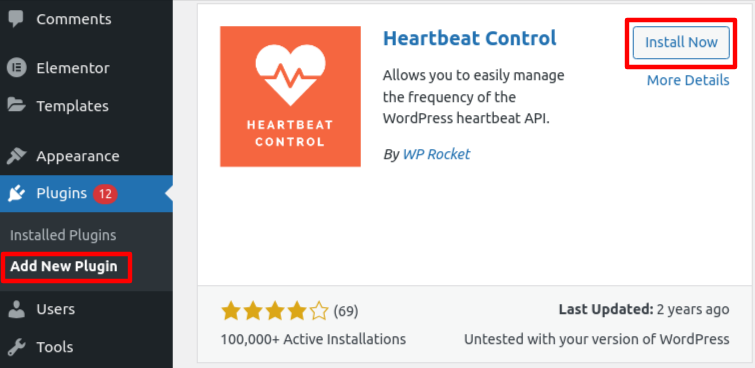
3. Search for the Heartbeat Control plugin in the search bar.
4. Activate the plugin and go to Settings > Heartbeat Control.
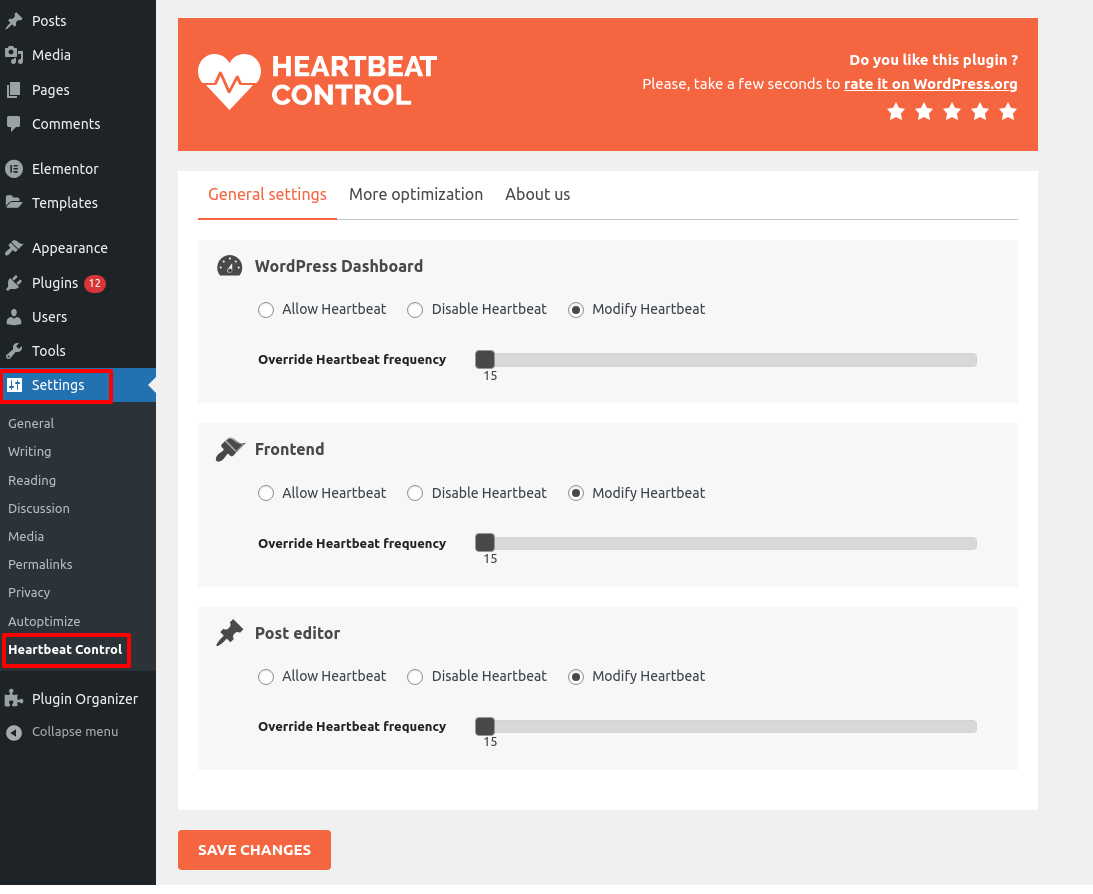
The Heartbeat Control feature lets you adjust how the WordPress Heartbeat API works on your dashboard, front-end, and Block Editor.
- Allow Heartbeat: Keeps Heartbeat running without restrictions.
- Disable Heartbeat: Completely blocks Heartbeat activity in selected areas of your site.
- Modify Heartbeat: Allows you to set a custom interval for heartbeat requests, anywhere from between 15 to 300 seconds, to manage performance better.
Option 2: Manage WordPress Heartbeat Using Code
You can manage WordPress Heartbeat using cPanel and WordPress dashboard.
add_action( 'admin_init', function() {
register_setting( 'general', 'custom_heartbeat_interval', 'intval' );
add_settings_field( 'custom_heartbeat_interval', 'Heartbeat Interval', function() {
$interval = get_option( 'custom_heartbeat_interval', 120 );
echo "<input type='number' name='custom_heartbeat_interval' value='".absint($interval)."' min='15' max='120' /> seconds";
}, 'general' );
});
add_filter( 'heartbeat_settings', function( $settings ) {
$settings['interval'] = get_option( 'custom_heartbeat_interval', 120 );
return $settings;
});
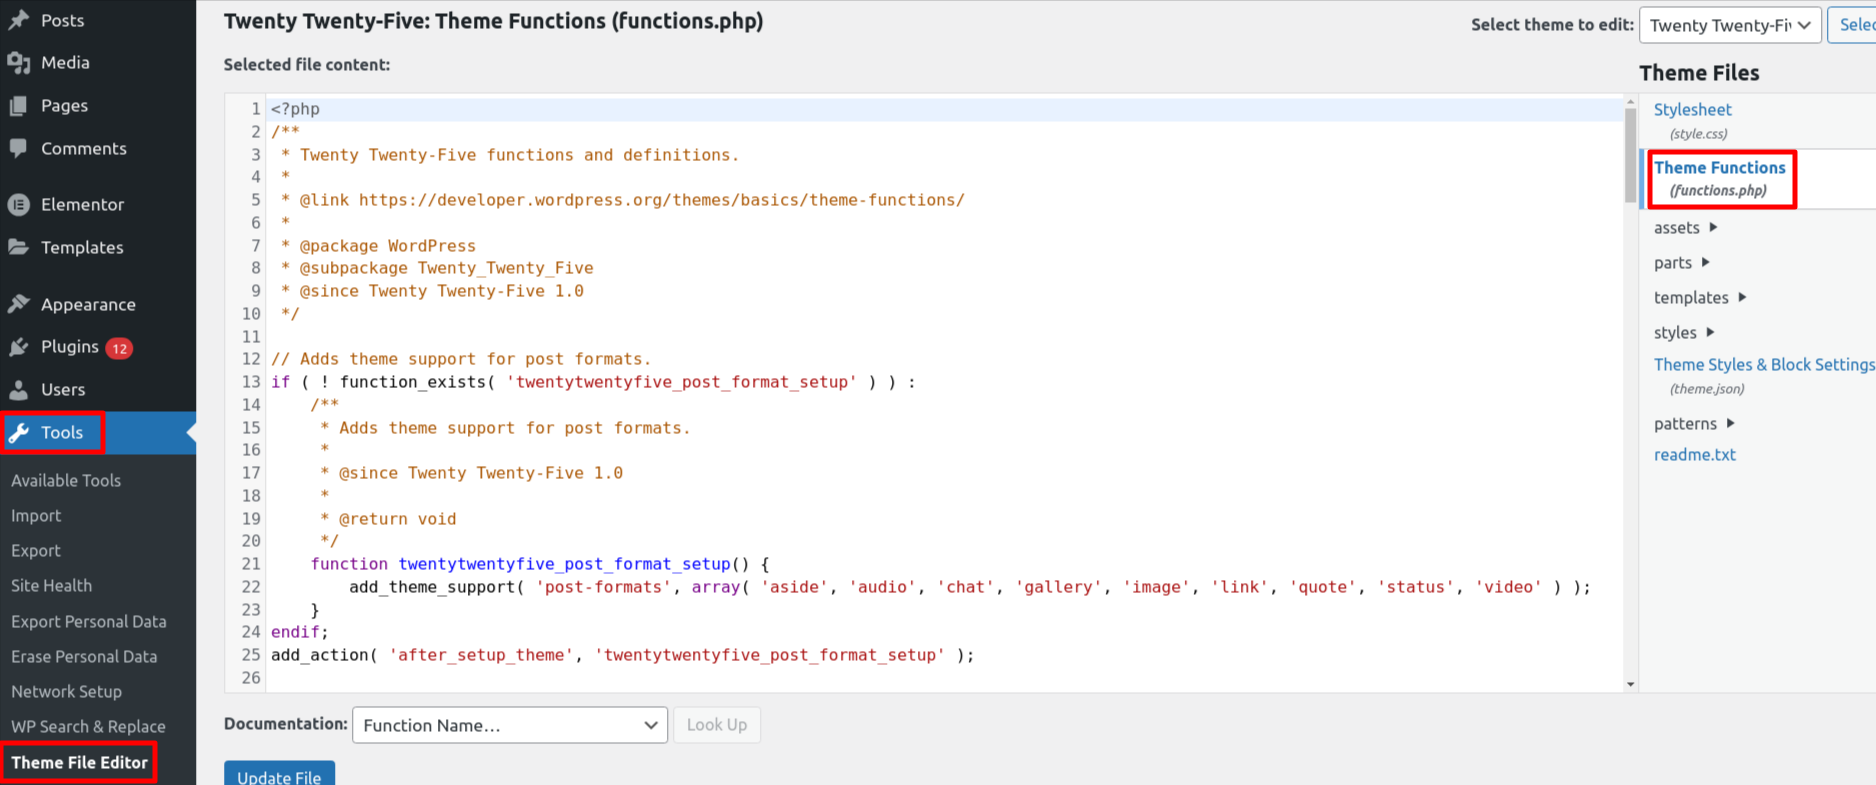
Using WordPress Dashboard
1. Navigate to Tools > Theme File Editor.
2. On the right side of the page, choose functions.php.
3. Add the above code inside functions.php.
Using cPanel
1. Log into your cPanel account.
2. Navigate to the Files > File Manager.
3. Inside your public_html, click on wp-content/themes and choose your active theme.
4. Next, add the above-mentioned code inside your functions.php file.
Why Should You Limit the WordPress Heartbeat API?
The WordPress Heartbeat API is useful for features like autosave and real-time notifications, but it can sometimes cause issues.
- Heartbeat works by sending AJAX requests to the server, and each request uses CPU power, and too many requests can slow down your website.
- Excessive CPU usage can lead to performance issues or even account suspension if you exceed your resource limits.
How to Completely Stop the Heartbeat API?
If you disable the WordPress Heartbeat API, you may lose any changes made to a post if you forget to click the Save Draft button.
Additionally, if you use WordPress plugins that rely on the Heartbeat API, real-time notifications and dynamic features on your site may not function properly.
You can stop WordPress heartbeat API by adding a code inside your active theme’s functions.php file.
add_action( 'init', 'stop_heartbeat', 1 );
function stop_heartbeat() {
wp_deregister_script('heartbeat');
}
In the future, if you wish to activate the heartbeat API, you can easily do so by commenting out the relevant code in your functions.php file.
