nopCommerce is a free and powerful eCommerce platform that lets you manage multiple stores from one admin panel. This guide will show you how to install nopCommerce and set up the multi-store feature on a Windows server using Plesk hosting.
What You Need Before You Start
Make sure you have the following ready:
Plesk Panel: Your server must have Plesk installed to manage hosting easily.
ASP.NET Core: nopCommerce runs on ASP.NET Core, so ensure it’s installed and configured.
SQL Server: A working SQL Server database is required for nopCommerce.
Downloading and Uploading nopCommerce
Step 1: Download nopCommerce
- Visit the official nopCommerce website: Download nopCommerce.
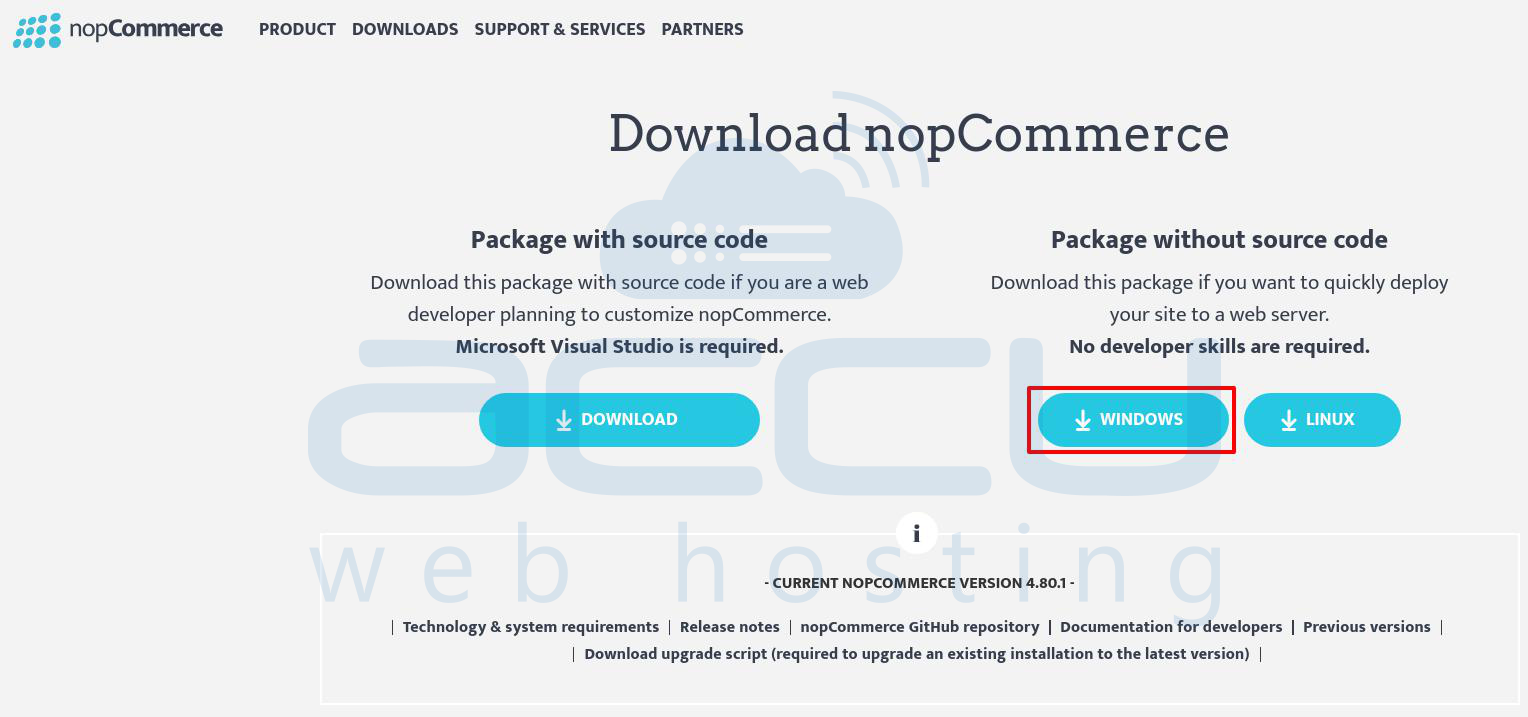
- Download the latest stable version as a ZIP file.
Step 2: Log in to Plesk
- Open your browser and go to https://yourdomain.com:8443.
- Log in using your Plesk credentials.
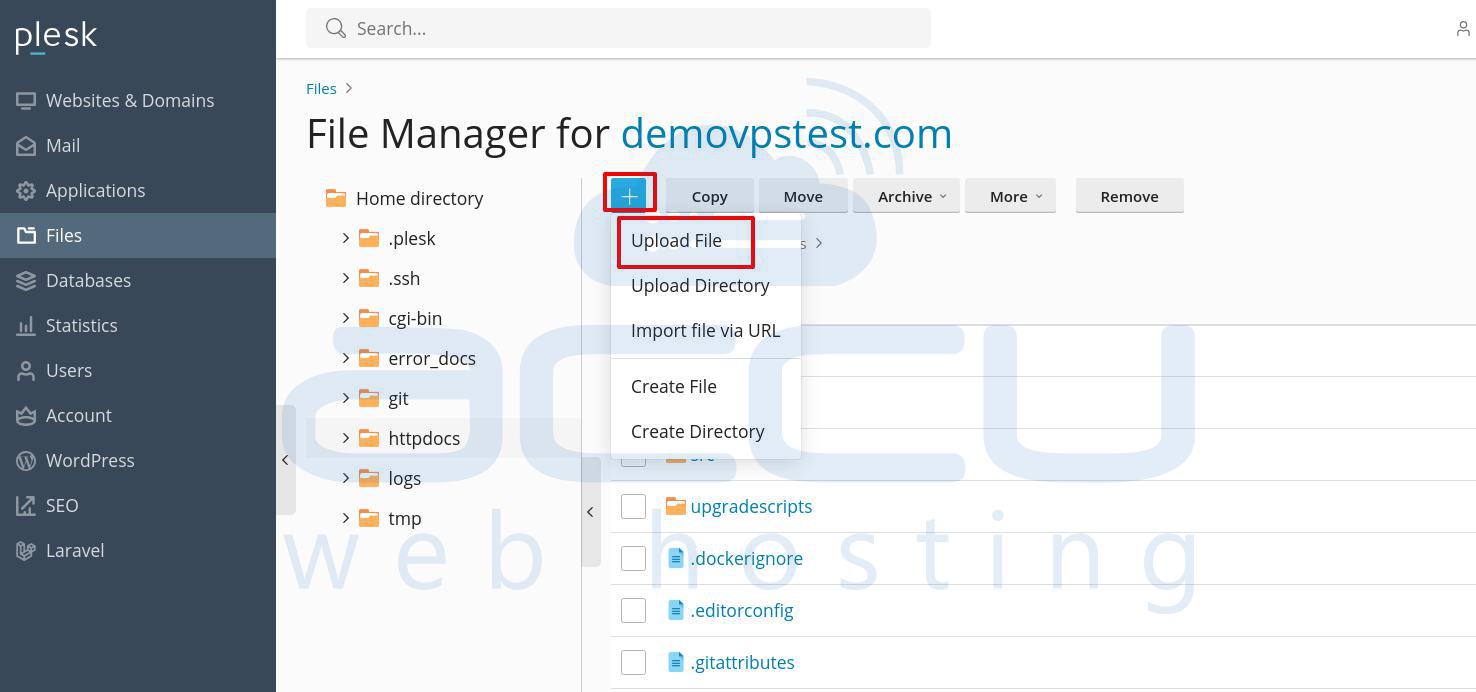
Step 3: Access the File Manager
- In the Plesk dashboard, click on Files to open the file manager.

Step 4: Create a Folder for nopCommerce
- Go to the httpdocs folder (or your desired root directory).
- Create a new folder named, for example, nopcommerce.
Step 5: Upload the nopCommerce ZIP File
- In the file manager, click the Upload button.
- Select the ZIP file you downloaded and upload it to the folder you created.
Step 6: Extract the Files
- Once the upload is complete, right-click on the ZIP file and choose Extract.
- The files will be unpacked into the folder you created.

Set Up the Database for nopCommerce
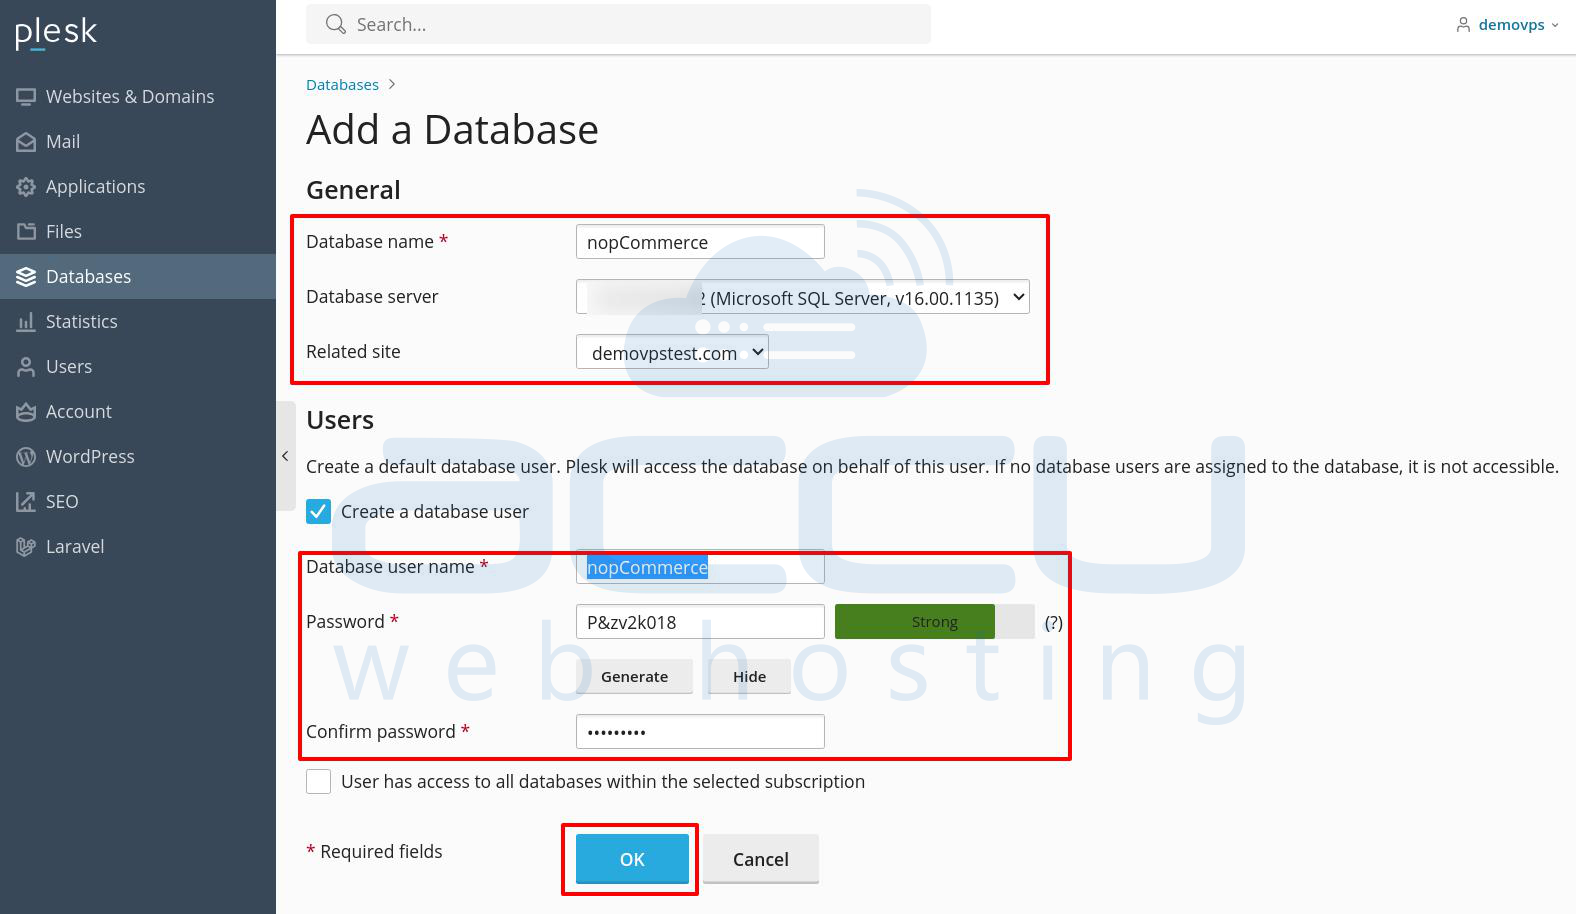
Step 1: Create a SQL Server Database
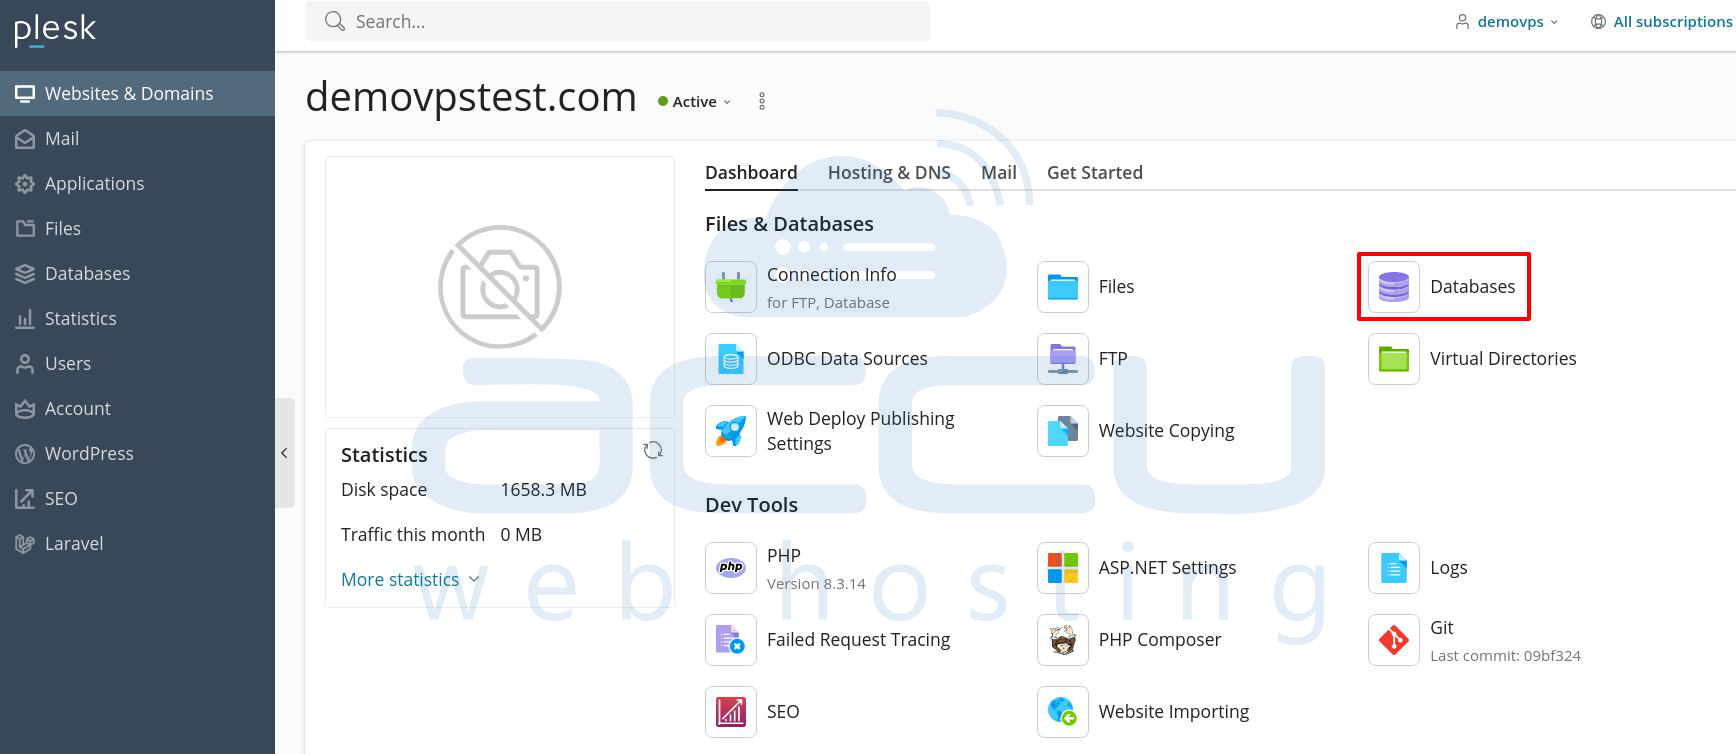
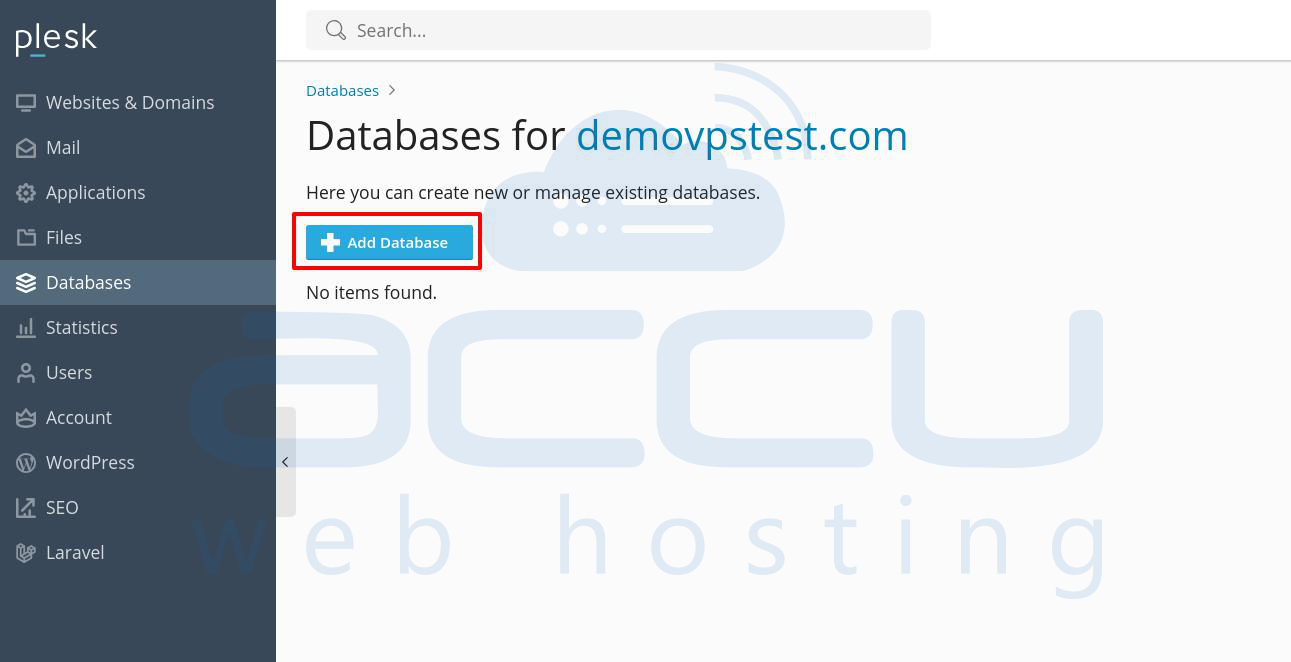
- Log in to Plesk and go to the Databases section.
- Click Add Database to create a new database.
- Select SQL Server as the database type.
- Enter a name for the database (e.g., nopcommerce_db).
- Create a database user and set a password for access.
- Save the database name, username, and password for later.
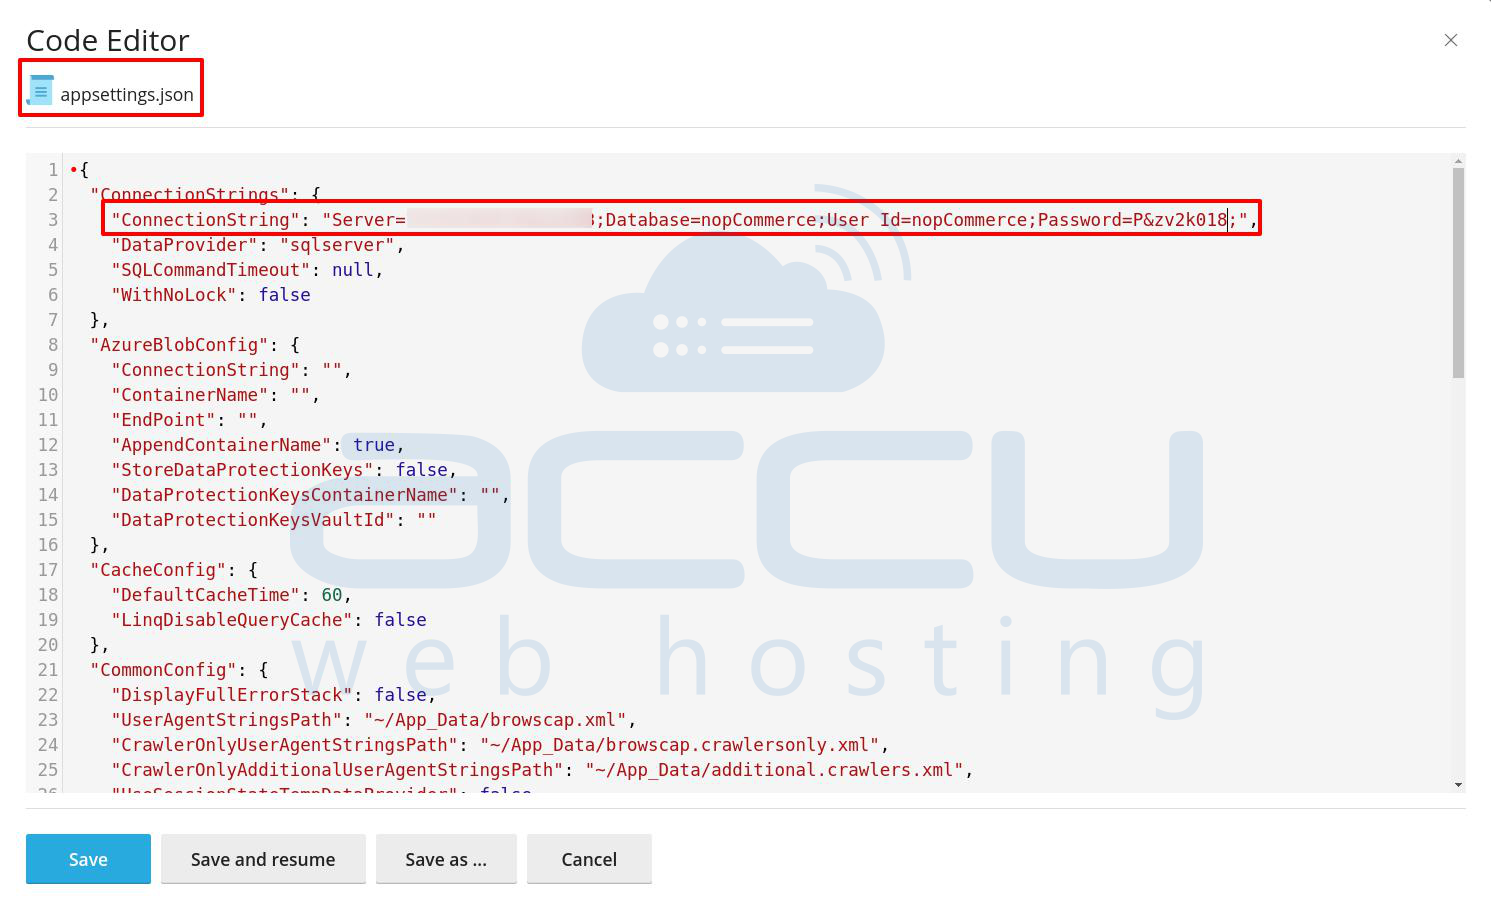
Step 2: Configure the Database Connection
- Open the appsettings.json file in the nopCommerce folder (e.g., /httpdocs/nopcommerce).
- Update the connection string with your database details:
"ConnectionStrings": {
"DefaultConnection": "Server=your_server_name;Database=nopcommerce_db;User Id=nop_user;Password=nop_password;"
}
Important Note: Replace your_server_name, nopcommerce_db, nop_user, and nop_password with your actual server information.
Your database is now set up and ready for nopCommerce!
Install nopCommerce application
Step 1: Set File Permissions
- In Plesk, go to the Files section.
- Right-click on the nopCommerce folder (e.g., /httpdocs/nopcommerce) and ensure the web server user has read, written, and executed permissions for all files and folders, especially for App_Data, wwwroot, and logs.
Step 2: Run the nopCommerce Installer
- Open your browser and visit your site URL (e.g., http://yourdomain.com/nopcommerce).
- The nopCommerce installer will start. Follow these steps:
Admin Setup: Enter the admin username, password, and email for the store's admin panel.
Select Language: Choose your preferred language.
Database Configuration: Provide your SQL Server connection details.
Store Setup: Enter basic details like store name, currency, language, and country.

Step 3: Complete the Installation
- Click the Install button to begin.
- After the installation finishes, you will be redirected to the nopCommerce admin panel.
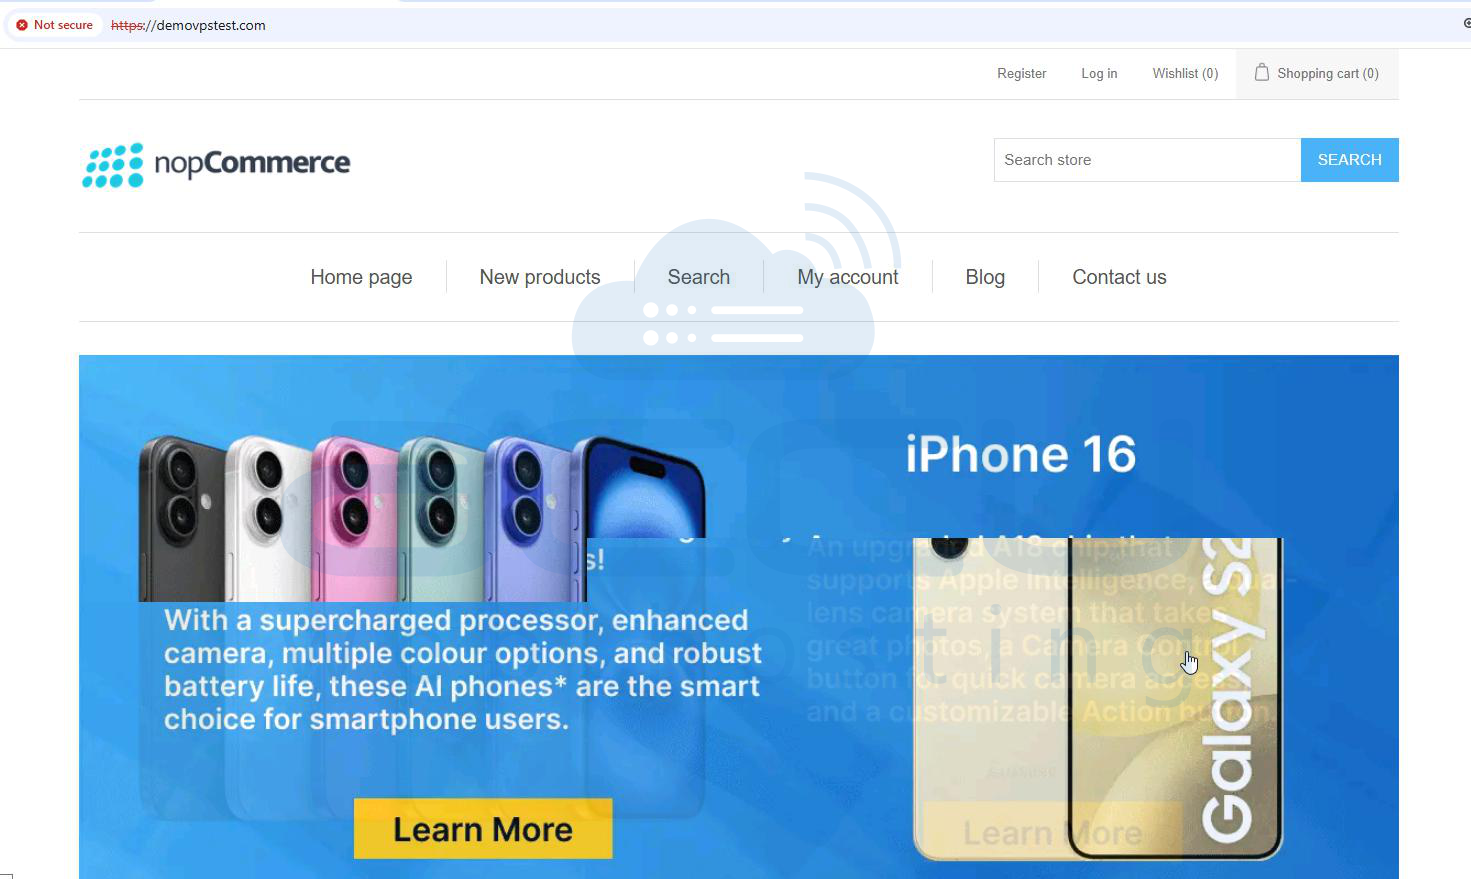
Your nopCommerce store is now ready to use!
Enable the Multi-Store Feature in nopCommerce
Once nopCommerce is installed, you can enable the multi-store feature to manage multiple stores.
Step 1: Log In to the Admin Panel
- Go to http://yourdomain.com/admin.
- Log in using the admin username and password you set during installation.
Step 2: Enable Multi-Store
- In the admin panel, navigate to Configuration > Settings > General Settings.
- Under the Store settings tab, find the Multi-store option and set it to Enabled.

Step 3: Add a New Store
- Go to Configuration -> Stores.
- Click Add New Store and fill in the details:
Store Name: Enter the name of the store.
Store URL: Enter the store's URL.
SSL Enabled: Check this box if the store has an SSL certificate.
Host Values: Specify URLs to distribute requests and identify the store.
Default Language: Choose the store's language.
Display Order: Set the order for the store to appear.
Company Details: Enter the company name, address, phone number, and VAT.
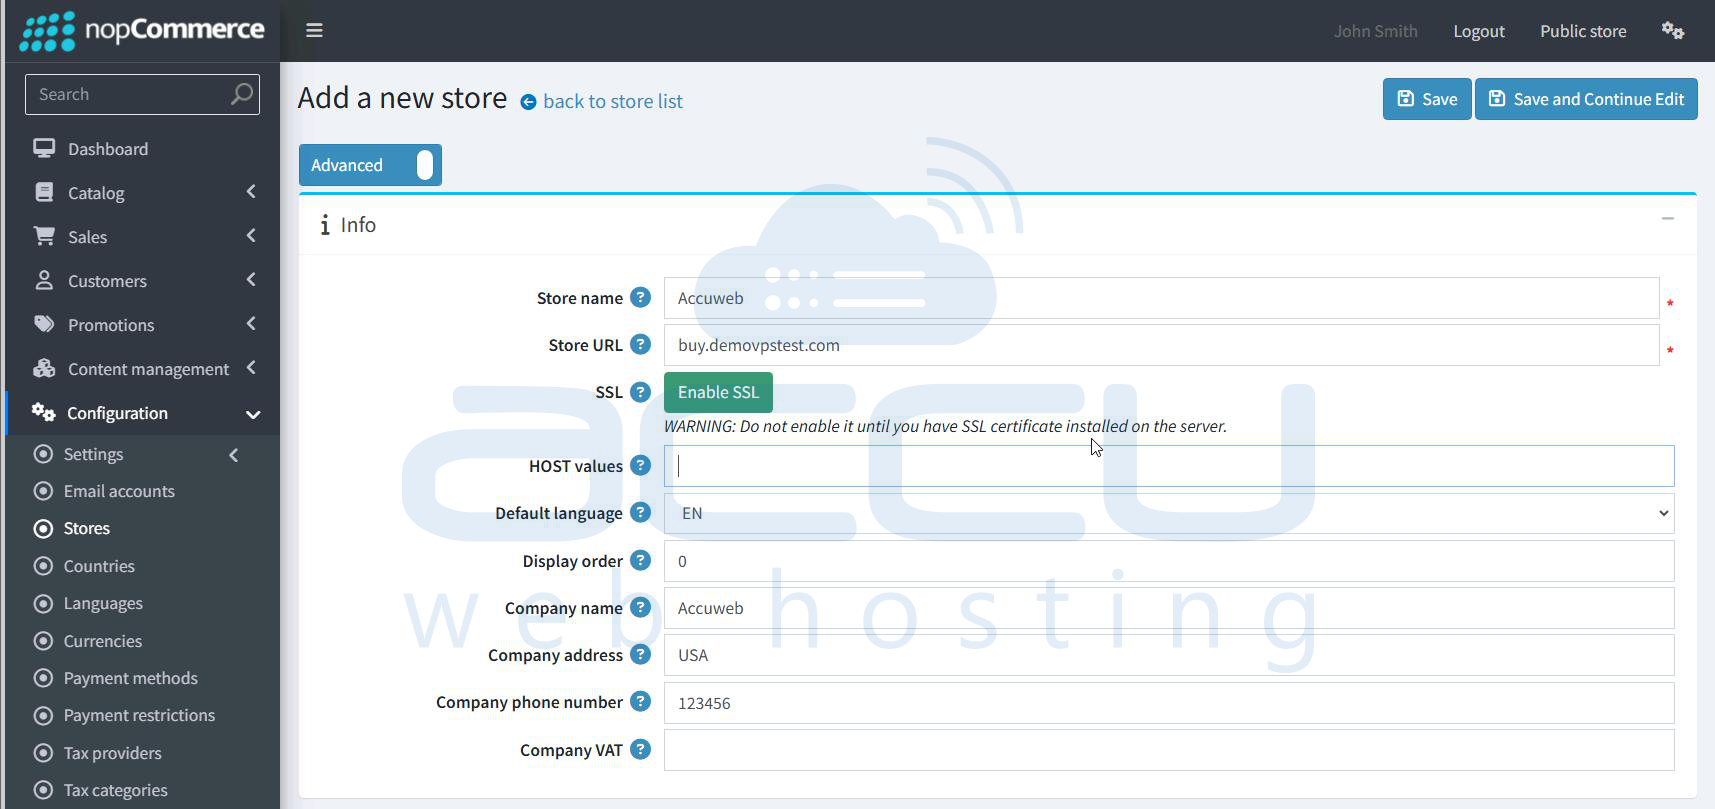
Step 4: Save and Add More Stores
- Click Save Changes to create the store.
- Repeat the process to add additional stores.
You’ve now enabled and configured the multi-store feature in nopCommerce!
Setting Up Multiple Stores Using Hosting Control Panel
Here’s how to set up two sample stores:
Store 1: www.accunopcommercestore1.com
Store 2: www.accunopcommercestore2.com
Step 1: Install nopCommerce on the Main Domain
- Upload and install the nopCommerce files on www.accunopcommercestore1.com.
- All nopCommerce files, including DLLs, will reside here.
Step 2: Forward Requests for the Second Domain
- In the control panel for www.accunopcommercestore2.com (your hosting control panel):
- Set up CNAME records in the DNS settings to forward all requests to www.accunopcommercestore1.com (this is a forward, not a redirect).
Step 3: Configure Domain Alias
- In the control panel for www.accunopcommercestore1.com, set up a domain alias for www.accunopcommercestore2.com.
- This ensures the server recognizes requests for www.accunopcommercestore2.com and serves content from www.accunopcommercestore1.com.
Step 4: Test and Proceed
- After completing these steps, opening www.accunopcommercestore2.com in a browser will display content from www.accunopcommercestore1.com.
- You can now proceed to configure the stores in the nopCommerce admin panel and upload content for each store.
By following these steps, you can successfully host and manage two stores on a single nopCommerce installation.
Testing and Managing Your Multi-Stores
1. Open the store URLs, like http://www.accunopcommercestore1.com and http://www.accunopcommercestore2.com.
2. Check that both stores load properly and show the correct content, language, and currency.
Common Errors and Solutions for nopCommerce Installation on Windows Plesk Server
1. 403 Forbidden Error
Issue: This error happens when the server blocks access to a page due to permissions or configuration issues.
Solution:
- Ensure the web server’s user (e.g., IIS_IUSRS or the App Pool identity) has read and write access to the httpdocs folder.
- Remove all files from the httpdocs directory, re-upload the nopCommerce ZIP file using FTP or Plesk File Manager, and extract it again. Ensure no errors during extraction, including hidden files like .htaccess.
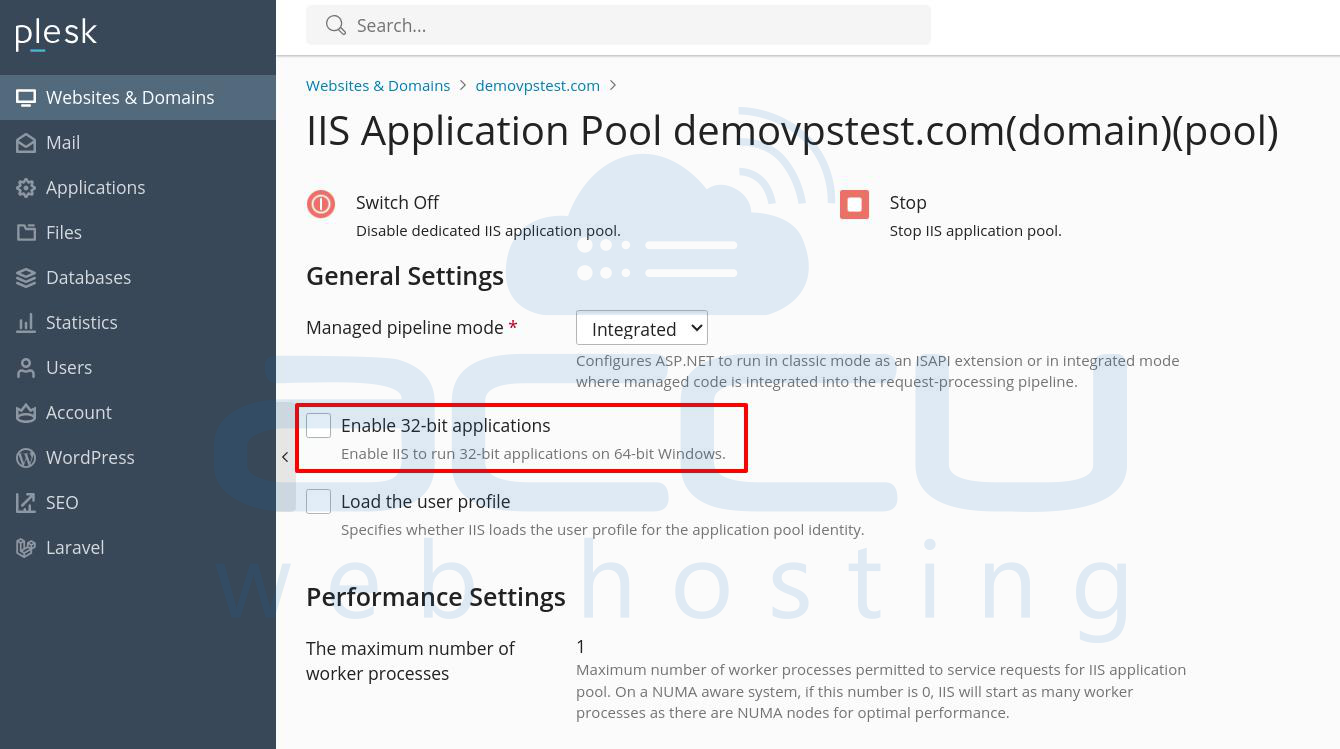
500.32 - Windows Authentication Error
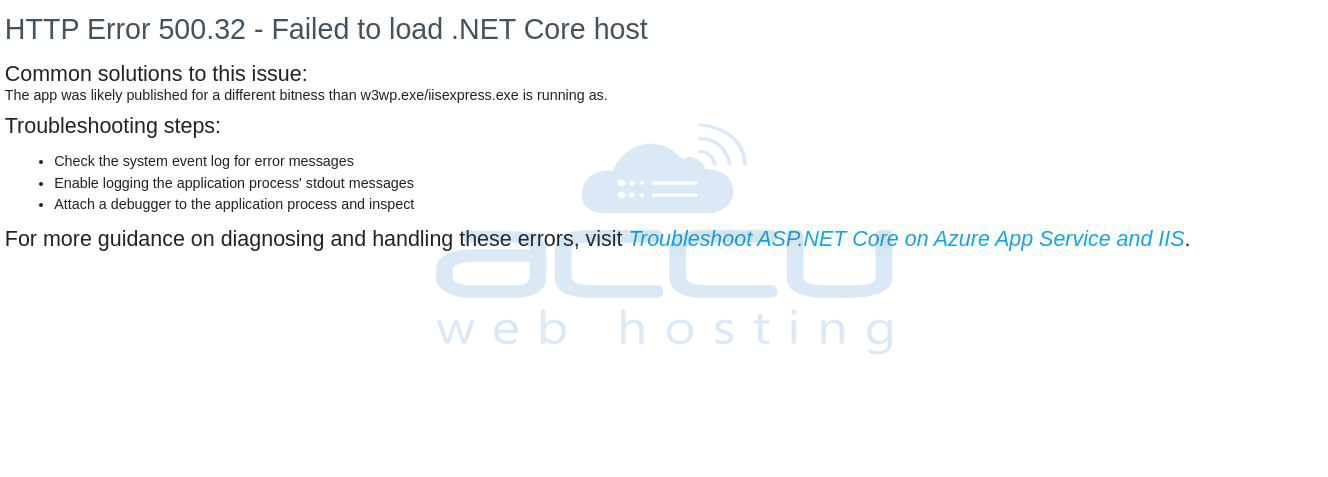
Issue: Occurs due to issues in application pool configuration or ASP.NET Core handling.
Solution:
Log in to Plesk, go to Websites & Domains -> Hosting Settings, and disable the 32-bit applications option under Application Pool settings.
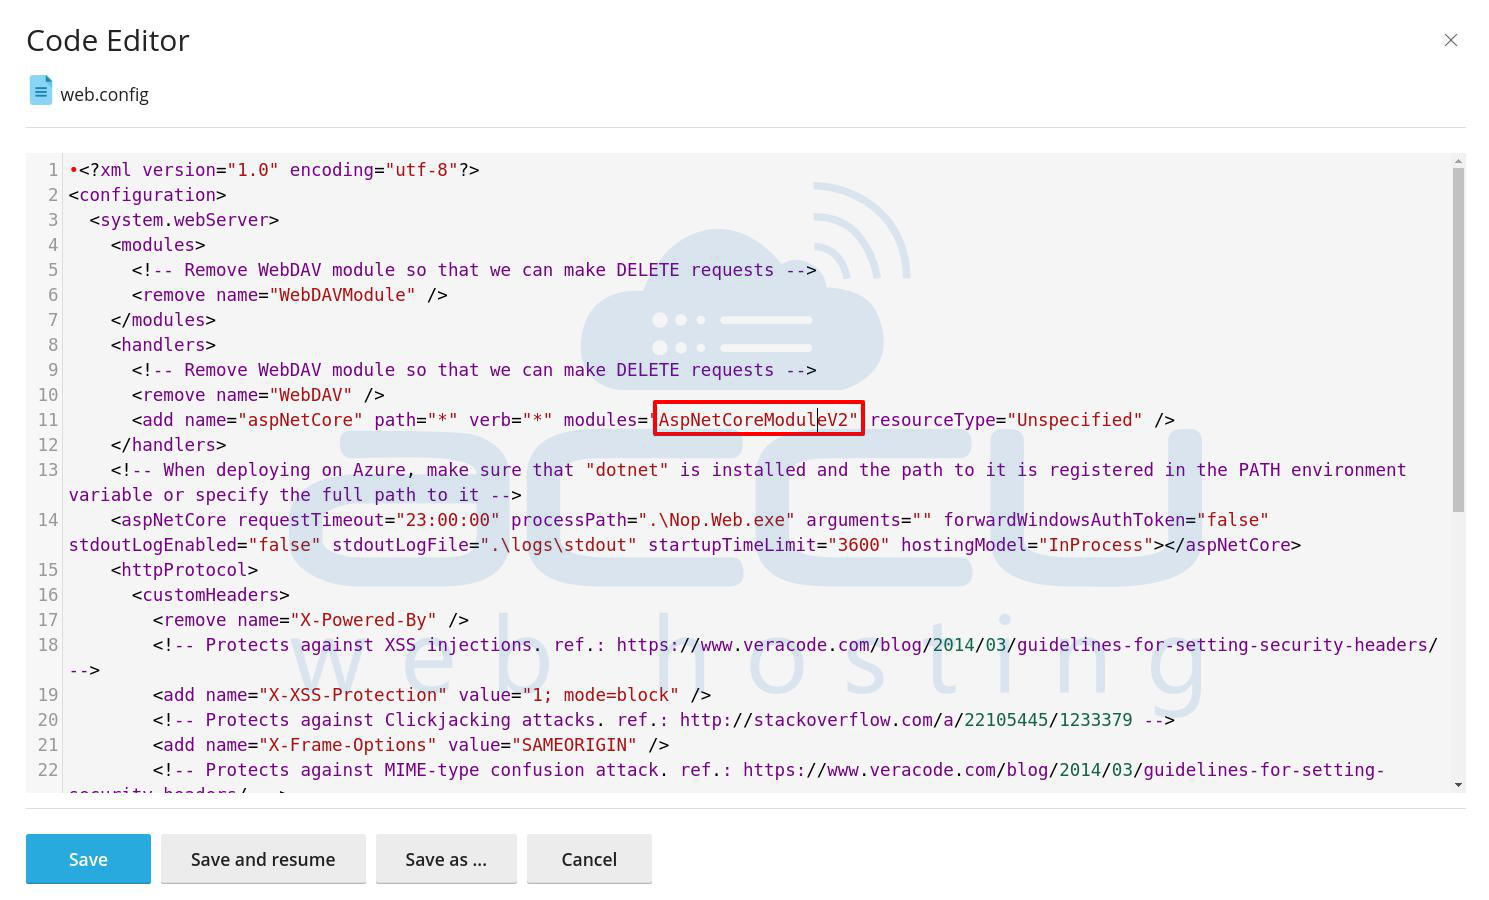
.NET Core Module Error
Issue: Happens if the server improperly handles ASP.NET Core apps via the web.config file.
Solution:
- Open the web.config file in the httpdocs folder and check for this section:
<aspNetCore processPath="dotnet" arguments=".\Nop.Web.dll" hostingModel="inprocess">
<environmentVariables>
<environmentVariable name="ASPNETCORE_ENVIRONMENT" value="Production" />
</environmentVariables>
</aspNetCore>
- If V2 appears anywhere (like in the module version), remove it.
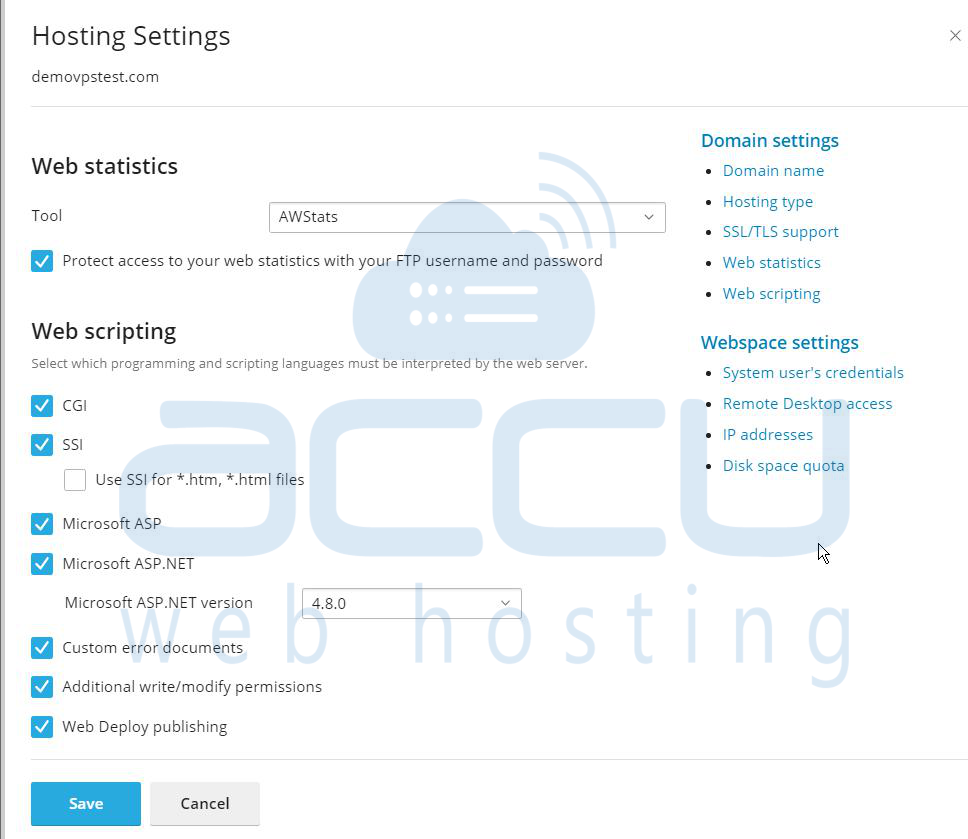
SSL/TLS Configuration Errors During Installation
Issue: SSL/TLS settings may cause problems during the setup process.
Solution:
- In Plesk, go to Websites & Domains -> Hosting Settings, and temporarily untick SSL/TLS Support.
- Disable SSL for specific file types (e.g., .html) to avoid HTTPS interference during installation.
- Ensure write permissions are enabled on the httpdocs folder.
- After installation, re-enable SSL/TLS and configure the certificate if needed.
Database Connection Errors
Issue: Happens if nopCommerce cannot connect to the database.
Solution:
- Verify the connection string in the appsettings.json file or during installation.
- Ensure the server name, database name, username, and password are correct.
- Test the connection using SQL Server Management Studio or MySQL Workbench.
Conclusion
Congratulations! You have successfully set up nopCommerce with the multi-store feature on your Windows Plesk server. This feature helps you manage multiple online stores efficiently from a single dashboard, making it easier to grow your business.


