WordPress 404 errors often happen when you delete pages from your website without setting up redirects to other pages. Sometimes, these errors occur if you change a page's URL.
If your website isn't maintained properly, you may see the WordPress 404 error or "WordPress site permalinks not working" message.
Sometimes, when your website is being updated or fixed, visitors might see a 404 error page. If you encounter a WordPress 404 error or "WordPress page not found" message, don't worry!
In this guide, we'll explore 7 easy solutions to fix the WordPress 404 page not found error.
What Causes Error 404 Not Found?
There are two types of 404 errors that you might encounter, and the reason for each type depends on what kind of error it is.
We'll provide solutions for both types of issues below.
If you're seeing a "404 Not Found" error on your entire website, regardless of which page you try to visit, the problem is likely with how your WordPress site's web addresses (permalinks) are set up or with the .htaccess file.
This means something is wrong with your site's server that makes it think the web addresses don't exist. It might sound serious, but it's usually easy to fix, so don't worry.
On the other hand, if you only see the "404 Not Found" error on specific web addresses (but the rest of your site works), there could be several reasons:
Broken links: Someone might be linking to a page on your site that no longer exists. This could be a link on another website or within your own site. Clicking the link leads to a non-existent page and triggers the 404 error.
Changed URLs: If you changed the web address (URL) of a piece of content, people might still be trying to visit the old URL, resulting in a 404 error (unless you set up a redirect).
Typos: Someone might have accidentally typed the wrong URL.
It's impossible to prevent typos, but you can fix broken links and changed URLs. You can also create a custom 404 page to give users a friendlier message when encountering errors.
How to Fix Error 404 Not Found?
Here, we will explain how to solve the 404 Error based on whether it occurs for a specific piece of content or across the entire website.
1. Clear Your Cache
Start by refreshing the page and checking the URL again (typos are more common than you think).
If you still see a 404 error, try opening the link on another device. If the page appears on another device, the issue might be with your computer's stored data (cache).
Clearing Browser Cache in Google Chrome:
Step 1: Open Google Chrome and click the vertical ellipsis button at the top-right corner.
Step 2: Choose "Clear browsing data."
![]()
Step 3: In the pop-up window, select a time range from the drop-down menu. Choosing "All time" clears all browsing history, cookies, and cached files.
Step 4: Check or uncheck boxes based on what you want to clear. To clear only the cache, check "Cached images and files."
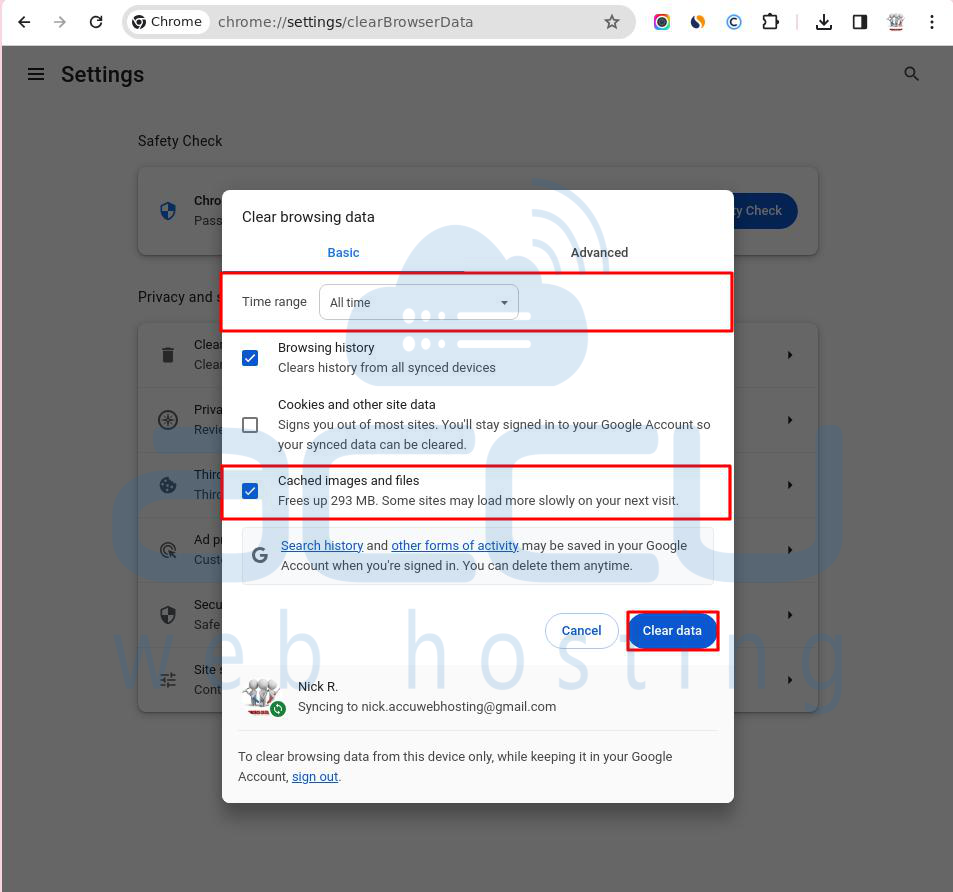
Step 5: Click "Clear data."
2. Reset Your WordPress Permalinks
Permalinks are permanent web addresses that lead to your posts, categories, archives, and similar pages. They provide a unique link to each specific post.
A "pretty permalink" is a more descriptive URL format than the default option. Instead of just showing the post's ID number, pretty permalinks can include the post's publication date (year, month, day), post title, and more.
The easiest way to reset permalinks is through the WordPress dashboard:
Step 1: Go to Settings -> Permalinks.
Step 2: Click Save Changes without making any modifications. This action refreshes your permalink settings.

If you need to reset permalinks automatically:
Step 1: Go to Settings -> Permalinks.
Step 2: Note down your current setting.
Step 3: Change it to Plain and click Save Changes.
Step 4: Change it back to your preferred permalink structure.
Step 5: Click Save Changes again.
Your permalink settings are now reset. Check your posts, pages, and images to ensure there are no more 404 errors or blank screens.
3. Restore or Update Your .htaccess File
You can work on the .htaccess file in two ways: download a copy, edit it in a text editor, and then upload it back to your site to replace the original. Alternatively, you can use SSH or an FTP client like FileZilla to edit the .htaccess file directly on your server and save your changes there.
Below are the steps to restore the .htaccess file using cPanel:
Step 1: Sign in to your cPanel account.
Step 2: Go to "Files" and select "File Manager."

Step 3: Look for the .htaccess file inside the "public_html" directory.

Step 4: Right-click on it and choose "Edit."
Paste the following lines into the .htaccess file:
# BEGIN WordPress
RewriteEngine On
RewriteBase /
RewriteRule ^index.php$ - [L]
RewriteCond %{REQUEST_FILENAME} !-f
RewriteCond %{REQUEST_FILENAME} !-d
RewriteRule . /index.php [L]
# END WordPress
This code is the default .htaccess settings for WordPress. After pasting this and saving your changes, your .htaccess file should be restored!
4. Set Up a 301 Redirect for Moved Content
If you're seeing 404 errors on a specific piece of content, it's likely because:
-> You changed the web address (URL) for that content.
-> You manually moved that content, such as by deleting the old post and creating a new one.
When users try to access the content at the old address, they end up on a 404 page instead of the expected resource. The best way to fix this is to automatically redirect anyone accessing the old address to the new one. This helps users find the right content without encountering 404 errors and is also good for SEO. If you move or rename a post without setting up a redirect, you lose all the SEO benefits from backlinks pointing to the old post.
WordPress tries to handle redirects automatically when content is moved or changed, but it doesn’t always work perfectly. It's safer not to rely solely on WordPress for this. However, there are simple ways to set up redirects in WordPress:
You can use the free "Redirection" plugin. It's an easy and free way to quickly set up the redirects you need.
Step 1: Sign in to your WordPress dashboard.
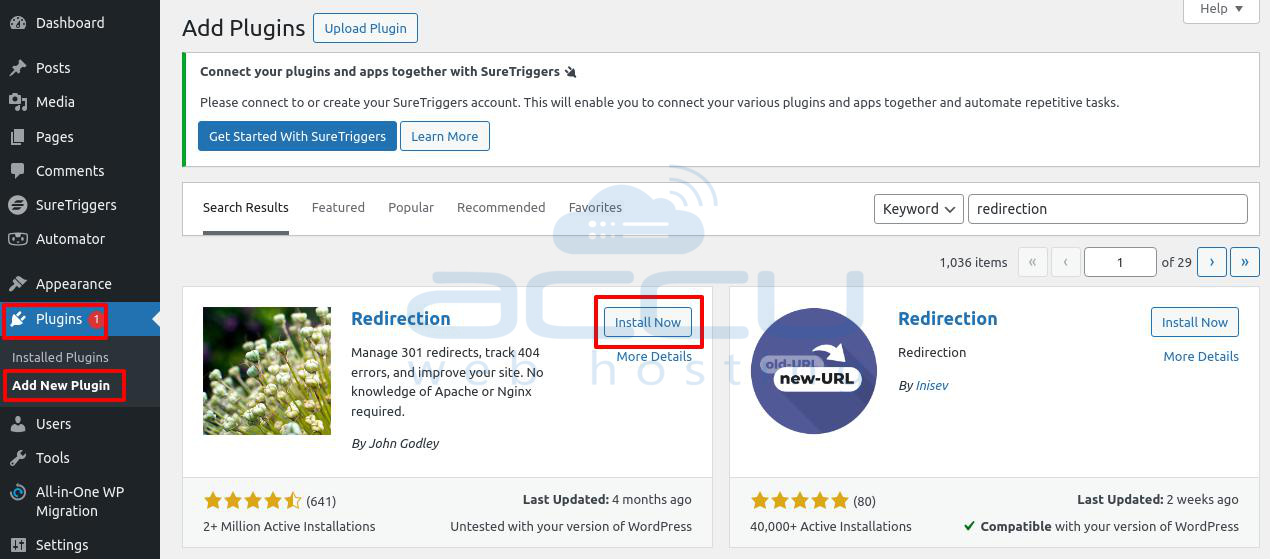
Step 2: Go to Plugins > Add New.
Step 3: Search for the Redirection plugin, then click Install and Activate.
Once it's installed:
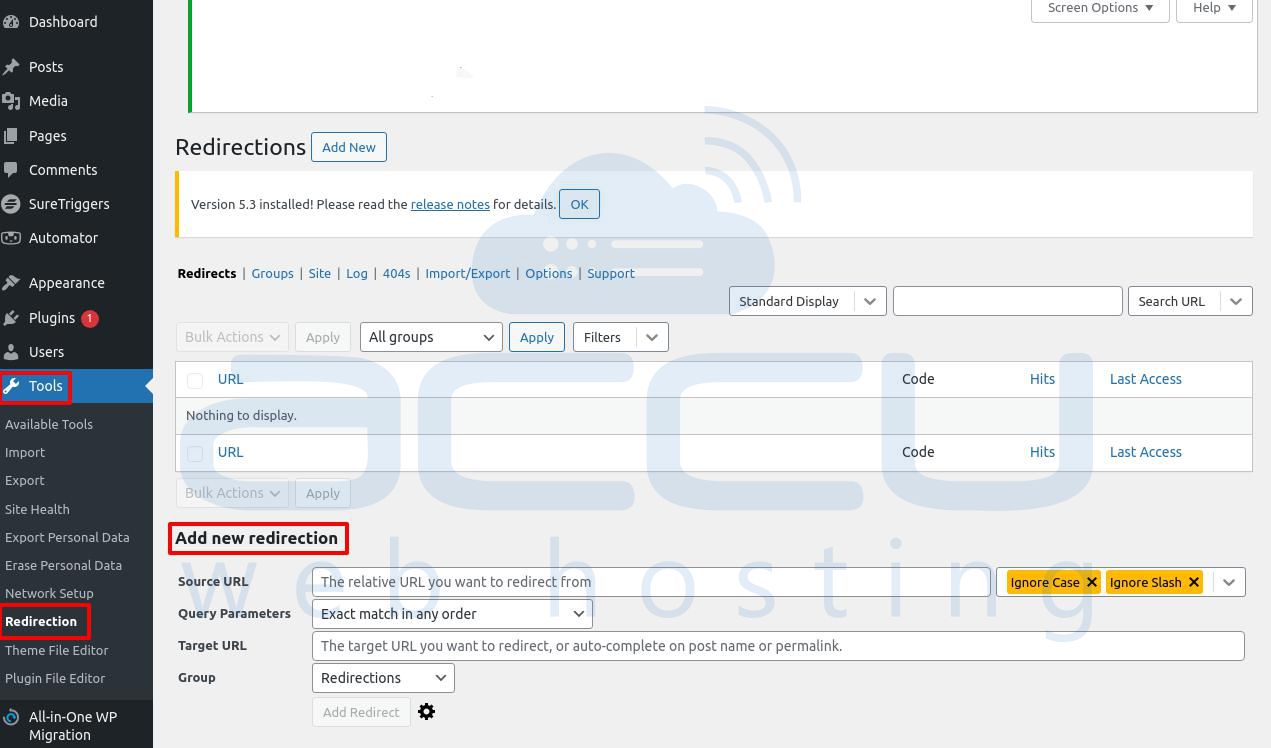
Step 5: Scroll to Tools > Redirection.
Step 6: Follow the setup instructions and create new redirects.
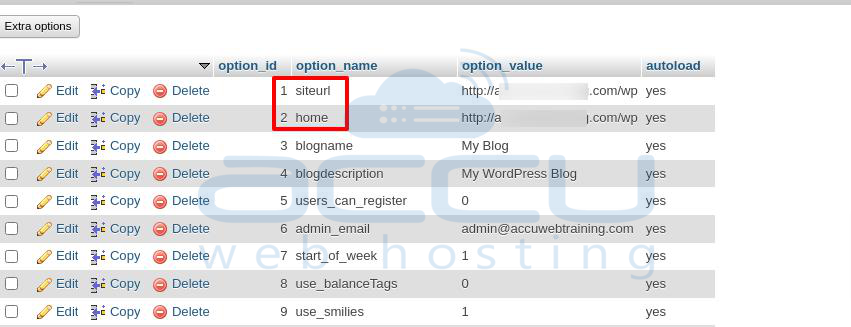
5. Update your WordPress URL in the database
Step 1: Log in to your cPanel.
Step 2: Find Database -> PHPMyAdmin.
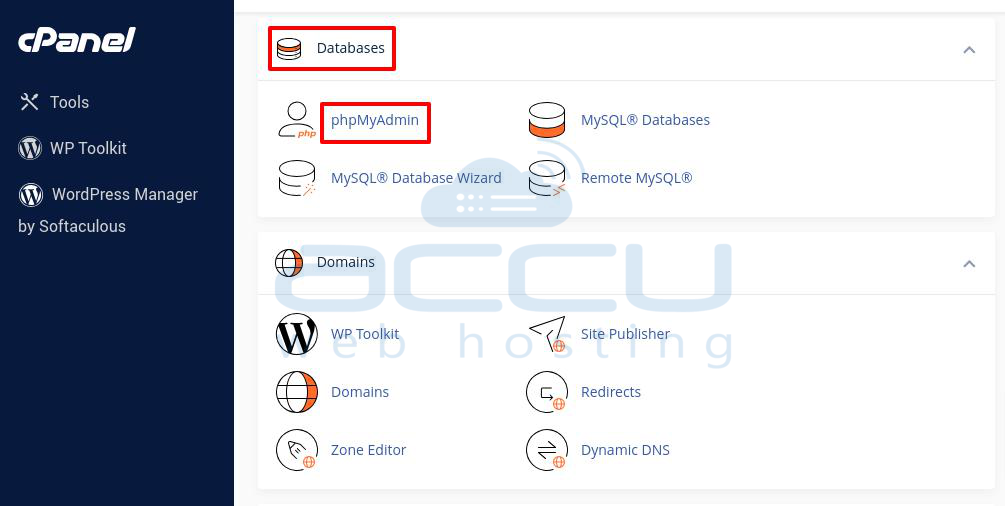
Step 3: Choose your database and locate wp_options.
Step 4: Update the URL (e.g., change www.test.com to http://localhost/blog).
6. Turn Off Your WordPress Plugins and Theme
Sometimes, you might need to disable plugins and themes in WordPress to fix problems or do maintenance on your site. Here's how to do it using the WordPress Dashboard:
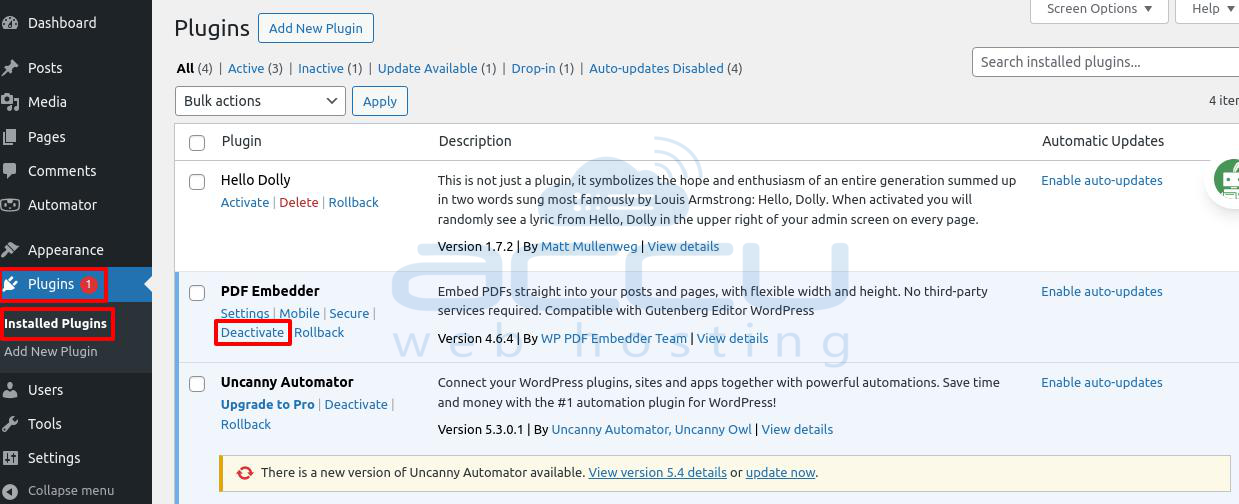
Plugins:
Step 1: Log in to your WordPress dashboard.
Step 2: Go to "Plugins" and select "Installed Plugins."
Step 3: Find the active plugin at the top of the list and click "Deactivate."
After deactivating a plugin, refresh your site to see if the 404 error is gone.
Step 4: If the error is still there, reactivate the plugin you just deactivated and move on to the next one on the list.
Step 5: If a specific plugin fixes the issue, check for updates available. If updating doesn't help, consider finding another plugin that does a similar job.
Themes:
Step 1: Log in to your WordPress dashboard.
Step 2: Go to "Appearance" and click "Themes."
Step 3: Activate a different theme by hovering over it and clicking "Activate."
After changing the theme, refresh your site and check if the problem page is accessible.

Note: Changing your theme can have a big effect on your site. If you've made any changes to your theme, they might be lost when you switch. Always back up your site before making changes to themes or plugins.
7. Fixing Custom Post Types
Fixing 404 errors on custom post types is a bit different. You need to ensure each type has a unique title and slug.
If two or more posts share the same title or slug, you'll need to change them. Only one post can have a specific title and slug, so update the others to something different.
It's not enough to change just the title or slug alone—they both need to be updated.
Resetting Permalinks to the Default
Reset your permalink settings to fix 404 errors on custom post types. You can do this automatically or manually using the steps mentioned earlier.
Once done, check if the error is gone and visit the URLs of your custom post types to confirm the issue is resolved.
Conclusion:
In summary, fixing the 404 error for WordPress posts and pages requires a methodical process for finding and solving the issues.
By checking your web addresses (permalinks), troubleshooting plugins and themes, repairing broken links, and setting up redirects, you can improve your website's usability and smooth navigation.
Consistently monitoring and improving your site's structure will help reduce 404 errors, making your WordPress website more dependable and user-friendly.
