WordPress SEO enhances a website's search engine rankings and boosts organic traffic.
WordPress, the best content management system, is inherently designed with SEO best practices. Yet, you can take additional steps to maximize search engine rankings and enhance website performance.

How to Improve SEO On WordPress
1. Check WordPress Site Visibility Settings
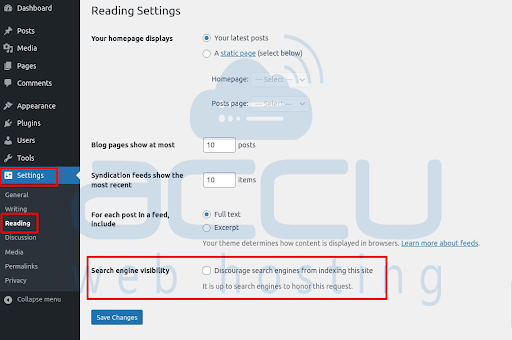
WordPress includes an option to block search engines from indexing your site. Usually, this setting should be turned off by default, but it's good to verify its status.
Step 1. Log into your WordPress Dashboard.
Step 2. Scroll down to Settings and choose Reading.
Step 3. Find the checkbox for Search engine visibility and make sure it's not checked.
2. Add your website sitemap to search engine
While search engines naturally index websites, submitting a sitemap can assist in providing accurate and up-to-date information in search engine results pages (SERPs).
WordPress offers two types of sitemaps: XML and HTML. For search engine submission, focus on the XML sitemap. It conveys page importance and relationships and helps crawlers locate content efficiently.
Step 1. Log into your WordPress Dashboard.
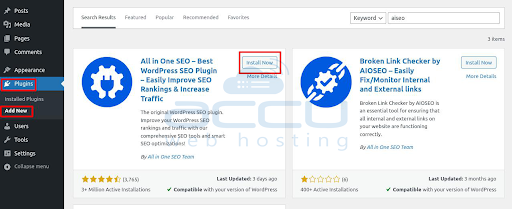
Step 2. Navigate to Plugins> Add New.
Step 3. Search for All in One SEO (AISEO).
Step 4. Click on Install Now and Activate it.
Step 5. In the sidebar, click on All In One SEO > Sitemaps > Open Sitemap button.
The browser will display the XML sitemap in a new tab. You can use the URL to submit the sitemap to search engines. After obtaining the XML sitemap, submit it to the Google Search Console.
3. Install SSL Certificate
Secure Sockets Layer (SSL) is a security technology that establishes an encrypted connection between a website and a browser. This encryption safeguards sensitive information on the website, preventing unauthorized access by third parties.
Having an SSL-certified domain will enhance the security of your WordPress website and contribute to its better ranking on search engines.
URL Encryption: SSL certification transforms your website's URL from "http://" to "https://." The 's' stands for secure, signifying an encrypted connection. This added layer of security safeguards the data exchanged between the browser and server. The browser displays a padlock icon next to the URL for SSL-certified websites. This visual cue reassures visitors that their interactions with your site are protected.
SEO Advantage: Search engines, such as Google, consider HTTPS as a factor in page experience evaluation. Websites with SSL certificates may receive a slight boost in search engine rankings. An SSL certificate, thus, plays a role in improving your site's visibility and attracting more organic traffic.
4. Decide between www and non-www
To optimize your WordPress website for SEO, you must choose to use "www" in your site's URL or opt for a non-www format. Google treats these as distinct URLs, and your choice can impact your search engine rankings.
- Log into your WordPress Dashboard.
- Navigate to Settings and choose General.
- On that page, enter the WordPress Address (URL) and Site Address (URL) fields.
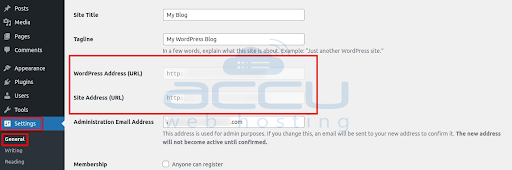
- Click on Save Changes.
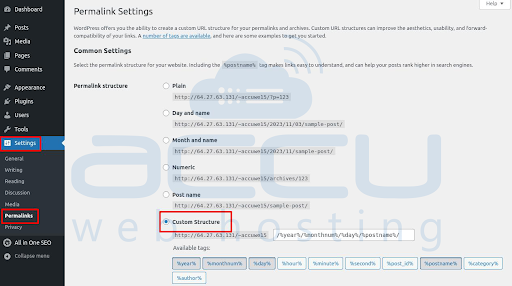
5. Set up the permalink structure
Every web page has a unique permanent URL structure known as a permalink. A clean permalink structure enhances the user and search engine experience on your WordPress site, contributing to better search engine optimization.
Furthermore, search engines frequently showcase URLs in search results. Clear and legible permalinks are more trusted by visitors than those composed of random combinations of letters and numbers.

By default, WordPress assigns an ID number as the permalink for a page, resulting in URLs like https://test.com/?p=123. Fortunately, you can change the permalink structure to predefined formats or create a custom one for your WordPress website. This flexibility is beneficial for optimizing your site's SEO.
- Log into your WordPress dashboard.
- Navigate to Settings and choose Permalinks.
- Choose the Custom Structure option and include the necessary tags.
6. Use Structured Data
Structured data employs schema markups to convert content into a standardized format, facilitating search engines' comprehension of page content. This coding can alter how content snippets appear on SERPs, leading to rich results displayed prominently by search engines. The presence of rich results can significantly boost your click-through rates and enhance the visibility of your content.
Adding WordPress schema markups can be accomplished through two methods: using a WordPress SEO plugin or manually implementing them with JSON-LD. The manual method requires coding expertise to avoid potential issues with your WordPress website.
For a more straightforward and accessible approach, we will illustrate how to add schema markups using a WordPress SEO plugin, specifically AIOSEO.
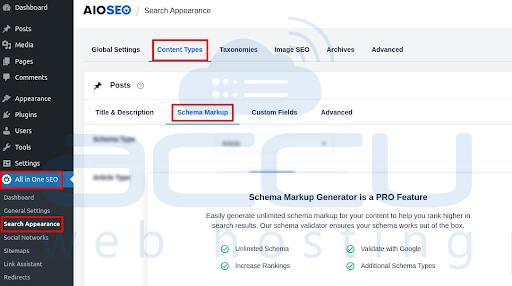
Adding Site-Wide Schema Markup
- Navigate to All in One SEO, choose Search Appearance from your WordPress dashboard, and open the Content Types tab.
- In the Schema Markup section, you'll discover options for both posts and pages. Navigate to the Schema Type field, which features a drop-down menu.
- Here, you can choose the default content type for your WordPress website. For instance, you can opt for "Article" as the Schema Type and select an appropriate Article Type from the available options.
Adding Schema Markup for Individual Pages and Posts
- To edit a specific page or post, begin by opening it.
- Then, scroll down to access the AIOSEO Settings and choose the Schema tab.
- In the Schema Type field, use the drop-down menu to select the appropriate schema type.
- Remember to provide the necessary information in the Description text field.
7. Create WordPress tags and category
Categories and tags are fundamental taxonomies in WordPress, serving to enhance user navigation on WordPress websites.
Categories are organized hierarchically, allowing posts to be grouped into parent categories and subcategories. In contrast, WordPress tags are like keywords that provide insights into the post's content.
For websites that regularly feature diverse content types, leveraging WordPress categories is highly beneficial.
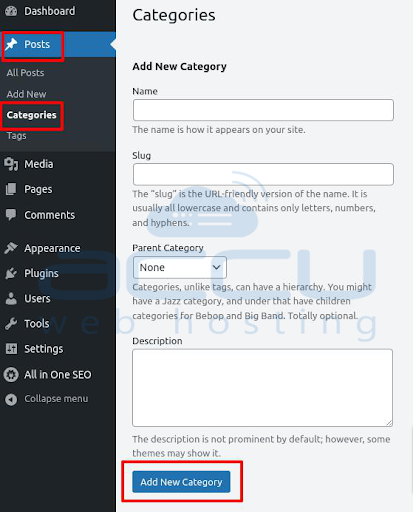
To create and edit categories
- Log into your WordPress Dashboard.
- Scroll down to the Post and choose Categories.
- On the right side of the screen, you'll find a list of all your current categories.
- To create a new category, fill in the Name, Slug, and Description fields. If it's a subcategory, choose a parent category to maintain a well-organized site structure. Finalize your changes by clicking on Add New Category.
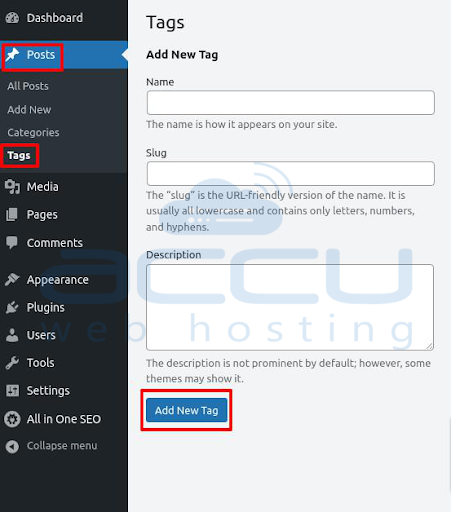
Same for Tags
Scroll down to Post > Tags, then click Add New Tag.
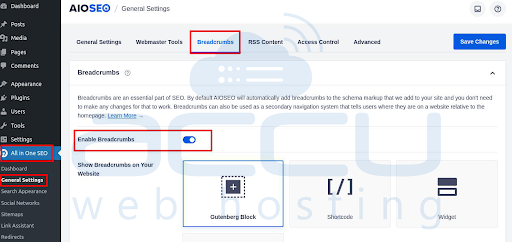
8. Enable Breadcrumbs
Breadcrumbs are links that display your visitors' location on a WordPress site. Activating breadcrumbs enhances the user experience and makes navigation easier. This feature is precious for websites with extensive content, numerous pages, and blog posts.
Breadcrumb trailing serves as a valuable internal linking strategy. It helps search engines comprehend the connections between pages and encourages visitors to explore more of a website, reducing bounce rates.
Additionally, Google includes breadcrumbs in search engine results pages (SERPs) instead of displaying the page's URL. This gives users insight into the page's category or location on the website, enabling them to assess if the page aligns with their search intent. Use the AISEO plugin to allow breadcrumbs to be on your WordPress website.
- Log into your WordPress Dashboard.
- Navigate to the Plugins > Add New and then search for AISEO.
- After installation, activate it.
- Navigate to All in One SEO > General Settings & open the Breadcrumbs tab. Toggle the "Enable Breadcrumbs" switch to the "on" position and choose your preferred method for integrating breadcrumbs into the website.
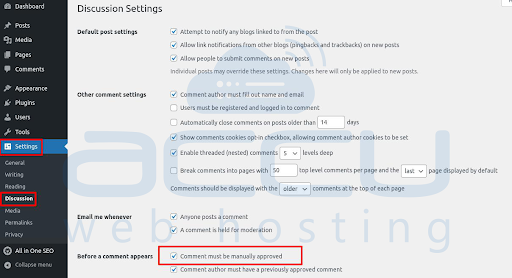
9. Enable Manual Approval for Comments
To protect your WordPress website from spam comments, enabling manual comment approval is crucial. This ensures that each comment is reviewed before it appears on your site, preventing unwanted and potentially harmful messages. You can configure this setting in your WordPress Discussion Settings.
- Log into your WordPress Dashboard.
- Navigate to Settings and click on Discussion.
- Check the Comment must be manually approved and scroll down to Save Changes.
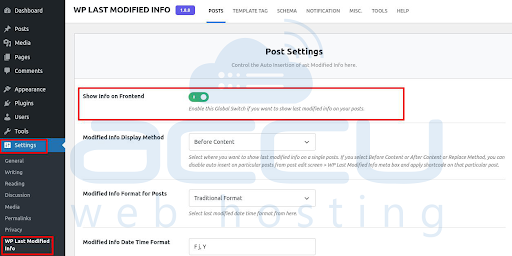
10. Enable “Last Updated” Date
Adding the last updated date to WordPress posts can increase click-through rates. While the original publishing date doesn't impact search engine rankings, it is displayed in Google search results.
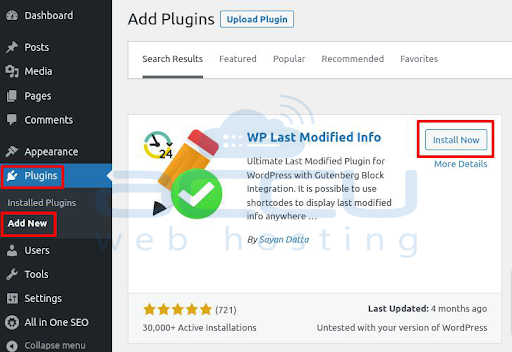
The last updated date is a crucial factor for users when deciding which page to click on because they often prefer content with the most recent information. Install the WP Last Modified Info plugin.
- Log into your WordPress dashboard.
- Go to Plugins > Add New and search for the WP Last Modified Info plugin.
- After installation, activate it.
- Afterward, go to Settings > WP Last Modified Info > Post Option.
- Switch on the last updated date feature by toggling the button next to Enable for Posts/Pages on Frontend.