WordPress uses wp-cron.php to schedule tasks for WordPress websites, such as scheduling a post to publish, checking for new WordPress versions, plugin updates, theme updates, email sending notifications, etc. However, there is a limitation.
By default, wp-cron requires a back-end or front-end visit to function. Otherwise, wp-cron can't run the scheduled tasks. Therefore, a WordPress website with high traffic doesn't face any issues, but a website with low traffic can cause missing scheduled tasks.
Another issue that can occur with WP-Cron is performance. WP-cron works by checking with every page load. When a WordPress page loads, it will check for the list of scheduled tasks to see what needs to run.
Website pages will check for the scheduled task each time it is visited. On a high-traffic website, this can lead to high resource usage and slower website speed.
How to disable the default wp-cron.php behavior?
Implementing the following steps will disable WP-Cron from running on cPanel:
Step 1: Log in to your cPanel account.
Step 2: Go to your WordPress website path. Open your wp-config.php file.
Step 3: Inside wp-config.php, add the below line after the database settings:
define('DISABLE_WP_CRON', true);
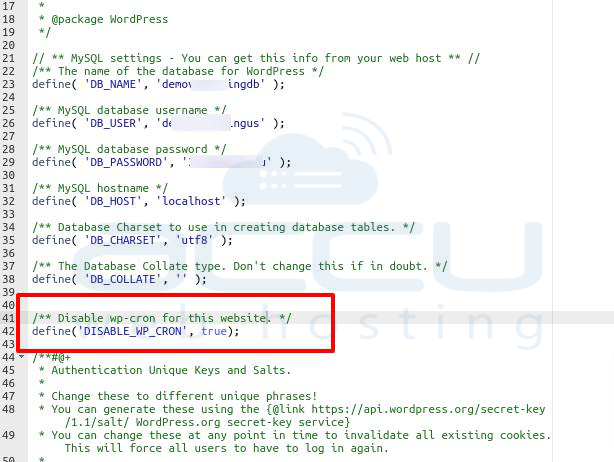
Step 4: Finally, click on the Save Changes button.
WordPress will not run the wp-cron.php script each time the website has a new visitor after making these changes.
How to set up a manual cron job for wp-cron.php?
We shouldn't stop all the automatic tasks on the WordPress website entirely, as some of the tasks are crucial. However, it shouldn't run with every single visitor.
We can set up control on how these tasks can run by setting the wp-cron.php to run every 12 hours, twice in 24 hours. It is better than the default behavior of wp-cron.php.
You can set up this time as per your website requirement via these steps:
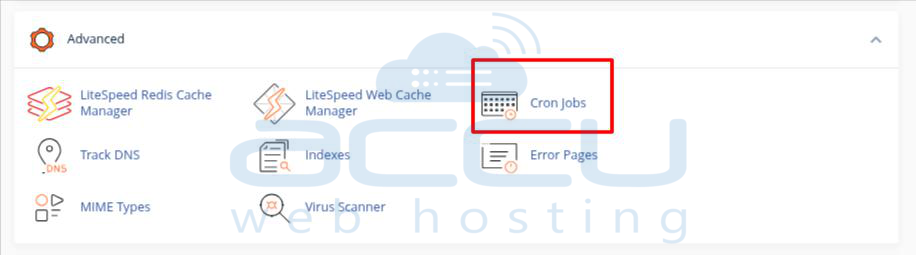
Step 1: Log in to your cPanel.
Step 2: In the advanced section, click on Cron Jobs.
Step 3: At the common settings drop-down, select Twice Per Day. Once you choose, it will automatically fill the hour section with Every Twelve Hours (0,12).
Step 4: Inside the command section, add the following command:
cd /home/cPanel_username/public_html; php -q wp-cron.php
Step 5: Replace the cPanel_user with your cPanel username.
Step 6: Here, we have used the path of the primary domain. You can change the path accordingly if you want to do this for the addon or sub-domain within the cPanel.
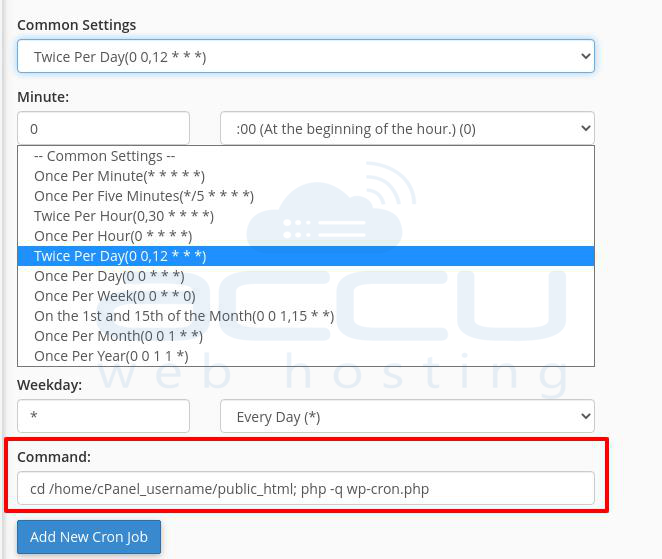
Step 7: Finally, click on the " Add New Cron job" button.
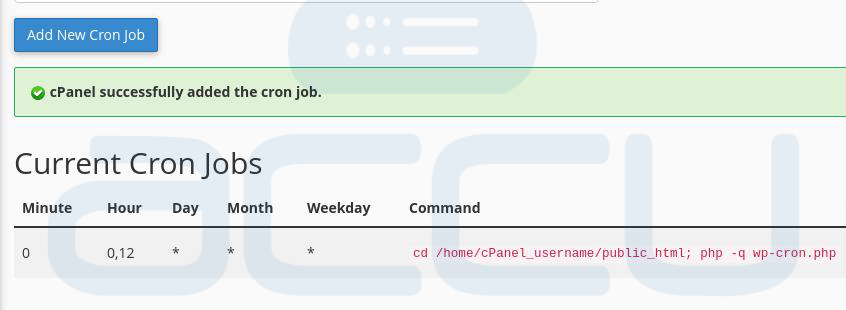
After setting up the manual cron job for wp-cron.php, your WordPress website should run the scheduled task at the set intervals.
