When you choose to setup Windows VPS with WebsitePanel, it will require one time setup and configuration. You can manage domains, websites, emails, MySQL/MSSQL databases from WebsitePanel like webhost. This article will give you the step by step guidance on how to manage Windows VPS with WebsitePanel. Let's go through these tutorials. You can also jump over to specific sections through the following links:
- How to create Hosting plan in WebsitePanel
- How to create Customer in WebsitePanel
- How to create Hosting Spaces in WebsitePanel
- How to create Domain and website in WebsitePanel
- How to create FTP account in WebsitePanel
- How to create Email account in WebsitePanel
- How to create MSSQL database
- How to create MySQL database
Log into your WebsitePanel, URL will be like http://IP-Address-of-VPS:9001. After logged into WebsitePanel, first thing you should do is create a Hosting plan. After creating Hosting plan, you can allocate it to customers.

To create Hosting plan, click on Hosting Plans option from the left pane and click on Create Hosting Plan button.

Enter your desired plan name and mark the checkboxes according to resources you want to assign with the plan. You can also set/modify the quotas for resources as per requirement.

Once the Hosting plan is created, you need to create Customers and assign this hosting plan to them.

To create a Customer, from the left hand side pane, click on Customers and click on Create Customer button.

Enter the necessary details as shown below and click on Create button.

You can see that a Customer has been created.


Enter the necessary details as shown below and click on Create button.

You can see that a Customer has been created.

Now, you need to create the Hosting Space under the created Customer. For that, click on Create Hosting Space button.

Select the plan you want to assign to Customer from Hosting Plan drop down menu, set the Hosting Space status to Active status and click on Create Space button.

Once Hosting Space is created, you can add domains, websites, FTP/email accounts, MSSQL/MySQL databases and their users. We will go through these steps one by one.

To create a domain, select the Domains option from the left pane and click on Add Domain button.

Now, click on Domain (top level domain), SubDomain (Subdomain of main domain) and Domain Alias (domain pointer to existing website) as per your requirement.

Enter the domain name and select the checkboxes as per your requirement. Here, we have selected Create Web Site option, so it will automatically create the website with the domain name entered, after that click on Add Domain button.

Now, you can see that domain has been created.

Website associated with the domain is also created. By default, website is created on shared application pool. However, you can also configure WebsitePanel to assign dedicated application pool when new website is being created. Please refer to our detailed article on IIS application pool here.

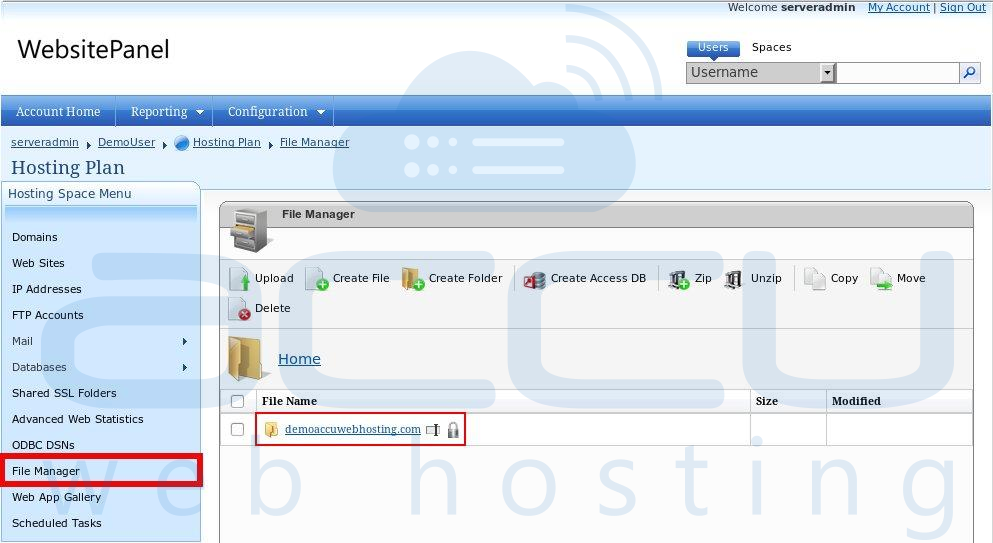
In left hand side pane, you can see an option of File Manager. From File Manager, you can upload/download files and modify/move/delete/rename the webpages and folders.

Domain and Website are created, now you will need FTP account to upload your web contents. To create an FTP Account, select FTP Accounts option from the left pane and click on Create FTP Account button.

Enter the Username and Password and select path where you want FTP user to land. Assign read & write permissions to FTP user and click on Save to create the FTP account.

Store FTP credentials for future use to connect to FTP server of your VPS. You will need any FTP client application like FileZilla to upload/download web contents in your VPS. Please refer this knowledgebase URL for more details on FTP clients: Complete FTP Clients.

Now, let's create an Email Account for your domain. To create an Email account, select Mail > Accounts and click on Create Mail Account button.

Enter the email account name in Email Address text field and select the domain name from the dropdown for which you want to create an email account. Enter the password and mailbox size (if needed), click on Save to create the email account. You can connect to webmail through URL: http://VPS-IP-address:9998.

Now, let's create the MSSQL database for your application. Select Databases > SQL Server 2008/SQL Server 2012 and click on Create Database button.

Enter the database name and click on Save to create the MSSQL database.

Once MSSQL database has been created, you need to create a database user. Click on Create User button.

Enter the Username, Password, select the associated database from the dropdown and click on Save to create the user. If you want to use same user for other databases, you can mark the checkbox for those databases.

You can see that the MSSQL database and its database user have been created.

Now, let's create the MySQL database and its user. Select Databases > MySQL Database and click on Create Database button.

Enter the database name and click on Save to create the MySQL database.

You can see that MySQL database has been created. Now, you need to create a database user, for that click on Create User button.

Enter the Username, Password, select the associated database from the dropdown and click on Save to create the user. If you want to use same user for other databases, you can mark the checkbox for those databases.

You can see that the MySQL database and its user have been created.

WebsitePanel Control panel is integrated with Microsoft Web Application Gallery allowing you to easily install popular web applications to your web site. Click on Microsoft Web App Gallery, select the desired application and follow the mentioned instructions to install it.

You can to refer our WebsitePanel tutorials for the individual options from the below URLs:
WebsitePanel User Control Panel
WebsitePanel Reseller Control Panel


